How To Airstream

Hints and tips for Airstreamers from the publisher of Airstream Life magazine

  • Shop at the Airstream Life Store
  • Subscribe to the Magazine
  • Submit a “How to” Question
You are here: Home / Archives for Safety and security

Aug 16 2020

Locked out of your Airstream

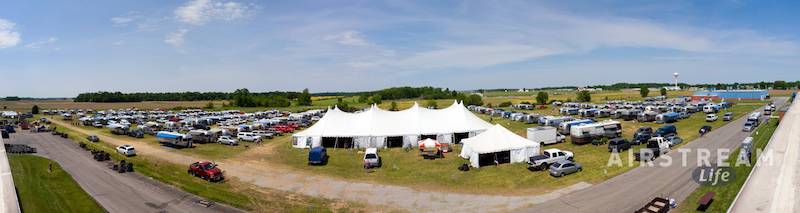
It seems to happen at every large Airstream rally:  someone, somehow, gets locked out of their trailer or motorhome.

I have seen it far too many times.  There’s panicked look of owners as they realize they can’t get back in. They think about their wallet, pets, cell phone, and everything else they need that’s inside.  Then the the slow circulation of bystanders begins, anxious to help but not capable of doing much.

Then someone suggests climbing in through a cargo hatch.  This can work (and I’ve done it) but it only works on a few floorplans that have an exterior cargo compartment that goes under the bed—and you’ve got a very thin person on hand—and the bed is on hinges—and the hinges are not locked down.

Finally the inevitable call to a locksmith goes out.  An hour or two later, and a $100 bill, and they’re back inside.

Why is this such a common problem?  Several reasons:

  1. Some Airstream door locks have an “interesting” ability to occasionally self-lock when slammed
  2. It’s easy to drop your Airstream keys when you’re out and about
  3. People don’t think to stash a spare key
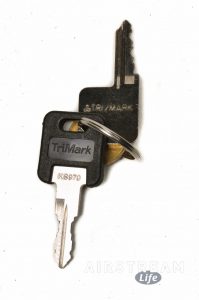
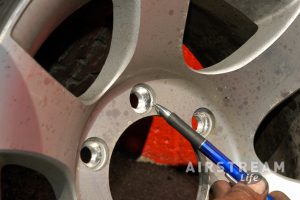
  4. Local locksmiths don’t usually have the correct blank in stock for Airstream door keys

Fortunately it’s very easy to prevent the shock of being locked out.  We sell blank keys for most Airstream trailer locks (door handle and deadbolt), plus Basecamp, Nest, and most motorhomes including Interstate and Atlas.  As I mentioned, you can’t find these at most locksmiths, so you need to order the blanks in order to get duplicates made.

Sometimes locksmiths say the key blanks won’t work because they have slightly different head shapes or grooves cut into them. We promise they will! For more explanation, watch this video:

After you’ve had the duplicates made (I suggest two spare sets), put one set in a hidden place. There are lots of interesting hiding places on the outside of an Airstream if you think about it for a while.  I won’t mention them all here (why help potential thieves?) but if you walk around the outside and look closely at the trailer A-frame, various unlocked access hatches, underside, wheel wells, and compartments I bet you’ll come up with a few ideas of your own.  A magnetic Hide-A-Key is helpful for fastening your keys to steel parts.

Another place to keep spares is in your tow vehicle, but that assumes you’ll have access to the vehicle even if you’ve left your Airstream keys inside.  Or, hide a spare key for the tow vehicle on the outside of the Airstream, and hide an Airstream key inside the truck.

But whatever you do, get a couple of spare sets of keys for your Airstream now!  Someday you’ll be glad you did.

Written by RichLuhr · Categorized: Cleaning and exterior, Safety and security · Tagged: blank, hideakey, key, keys, lock, trimark

Aug 01 2020

Here’s why you really do need a torque wrench

Every Airstreamer should know how to change a tire, but many don’t.  That’s why we do tire changing demonstrations at Alumapalooza every year.

Lots of people want to learn the technique, but there is usually one point at which they start to resist the idea: they don’t want to buy a torque wrench.

I can understand why.  A good quality torque wrench is a moderately expensive tool, and if you don’t need to work on cars regularly it will probably sit in your Tire Changing Kit most of the time.

Also, people often wonder why they need a torque wrench for their Airstream trailer wheels, when they don’t apparently need one for their car.

The reason is that the aluminum alloy wheels found on all late model Airstreams are prone to allowing lug nuts to loosen in the first 50 to 100 miles of towing.  To prevent them from completely coming loose, you need to check them with a torque wrench a couple of times, any time that the wheel is removed.

Each lug nut must be tightened to a specific tightness.  For aluminum Airstream wheels this is 110 foot-pounds (ft-lbs) of torque.  (If you use metric specifications that’s 150 Newton-meters.)  Steel wheels, which are usually the spare tires only, need 150 foot-pounds. To verify the correct torque spec for your wheels, check the Specification page in your Owner’s Manual or ask Airstream about the wheels you have.

The wheel studs (the part the lug nuts thread on to) are designed to stretch a tiny amount to clamp the wheel on. This elasticity of the stud is what helps to secure the wheel on the hub. If the lug nuts are put on too tightly, the threads on the wheels studs can stretch beyond their elastic range. In the extreme, this can cause the studs to break and the wheel will come flying off.

Too loose, and the lug nuts will gradually work their way loose, which is just as bad. When a wheel comes off, the wheel is generally damaged beyond repair, and the Airstream tends to get collateral body damage that can run into the thousands of dollars.

That’s why you don’t want to guess at the proper tightness. Even if you work with cars every day, you can’t accurately estimate how tight those nuts should be.  The torque wrench is the way smart professionals verify the job is done right.

Here’s how a torque wrench works:

A few other tips: 

Before putting lug nuts on, check that the threads are clean (no dirt or grease).  Wipe any contaminants off with a paper towel or clean rag.

Don’t use any kind of lubricant (oil, grease, moly, anti-seize compound) on the studs.  Those things will make the torque reading inaccurate and you’ll end up over-tightening the nuts.

If you need a good torque wrench, we offer an excellent choice at a good price in the Airstream Life Store.

If you need a full set of tire changing tools, we have a complete kit with instructions and a carry bag.


Written by RichLuhr · Categorized: Safety and security, Tires and wheels, Tools

Jun 01 2020

Best and worst places to store your Airstream

Airstreams don’t like being lonely. They’re gregarious and fun-loving.

That’s why you need to store them in the right place between trips. Left alone, all kinds of bad things can happen. A small leak from rain or melting snow can seep in and do a lot of damage. Squirrels and mice can find their way in, and wreak havoc on the insulation (and anything else chewable by rodent teeth). Spiders can clog up the water heater burner. Thieves and vandals can break in.

So what’s the best choice for storing your Airstream?

#1: At home, in a carport or pole barn

No question, the best place to have your Airstream is where you can keep an eye on it and use it between trips. It’s not just a recreational vehicle, it’s potentially:

  • a guest apartment
  • a quarantine facility
  • a place to refrigerate your Thanksgiving leftovers
  • an office or creative space
  • an awesome place for a nap (or a little canoodling)
  • a bug-out vehicle in the event of a natural disaster

With the Airstream at home, you can keep it charged and ready for the next adventure at all times. You don’t even have to turn off the refrigerator if you have solar panels (or a plug) and propane in the tanks. And it’s a lot less likely to suffer damage when you keep using it between trips, compared to being out of sight and neglected at a storage facility.

If you store the Airstream inside a closed barn with a gravel floor, be sure that the floor has a vapor barrier (plastic sheeting under the gravel). Otherwise a lot of moisture from the ground will accumulate over the winter and rapidly accelerate corrosion. Any indoor environment needs to be dry and/or have great ventilation.

#2: At home, in the driveway

This is also a great choice, with only the disadvantage being that the Airstream is exposed to the elements. It’s a huge benefit to have a roof over the Airstream. That extends the life of your Airstream significantly—by keeping rain, snow, and UV light from the sun from gradually breaking down the sealants and plastics on the roof and appliances, and keeping the interior cooler in summer.

Driveway storage is great but eventually it would be best to put up some sort of shade structure or shed roof to keep the worst of the weather off the Airstream.

#3: At home, out in the field somewhere

I’m not a fan of keeping an Airstream in a grassy field, but if that’s what it takes to keep it close, it’s still better than a remote storage lot. The problem with storing the Airstream on grass is that it’s easy to let the weeds grow up, and that encourages critters, spiders, and snakes to check it out.

The belly pan on an Airstream is not fully sealed. It’s “mostly sealed” to protect the underbody and insulation from damage, but there are gaps big enough for a mouse to get in. Mice can get in the most incredibly tight spots, and the solution is not to seal up the belly pan so tight that you could camp on the Pacific Ocean—it needs to “breathe” so that moisture can get out.

A better preventative measure is to mow down those weeds, or better yet, put in a gravel pad. Maintain a “sterile” area around the Airstream for at least a couple of feet. There’s always going to be a risk of an unwanted visitor, but at least you won’t be rolling out a red carpet for all of Mother Earth’s creatures.

In any case, be sure to secure your Airstream trailer with a good coupler lock. It’s amazing how quickly thieves can remove cheap coupler locks and zip off with your Airstream.

#4: In a secure, covered, storage facility

Off-site storage is a reality for most of us. It’s rarely truly “secure” and often inconvenient, but I’d personally look for indications of good security anyway. I like storage lots with high walls so that the RVs aren’t on tempting display, video cameras that actually work, and a decent neighborhood around them.

I’d choose a more expensive storage lot in a good area far away, over a cheaper/scarier one that’s close to my house. I like my Airstream too much. But to each their own.

If you’re paying for a storage lot, strongly consider upgrading to covered storage. Like I said before, putting a roof over your Airstream pays off in the long run. A tiny drip from slow-melting snow can turn into a major, major repair of floor rot in a single winter.

#5: In an open lot, away from home

Now we’re getting down to the least palatable choices. Storing in an open lot away from your home is approaching an act of desperation. Maybe you have no other place to keep your Airstream, but without at least a good fence and some active security (night watch) you’re really rolling the dice.

Even RV dealerships sometimes have thieves come through at night. They like to break in quickly, steal the TV and other electronics, and flee. Sure, you’ll still have an Airstream in the end, but there’s going to be hassle involved in filing the insurance claim and getting the repairs done, and possibly some personal trauma and permanent scars to the Airstream.

#6: Near a body of salt water, or on damp ground

If you live near the ocean or perhaps Great Salt Lake, make sure your Airstream is stored far away. The “salt breeze” is seriously detrimental to your Airstream. It will cause fast-moving filiform corrosion (those white “spider webs” that afflict the edges of the aluminum skin, taillights, wheels, and other coated aluminum parts), and nothing will stop it except getting away from the salt and humidity.

Damp ground can be almost as bad. Florida is famous for this. I’ve seen lots of Florida trailers with completely rusted out frames underneath, just from a few years of sitting on neatly mown grass. There’s a lot of moisture rising from the soil all the time, even if you can’t feel it or see it.

#7: Under a tarp

Well, don’t do that. The only Airstream I’d cover with a tarp is a project trailer that has open holes in the roof—and not for long.

The problems with tarps are multiple:

  • they trap moisture
  • they flap in the breeze and create rub marks
  • they leak

They’re kind of the worst of all worlds, trapping moisture beneath while allowing leaks, and damaging the Airstream at the same time. Plus they’re ugly. Tarps are for temporary fixes and emergencies, but they’re not for long-term storage.

If you’ve got a tip regarding storage, share with us using the Comments box below.

Written by RichLuhr · Categorized: Safety and security · Tagged: storage

Feb 28 2017

Airstream Fire Safety: How to Use an Extinguisher

“You have to practice for an emergency like a fire,” said RV expert John Gold at a recent Alumaevent. “I’m superstitious. I believe in Murphy’s Law: the worst possible thing will happen at the worst possible time. If,” he added emphatically, “IF you aren’t prepared. So be prepared!”

Safety step one: check the fire extinguisher in your Airstream. “They are all about the same,” said Gold, speaking of the traditional fire extinguishers that come with Airstreams. “But when is the last time you took one out?”

Start by checking the expiration date printed on the label or the neck of the bottle. You should replace your traditional RV fire extinguisher every five years, or upgrade to the Element fire extinguisher, which has no expiration date.

Also, look at the dial of the traditional fire extinguisher. If it’s in the red, “it won’t work,” said Gold. “Throw it out and get another one. If it is in the green, it may work.” Or, if it has a green button on top, press it down. If it doesn’t pop back up, get a new fire extinguisher because that one won’t help you when you need it.

Change may to will.

Shake the canister, hard enough to feel the powder moving inside. “If you have to, bang it on the ground a couple of times until you feel the powder move,” Gold said.

Compressed gas inside the extinguisher pushes out a powder that puts out the fire. “Every time your Airstream hits a bump, the powder inside becomes compacted on the side or bottom of the can and won’t come out after a time, only the compressed gas—which won’t put out a fire,” he said. If you feel the powder moving and the dial is in the green, then you know the extinguisher will work.

If you have an Element fire extinguisher, it works entirely differently. It stops fires without leaving a mess of powder, and there’s no need to routinely check it. It doesn’t have the risk of not working because there’s no powder to pack down.

Practice the pin.

Pull the pin out and put it back in. (It will take some force.) Then give it to your spouse and other travelmates to try it, too. “It doesn’t explode like a hand grenade!” assured Gold. The pin merely prevents you from engaging the trigger before you’re ready.


With an Element fire extinguisher, the technique is different. Instructions are printed on the tube. You pull off the top cap, then pull off the bottom cap, and use the striker on the bottom cap to start the fire extinguisher. There’s no force needed and anyone can do it.

Fire fighting basics

If the time should ever come when you need to deploy the extinguisher, you’ll have just 9 to 11 seconds to use it, “because that’s all the compressed gas they put in there,” stated Gold. Gold shared a surprising statistic: four full-size extinguishers (much bigger than a typical 2-lb. extinguisher that comes with a Airstream) are required to put out a burning tire. An Element fire extinguisher runs for either 50 seconds or 100 seconds, depending on which model you buy, so if you want more time, upgrading is a sensible choice.

How many traditional fire extinguishers do we need in our trailers? “Maybe two,” he said. “But don’t stress about this too much. Fires in RVs are very rare.” The most common fire in your Airstream will likely be the same one that can occur in your home: a small grease fire on the stove. “You know how to put that out, just calmly smother it,” said Gold. “Put a lid on it, or towel over it.” (Be sure to pass this skill on to the kids and grandkids.)

Using the extinguisher

If there’s a significant fire requiring the use of an extinguisher, and there are two or more of you in the trailer when a fire occurs, “you each have different jobs,” said Gold. “One of you, grab the extinguisher. The other, get the cell phone, its charger, your emergency escape kit, and every living thing out of the Airstream. And nobody go back in except for the person operating the extinguisher.”

The P.A.S.S. technique

The American Red Cross and OSHA recommend memorizing “PASS”—an acronym that reminds you how to operate your extinguisher during the excitement of a sudden fire. Follow the “pull, aim, squeeze, and sweep” technique, step by step:

  1. “Pull” the pin. This will also break the tamper seal.
  2. “Aim” low, pointing the extinguisher nozzle (or its horn or hose) at the base of the fire. (Don’t touch the plastic discharge horn on CO2 extinguishers; it gets very cold and could damage your skin.)
  3. “Squeeze” the handle to release the extinguishing agent.
  4. “Sweep” from side to side at the base of the fire until it appears to be out. Watch the area; if the fire reignites, repeat “aim” and “squeeze”. (If you have the slightest doubt about your ability to fight a fire, “evacuate immediately” says the Red Cross.)

To flee or not to flee?

After emptying the first canister, “you may need to make a decision,” stated Gold: “Do I go for the second extinguisher or not? That will be determined by your RV insurance,” he said with a smile. “Every one of you has insurance on your Airstream, but not everyone has replacement cost insurance.”

“If your coach is burning, you should know exactly what your insurance will cover and be able to quickly do the math in your head to debate your next move,” said Gold. A proactive phone call to your insurance company before you hit the road will help with this scenario. If the loss pencils out, “be safe, walk away, and buy a new Airstream.”

The problem with propane.

Fire in an RV is a serious matter, and especially in an Airstream carrying so much propane. “Even a small 3-pound propane container, when ignited, would explode and destroy a trailer and damage all the RVs around it,” said Gold. “If there’s a fire in an RV park where you are staying, and you are close by, move your rig,” he cautioned. “Do not stay and watch at a close distance.”

Dial 911

—and let the fire department come, even if you’ve put out the fire. “You want to make sure nothing is burning internally, and verify that the fire is completely out,” said Gold.

Written by RichLuhr · Categorized: Safety and security · Tagged: emergency, Fire extinguisher, Safety

  • « Previous Page
  • 1
  • 2

Recent Posts

  • 7 tips for hot summertime travel
  • Spare parts for Airstream road trips: 21 tips
  • What size Airstream trailer?
  • A quick guide to maintaining your Airstream’s exterior
  • Tire pressure monitoring de-mystified

Categories

  • Boondocking (3)
  • Cleaning and exterior (12)
  • Electrical (25)
    • Generator (2)
    • Solar power (7)
  • Furniture and interior (2)
  • General (3)
  • Kitchen and cooking (1)
  • Lifestyle and travel (16)
  • Mobile work and technology (9)
  • Product Review (6)
  • Renovations (1)
  • Safety and security (9)
  • Tires and wheels (10)
  • Tools (10)
  • Towing (4)
  • Travel tips (6)
  • Water and sewer (9)

©2004–2020 Church Street Publishing, Inc. “Airstream” used with permission