What’s wrong with campground power?

If you take one message away from this posting, it should be this: Don’t trust campground power.

I’ve camped at literally hundreds of campground across North America, and I’ve frequently been amazed how often the electrical service is poor or even dangerous. The most frequent problem is low voltage, where the normal 120 volt or 240 volt service sags because everyone is using their air conditioner at the same time.

The electrical devices in your Airstream are designed for normal voltage plus or minus 10 percent. That means anywhere from 108 volts to 132 volts is tolerated by the refrigerator, air conditioner, microwave, and power converter. (The power converter changes the 120 volt AC power into 12 volt DC power to charge the battery and support all the other 12 volt accessories like furnace, water pump and lights, so it’s particularly important that it is happy.)

But in reality, a hot day in a campground can mean brief “brown outs” where the power dips below 105 volts—and that is bad news indeed. If your air conditioner tries to start up under those conditions it will probably burn out, and that’s a $1000+ replacement. (Plus you’ll have to suffer in the heat until you can get a repair!)

We have a Digital Voltage Meter in the Airstream Life Store, and I recommend that everyone carry one at a minimum so you can test the power before you plug in your Airstream. It checks the voltage and the wiring to make sure you aren’t plugging into bad power. It’s cheap insurance and will protect you from things like mis-wired outlets, bad grounds, and incorrect polarity.

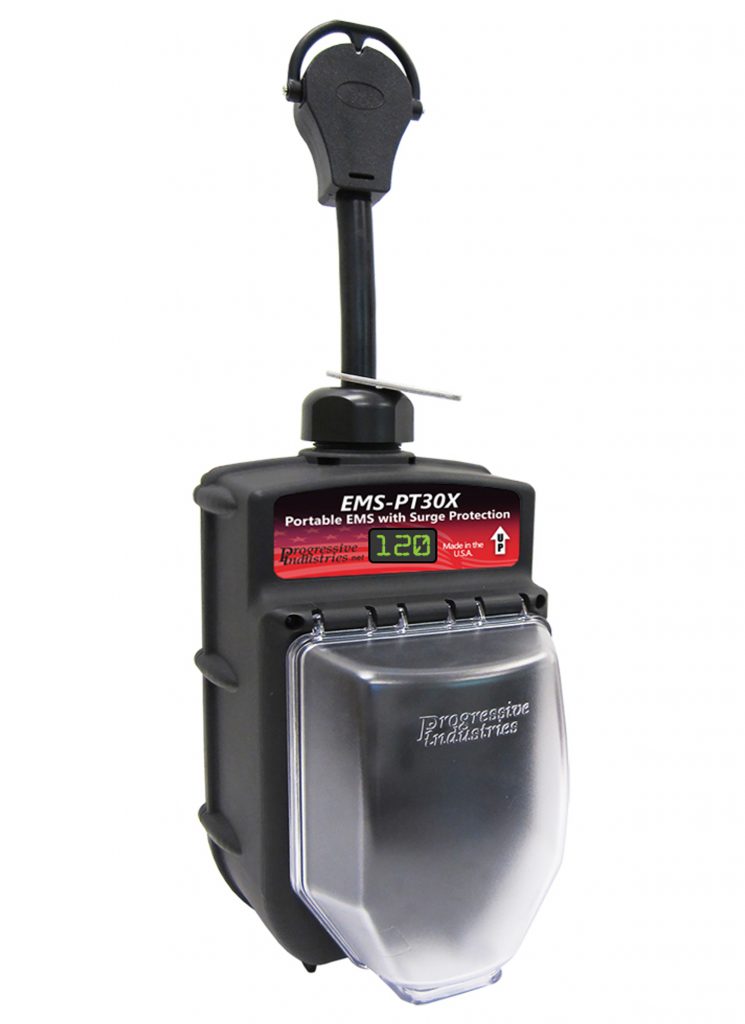
But the limitation of a meter is that it can’t help you if there’s a power surge or dip when you’re not watching. The best solution is  a smart Electrical Management System (EMS). Like the Voltage Meter, the EMS checks the wiring before allowing power to flow to your Airstream. Then it continuously monitors for dangerous conditions like high or low voltage.

An EMS like that will shut off the power instantly (in milliseconds) if something bad is happening, and then turn the power back on when conditions are safe again. It’s a brilliant solution.

Take a few tips next time you go camping:  When you get to your campsite, inspect the power pedestal before you plug in. Look for cracked or broken outlets, wasp nests (I’ve been stung more than once when opening a pedestal cover), or looseness. If the outlet seems questionable, don’t plug in without first using a Digital Voltage Meter or EMS.  You should see about 120 volts, and there should be no indications of mis-wiring.

If the voltage is below 115, be wary. That means the wiring you share with many other campers is already a little stressed, and it’s likely to go lower once you plug in. If you need to use an extension cord, that’s another concern because longer cord runs mean lower voltage. And don’t ever try to run the air conditioner while the Airstream is connected to a 15-amp household plug. It might work for a while but sooner or later the voltage will drop or one of the plugs may melt.

If the campground power voltage is a little low to start and you know the weather is going to get hot later you can probably expect that the voltage will continue to drop, perhaps to dangerous levels. This is the ideal situation to be using a good EMS, because it takes only a few seconds of low power to cause expensive problems in the Airstream. It’s much better to have the power cut off automatically by the EMS (and later restored automatically) than to blow up your AC appliances. The same is true of voltage spikes.

There are a couple of brands of EMS units on the market today. Most outlets sell a Surge Guard unit but I’m not a big fan of that one. Reliability seems to be an issue and the overall quality is (in my opinion) lower. For a decade now I’ve been using Progressive EMS units and they’ve been great, so that’s the only brand we carry in the Airstream Life Store.

Progressive also stands behind their product. I had one fail because I left it out in a Florida rainstorm with the plugs facing up, and they filled with water. Progressive honored the lifetime warranty anyway and replaced it for free. The current models come with a nice rain shield now, so even that problem is unlikely to occur.

Whatever solution you choose (Digital Volt Meter, Electrical Management System), be sure to pay attention to the power everywhere you plug in, including when you’re “driveway camping” at home or a friend’s house. A few seconds of attention can save you an expensive repair later!

Cooking without gas (or charcoal!)

I like trying new things as we travel in our Airstream. Last week, at Alumapalooza, I saw an earnest Welsh man named Davey Jones (really) demonstrating something I’ve never seen before: a solar cooker that actually makes sense.

I have seen solar ovens before. Back in 2005 at the Florida State Rally I spotted someone cooking with a giant solar oven (pictured at right) but I was unimpressed. Although the oven had room for a large pot, it was far too big to be practical for our style of travel. When deployed, it looked like an NASA probe bound for Jupiter. I dismissed it as an interesting but quirky niche item for extremists.

Thirteen years later, I’m not so quick to dismiss the power of the sun. After all my fixed base home and my Airstream are powered by solar panels, and I love them. At home the sun provides 110% of our annual power needs, and solar panels can keep us unplugged for weeks during the summer in our Airstream.

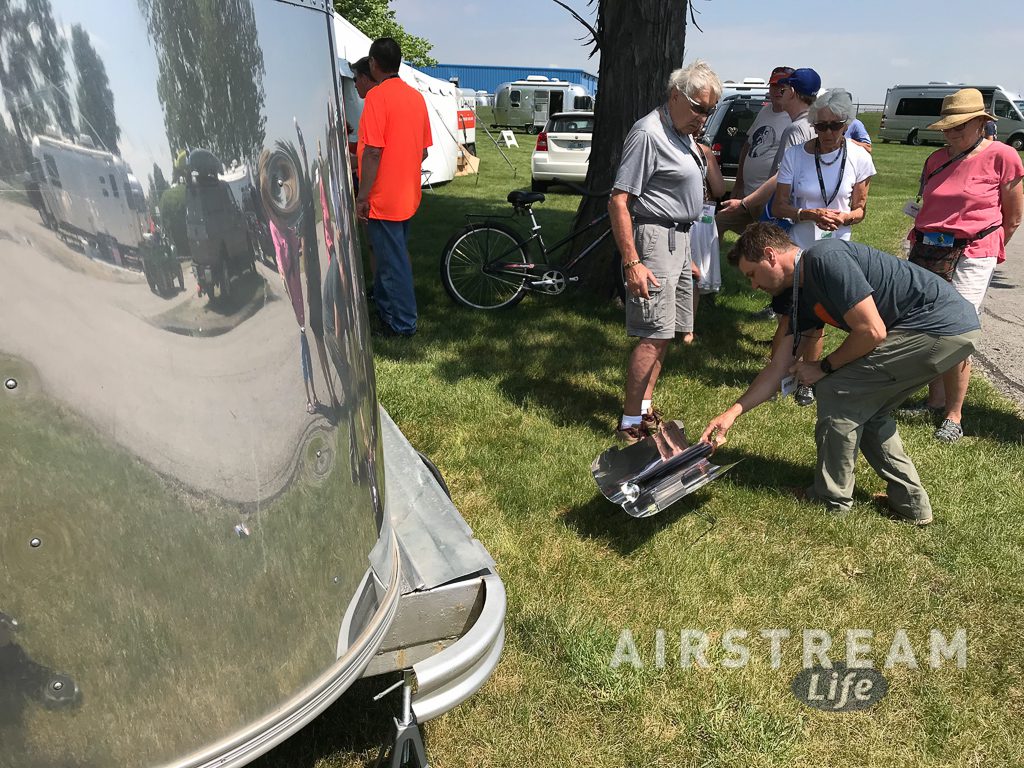
Davey was showing off the new GoSun line of solar cookers at Alumapalooza. (They’re called “cookers” because they can be stove, oven, broiler, steamer, or water-heater depending on how you use them.) Even in hazy Ohio sunlight he was baking up cinnamon rolls and frying bacon all day long. I’m not sure if I was more impressed at the cooking or the cleverness of his olfactory marketing.

The secret of the GoSun cookers is the vacuum tube at the center. It’s basically a Thermos bottle with one-way mirrored glass. Sunlight goes in, converts to infrared as it passes through the glass, and the heat is trapped by the vacuum bottle. This is a quantum leap from the big wood box of 13 years ago.

That means that with the GoSun cookers you don’t need a huge reflector area to make a lot of heat. The reflectors on the GoSun cookers is tiny compared to the giant Sun Oven pictured above, and yet the inside of the vacuum tube can get to 550 F. (Most of the time it runs 200-360 F.) The amazing thing is that you can grab the outside of the glass tube with your hands and it won’t even be hot. So you can’t burn yourself on it.

The smallest model, the GoSun “Go” (pictured below) is so portable it fits easily in a daypack, and weighs just 2 pounds. It’s perfect for meals for one person, or two people depending on what you cook. The next size up, the GoSun “Sport” (pictured above) is still very packable, and can make enough hot food for 3-4 people.

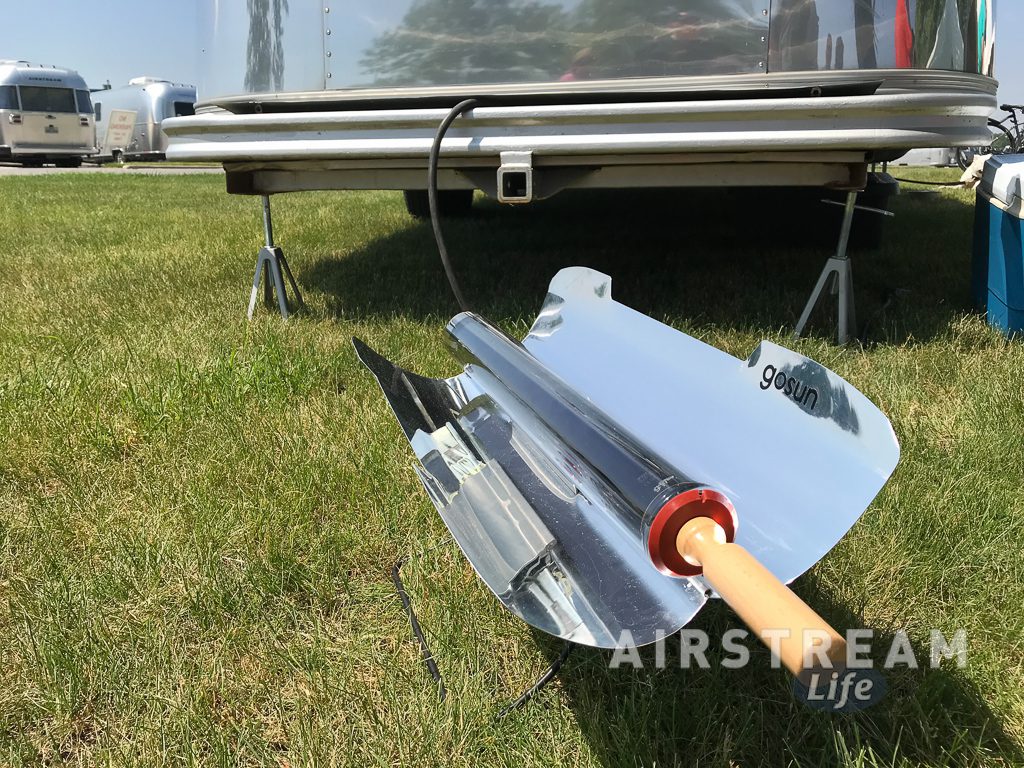
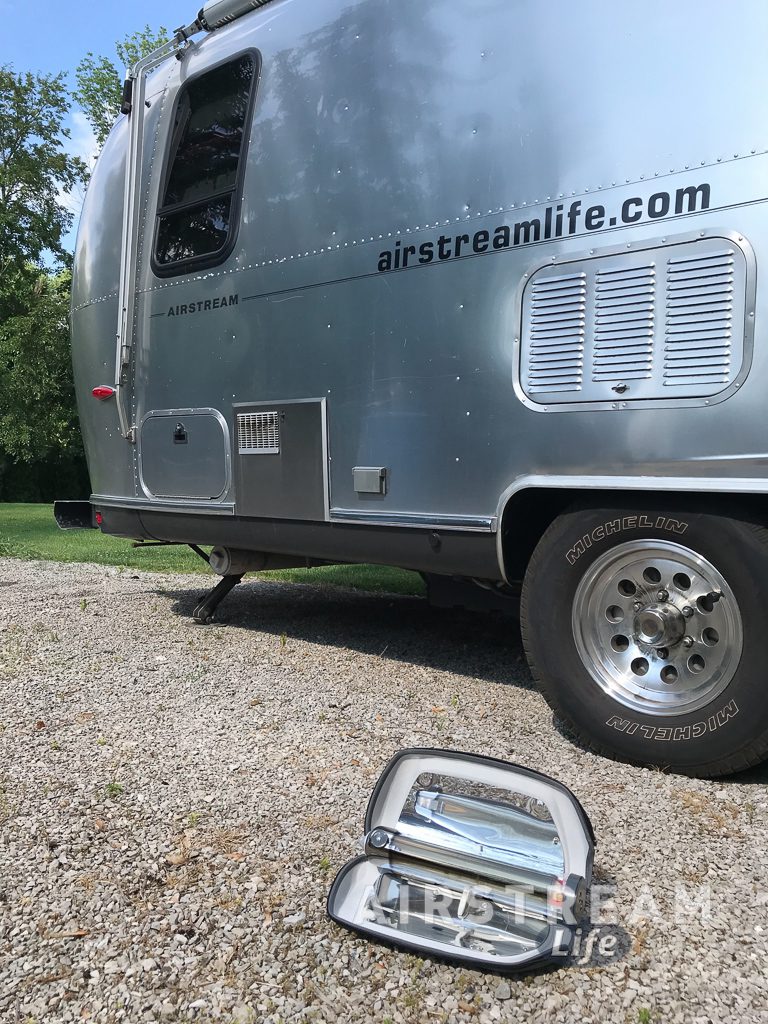
We got the “Go” model to try it out before adding it to the Airstream Life Store (as I do with every product we carry), and tried it out in a friend’s driveway a few days later. I decided to bake some apples for my first trial, and sweeten them with cinnamon, xylitol, and nutmeg.

Whatever you cook has to fit into the cylindrical cooking tray. In the case of my apples, that meant peeling them and cutting into chunks. Then I just put the apples into the tray, slid it into the cooker, and placed it in the sun.

The cleverness of the GoSun design started to become apparent when I did this. The hardshell case of the “Go” model is zippered, so deploying it is simply a matter of unzipping. A brace holds the two sides of the case open and the reflectors are built right in. There’s even a little dial attached to the tube to make it easy to locate the optimal angle to the sun, and an adjustable folding stand attached to the case props the whole thing up.

Once you slide the food tray in and point it at the sun, your work is done. After a few minutes in full sun the interior will be hot enough to start cooking. Steam begins to waft out of the end of the vacuum tube. You can take a peek at progress by sliding the food tray out for a moment.

My big mistake was not believing what I saw. I really couldn’t believe that the apples were cooking, so I left it in the sun for much longer than necessary, and when I finally removed them they were basically applesauce. Delicious applesauce, sure, but not quite what I had planned for. Fortunately, I had prepared three apples and could only fit 1.5 apples worth in the first batch, so did a second batch and cut my cooking time in half.

Those apples came out perfectly, softened but still firm. I mixed the chunks with the applesauce from the first batch and had a really great dessert for the next two days. (It would have been perfect on ice cream but I ate it all straight.)

Now, you may be thinking “I already have a stove and oven in my Airstream, so why do I need this?”  I thought the same thing at first. Then I realized, a big part of the joy of travel and camping is cooking outdoors for family and friends. Lots of people carry charcoal or propane grills. Others carry Dutch Ovens. You don’t need them but it’s so much more fun to prepare a meal slowly, outdoors, and while you’re waiting for that delicious slow food you can enjoy talking with your friends.

I particularly like that the GoSun cookers come with little silicone baking trays so that you can make cupcakes and such (I used them for the apples, too), and can be configured to make hot drinks. This gives them a lot of versatility. They’re also easy to clean; you just slide out the stainless steel tray and wash it. GoSun includes a bottle brush to clean inside of the vacuum tube if it gets a little food stuck to it, but most of the time that’s not necessary. So cleanup and packing took me about two minutes.

The only limitation I spotted with the “Go” model is that the food capacity is pretty small, best for one person or a small side dish (or a topping like I made). I think we’ll upgrade to the “Sport” model for future cookouts, and that way we can make things for all three of us. If you get the Sport, be sure to get the “Pro Pack” so that you have all the accessories you need including a case.

If you have one of these, please put in a comment below to tell me your favorite thing you’ve made in it. I’m looking forward to further experiments with our portable solar cooker, and your ideas would be welcome!

GoSun cookers in the Airstream Life Store with free shipping

Digital Voltage Monitor

Should you care about the power that comes into your Airstream from the campground?

Absolutely. YES.

Even newer campgrounds can have problems with their electrical power. Outlets may be mis-wired or damaged in a way that can be hazardous to your health—and the health of your Airstream.

Especially on a hot and humid day, when everyone in the campground is running their air conditioner, you’ll need to know that voltage is high enough to avoid burning out your A/C compressor.

The best way to know you’re getting good power is to use a digital AC voltage monitor. Outside Interests recommends one of the best: the Prime Products monitor, available at the Airstream Life Store. It constantly displays voltage so you’ll know if the power is sagging, and it checks for common mis-wiring conditions:

  • Reversed polarity (which can cause a very dangerous “hot skin” condition
  • Open neutral
  • Open ground

Digital Voltage MonitorIt’s simple to use: just plug it into any available outlet in your Airstream while you’re connected an electrical hookup, and observe the lights on the display. You’ll always know at a glance that you’re getting good power.

This voltage monitor is something every Airstream should carry at all times, and is available from the Airstream Life Store. When you order from Airstream Life you’ll also receive Rich Luhr’s short instructional booklet, How To Avoid Electrical Problems At The Campground.

Xantrex Freedom HFS Inverter/Charger

If you’re the type who likes (or aspires) to camp in remote sites far from electrical hookups, you’ve probably already put a few upgrades in your Airstream. The standard pair of batteries installed in an Airstream is fine for a night or two without campground power, but after that most people start looking at a generator or solar panels, and larger batteries to extend their camping time.

Serious boondockers sometimes take it step further, with an inverter to run a few 120-volt AC appliances like the TV or microwave.

Inverters explained

An inverter, for those who aren’t sure, is simply a device that turns the battery power (12 volt DC) into the type of power you’d get from a plug in your home (120 volt AC). It’s the exact opposite of what the built-in converter in your Airstream does when plugged into campground power.

Inverter pros and cons

A few Airstreams are factory-equipped with inverters, but even those aren’t usually capable of powering every outlet in the Airstream. They’re usually limited to a few outlets and produce a maximum of 1000 watts, which won’t run your microwave oven.

Worse, instead of producing nice clean smooth electrical current, most inverters on the market produce a sort of choppy electricity (called “Modified Sine Wave”). This is OK for most uses, but it makes some devices hum and buzz. Flat-panel TVs, computer power adapters, printers, and microwave ovens in particular don’t like it.

Cost factor

Xantrex Inverter Installed

Until recently, a “Pure Sine Wave” inverter that produced utility-grade power was a pretty expensive item. A 2000 or 3000-watt inverter could easily cost $2,000 ore more, plus installation. This is the major reason most inverter designs went the cheaper and less compatible route.

These days Pure Sine inverters have become much less expensive. Leading this trend, Xantrex recently introduced their new Freedom HFS Inverter/Charger specifically for the RV market. We got one and installed it in an Airstream for evaluation.

The Xantrex Freedom HFS

…comes in two specs: 1000 watt and 2000 watt. Because our goal was to provide “whole house” power (meaning powering every outlet and every appliance except the air conditioner) we opted for the 2000 watt model.

Installation is straightforward. Because the Xantrex Freedom HFS is also a power converter/charger, it replaces the existing converter/charger in the Airstream. That makes wiring fairly simple. Two 30-amp AC cables go to the inverter (campground power in, and inverter power out), and two heavy gauge DC wires connect to the battery (positive and negative).

A networking cable plugs into the inverter and runs to the remote control panel, which you can mount anywhere inside the Airstream. Those five connections (two AC, two DC, one remote) are all that are required.

Inverter installation

Because a big inverter like this can draw a lot of power, it must be located as close as possible to the batteries. That minimizes electrical “line loss” through the wires to the batteries, so the inverter can run most efficiently. In some Airstream floorplans this means stringing a cable from the new inverter location to the existing electrical circuit breaker panel.

Xantrex Inverter

Keep in mind that the Xantrex Freedom HFS can be mounted on a wall inside a cabinet if needed, and that’s often the best way to preserve storage space for other items. The unit does have a cooling fan that often runs when it is heavily charging the batteries or supplying AC power to a large appliance (like a microwave oven) so if you mount it under the bed be prepared to hear some “white noise” once in a while. The rest of the time, it’s silent.

The possible need to run wiring through the Airstream, and the requirement for heavy gauge cables to the batteries means that professional installation is a good idea for most people. A proper installation is crucial for efficiency and safety, so don’t cut corners here. Our installation took five man hours at a professional shop.

Batteries

The factory-installed set of two Group 27 batteries is really not enough for a big inverter like the 2000-watt Xantrex. If you want to go with a whole-house inverter, budget for a much larger battery bank at the same time. You’ll also want an amp-hour meter (like the Xantrex LinkLite or LinkPro) if you don’t already have one. A large inverter can drain the batteries pretty quickly, so accurate metering of battery capacity is important.

Performance

We were very impressed with the performance of the Xantrex Freedom HFS in our on-the-road tests. Not only did it seamlessly switch from campground power to battery power as needed (so quickly that no appliance lost power) but it consistently provided between 119 and 121 volts. That’s far more reliable voltage than the power we see at most campgrounds.

Both the 1000 watt and 2000 watt models of the Xantrex Freedom HFS are also 55-amp three-stage DC chargers, which means they’ll charge your batteries as well or better than whatever charger you currently have. Battery overcharging is not a worry, thanks to what Xantrex calls “Smart Battery Management” and built-in charge settings for standard “wet cell” batteries, AGM batteries, and a fixed voltage setting for new lithium batteries.

More power = more appliances

What can you run with a 2000-watt inverter? Any low-wattage appliance is simple of course, like battery chargers. The Xantrex Freedom HFS inverter had no trouble with a stick blender, toaster, vacuum, computer charger or TV. Amazingly, it will also run a hair dryer, vacuum cleaner, most microwave ovens, toaster or coffee maker—but keep in mind you should only run these high wattage appliances one at a time, and not for very long.

In general, if the appliance pulls 1,500 watts or less, it will probably be fine with the 2,000 watt inverter (allowing some leeway for surges and line loss). However, be wary of microwave oven wattage ratings. Those ratings are often “output” power (meaning cooking power) and the microwave may pull many more watts from the battery. In testing we observed a “1,000 watt” microwave draw 1,800 watts while in operation.

What about AC?

And while it might seem obvious to some, we should mention this: No, you can’t run the air conditioner through an inverter. It draws too much power. If your installer hasn’t rewired the air conditioner through a separate sub-panel to isolate it from the inverter, you’ll have to remember not to turn it on while you’re using the inverter.

Inverters and the fridge

Likewise, be sure to set your refrigerator to the “GAS” setting while you’re using the inverter, otherwise the fridge will stay in AC power mode and chew up the batteries quickly. Inverters draw a small amount of power even when they aren’t actively powering an appliance, so tap the green power button on the Xantrex remote panel whenever you don’t need it.

As you can see, there’s a small learning curve associated with having always-available AC power. But we found that after only a week or having it, we were hooked on the convenience of being able to run the coffeemaker and reheat a leftover in the microwave even while camped far off in remote places.

The Xantrex Freedom HFS 2055 is available online for about $800-900.

—By Rich Luhr

Secrets of Power: The Xantrex TrueCharge 2

Most travel trailers are built for weekend use. That mean the factory equips them with a battery or two that is sufficient to power the trailer for about two nights without being plugged in. After that, it’s time to find a source of power.

So it’s not surprising that not long after an Airstream owner begins to travel a bit more away from the KOAs and toward bucolic and private boondocking sites, they begin to look for ways to extend their power capacity. The next step is often a generator or solar panels, and a new set of batteries with greater capacity. Absorbed Glass Mat (AGM) batteries such as Optima and Lifeline are a typical choice because they last a long time, can be deeply discharged, and are maintenance free.

But then an interesting problem crops up, one that most Airstreamers—and even many RV repair technicians—don’t know about. The power converter built into your Airstream isn’t optimized for charging AGM batteries. Often it will undercharge them, particularly in cold weather.

People tend not to notice this unless they have also installed a highly accurate battery monitor, because the factory installed monitors are only rough estimators of the battery state of charge. So they are often misled into thinking the batteries are being fully recharged. But incomplete charging results in shortened battery life. Batteries will only have their longest possible life if they recharged to full after every use.

To truly get the most out of your new AGM batteries you need to replace the factory installed power converter too.

Only a few brands of power converters have the built-in capability to provide the correct voltages needed for AGM batteries. For this review, we upgraded an Airstream Safari to a Xantrex TrueCharge 2 (60 amp model) to see the difference in performance and the ease of installation.

The conversion job is fairly straightforward for a handy person, taking about 2-4 hours. Installing the Xantrex is easy; it’s removing the old converter that gets into a little mechanical surgery, because the factory charger is built into the same case as the fuse panel and circuit breaker panel. Separating the lower charging unit from the rest requires a drill, wire cutter/stripper, screw drivers and Torx drivers, a nut driver, and a few other basic tools. (Documentation for this job with photos can be found around the ‘net by Googling “replace power converter Airstream”.)

Once the old power converter is removed, installation of the Xantrex is painless. The Xantrex TrueCharge 2 is a beautifully crafted device that looks like it should be on display somewhere. As one friend commented, “It’s way too pretty to be installed inside,” but indeed that’s where it goes. It screws down to the floor securely, and then connecting it is a matter of butt-splicing six wires (ground, DC – and DC+, and three wires for AC), which takes only a few minutes. Since it’s designed for marine and RV use, everything on it is marine grade. Providing rubber covers for the wire connections is a nice touch, typical of this high-end unit.

The TrueCharge 2 is pre-programmed for 3-stage charging of “wet cell” batteries. Changing settings to provide optimal charge for AGM batteries is a matter of pressing two buttons. Once done, the output voltage jumps to the correct level for AGMs, which means those batteries will be charged to their fullest capacity. This was the feature we were looking for in our test Airstream, since other brands such as Parallax and Intellipower provide just one output voltage for all types of batteries.

The TrueCharge 2 can also support up to three separate battery banks, and can even run in parallel with a second charger for really large installations, but most Airstreamers won’t need those features. A single 40-amp or 60-amp TrueCharge 2 will be sufficient to replace the original factory unit.

TrueCharge Remote
TrueCharge Remote

The LED display on the case shows exactly what the unit is doing (rate of charge, type of battery, etc), but since it will be hidden out of sight, adding the optional Remote Panel is a wise choice. This panel connects with a simple telephone-style cable, and can be mounted on the wall anywhere within 25 feet. As a bonus, the Remote Panel adds a few features that the onboard TrueCharge 2 display doesn’t provide. If we are to be totally honest, it is also just plain cool-looking. You might never touch it again, but all those colorful LEDs certainly make for a nice display.

Battery Temperature Sensor

A particularly useful option is the Battery Temperature Sensor. This measures the temperature of the battery and allows the charger to compensate. Warm batteries need lower charging voltages; cold batteries need more voltage. If you simply slip the sensor over the negative post of the battery and run the provided wire back to the TrueCharge 2, it will figure the optimal temperature compensation automatically. If you don’t use the Battery Sensor you can still manually compensate for temperature using buttons on the Remote Panel.

Interestingly, since the TrueCharge 2 was designed for worldwide markets, it can accept input voltages of 90 to 265 volts AC. With that and other protections built into it, it’s unlikely to be damaged by excessively high or low voltage at the campground. It also has a battery equalization (or “de-sulfation”) mode that helps maintain the batteries.

Once the TrueCharge is in place and power is applied, it checks the batteries and then starts silently maintaining them. Although it has a built-in fan like the original converter, it rarely runs and when it does it’s much quieter. It’s also considerably lighter than the old converter because it isn’t mounted in a bunch of heavy sheet metal. Overall: it looks, feels, and operates like the major upgrade that it is.

Xantrex is known for premium products, and the TrueCharge 2 doesn’t disappoint. Running about $600 online for the 60-amp model, Remote Panel, and Battery Temperature Sensor, it’s a good investment for Airstreamers who like to get the most out of their power system. Smart, well-designed, flexible, and in every way an improvement over the original gear, it’s a device befitting an Airstream.