Spare parts for Airstream road trips: 21 tips

Back in February, we shot a video about the tools we carry on long trips, and exactly why they’re essential. (You can read the blog and see the video here.)

This week we’re following up with a discussion of the spare parts, tapes, and lubricants that we also bring on every trip. In the course of shooting this 23-minute video we came up with 21 separate tips for you, so it’s probably worth your while to watch the whole thing.

If you prefer to read the Cliff’s Notes version, here’s the summary of the tips:

  1. Choose spare parts based on your travel style & abilities
  2. Carry spares of cheap consumables like grease
  3. Bring spares that are hard to obtain on the road
  4. Tapes: Teflon, butyl, electrical, silicone, masking, body
  5. Threadlocker: great for screws that keep backing out
  6. Consider bringing spares of “dumb but essential” parts
  7. Light, small, handy items like zip ties and storage bags
  8. Gloves! Mechanics and vinyl
  9. Spare propane hoses and tools needed to change them
  10. Lubricants: silicone spray, Boeshield T9, grease, etc
  11. Little items: drain plug, fuses, latches, rivets
  12. Hensley owners: get the spare parts kit
  13. If you might replace the drain plug: 15/16″ socket
  14. Your Fantastic Vent and power hitch jack may need a glass fuse!
  15. Extra #8 wood screws for furniture
  16. Replacement refrigerator bulb
  17. “Travel size” containers of glue, lube, cleaner, etc
  18. De-Oxit and burnishing tool for electrical connections
  19. Organize your supplies into kits
  20. Pre-made kits available in the Airstream Life Store
  21. “Free-flowing” Y connector for big rallies

Tales of things that go “pfzzt” in the night

At first I thought it was just a fluke when the Airstreams got killed.

It was at the event we called Alumafandango, back in August 2012. The rally was being held at jerry-rigged “campground” we whipped up beside an old amusement park. Electricians had run power to service nearly 100 Airstreams, tying into transformers that had probably been sitting outside for several decades.

The heat was unbearable in Lakeside, Colorado that day, and everyone who had a 30-amp hookup was running their air conditioning. For nearly 24 hours the electricians struggled to stay ahead of the threat of a complete electrical collapse, and in their haste they made a dangerous mistake. One circuit of Airstreams got a jolt of 240-volt power (instead of the 120 volts they were expecting).

Result: Pfzzzt! Fried electronics—mostly blown power converters but also a few refrigerator and water heater circuit boards.

The poor folks who got hit were out of luck for a day or so, until RV techs could get to replacing the fried parts. The Airstreamers could run on batteries for a while, but they had no air conditioning on some of the hottest days of the year, couldn’t run the TV or microwave,  and in some cases had no refrigerator or hot water.

It seemed like a fluke, but then it happened again at Alumapalooza in Ohio in May 2018. I happened to be operating the Airstream Life pop-up store at the time, and I knew there had been a power mishap was because suddenly all the Progressive Electrical Management Systems (EMS) on my shelves were sold.

And once again, at the WBCCI International Rally in July 2019. Same deal—I was minding my booth in the convention center and suddenly there was a line of people rushing to buy all Progressive EMS units that I had. It turned out that once again a line of trailers had come face-to-face with more voltage than they could handle, and the word spread quickly. I came to realize that freaky power situations happen more often than people care to believe.

This wasn’t nearly as much of a problem in the old days, because before 2006 there were very few 30-amp connections available at major Airstream rallies. We didn’t usually have hundreds of air conditioners all straining to pull juice from one fairground’s electrical supply.

[CURMUDGEON MODE ON] When I was a young Airstreamer we were glad to share a single 15-amp circuit across four Airstreams (that’s a miserly 3.75 amps each, just enough to keep the batteries charged)—and if it got hot you just put more ice cubes in your drink. You kids have it too easy! [/CURMUDGEON MODE OFF]

These days it’s just good practice to have an EMS. Now, I’ll admit that an EMS is not a sexy purchase. It doesn’t seem to do anything until you really need it. It’s just insurance, a mild-manner Clark Kent toiling behind the scenes most of the time. But wow—it turns into a superhero when a tsunami of electricity arrives and puts all your neighbors out of commission.

Actually, an EMS does several things. It checks the power when you plug in, and re-checks it repeatedly for about a minute. This way it can be sure that the power is OK. It looks for:

  • mis-wiring in the power outlet
  • bad or missing ground
  • excessively high or low voltage
  • proper frequency
  • stability (the power stays in the proper range)

If the power is OK, the EMS lets it flow through to your Airstream. If anything goes wonky at any time it immediately cuts off the power and keeps it off until things are OK again. It’s designed to respond in milliseconds, which means the EMS will cut off the power before it can do any damage to your Airstream.

Personally I won’t plug in my Airstream without the EMS in place, even at home. Too many times I’ve been to campgrounds with sketchy-looking, cracked, wasp-infested, and worn power outlets. They should be replaced but often they’re not, at least not until an angry customer shows up with a damage claim.

And even if the campground is new and the outlets look pristine, you can still get a surge from a lightning strike, or a brown-out that toasts your air conditioner on the hottest day of the year.

This summer we’ll be attending three major rallies, ranging from 200 to 800 rigs all parked together. In my experience, this is the most likely scenario for a power anomaly to occur. So if we didn’t already have an EMS, you can be sure I’d be shopping for one before we set out.

Sometimes people tell me that they are worried about their dog, who they’ve left in the Airstream with the air conditioner on. Their concern is that the EMS will cut off the power during the day while they’re gone. My response is that the EMS might save their dog’s life. If there really is a temporary and acute power problem, having no EMS protection could mean that the air conditioner is permanently damaged. That means no cool air for Rover the next several days until you can buy a new air conditioner.

With an EMS, the air conditioner can survive to resume cooling after the power issue has passed. That might be only a minute or two. This is a far better scenario for you and your dog. And for added security, you can install one of the available remote temperature monitors on the market, which will alert you on your phone if the Airstream’s temperature rises. (I’m currently testing some of these because we’ll be traveling with our dog this summer.)

Pets or no pets, I think an EMS is one of those “must have” pieces of equipment if you’re a regular traveler, and especially if you like to go to big rallies. As you can tell from my previous experiences, a lot of people become believers after the electrical storm. My advice is to save yourself the trouble and plan ahead for this summer’s travels.

The inverter–simplified!

An inverter is a bit of RV technology that often baffles people. But like solar and other things we’ve explained in this blog, it’s simpler than you may think.

What the inverter does and where to find it in your Airstream

An inverter is a device that allows you to plug things into electrical outlets even when the trailer itself isn’t hooked up to campground power. For instance, charging your electric toothbrush when you’re enjoying a quiet boondocking spot far away from everything.

Normally, when you’re using only battery power, you can’t run something that you have to plug in. But the inverter makes this possible, through a little electrical trick: it turns the power from the batteries, which is 12 volt Direct Current (DC), into 120-volt Alternating Current (AC),* which is the same power you use in your house. With the inverter switched on, you can watch TV, play DVDs, and plug in your laptop, even if you’re not hooked up to campground power.

If you’ve got a late model Airstream (except Basecamp and Bambi), it probably has a factory-installed inverter. There’s a little control panel on the wall with a push-button to turn it on and off, like the photo to the right.

Other Airstreams might have an inverter too, but those are usually owner-installed.

How to use the inverter wisely

This handy device does have a few limitations, so let’s cover a few essentials for using it wisely. I’ll keep it simple, without getting into technology terms or complicated math.

1. Use inverter power sparingly.

You can run out of power if you’re not thoughtful about how long you keep the inverter turned on.

The inverter runs off the batteries in your Airstream. The factory-installed batteries are designed to support the Airstream for a day or two of “typical” needs. So realistically, if you use your laptop computer all day, there won’t be much power left for the next day unless you also have solar panels or a generator to recharge the batteries.

Also, the inverter isn’t particularly efficient. It wastes up to 20% of the power, so there’s a larger hit to the batteries than you might think, whenever you use it.

If you’re a frequent off-grid camper and heavy user of the inverter, you might want to talk to a good service center about adding more battery capacity.


2. Use only low-power appliances.

The standard inverter installed in an Airstream has a rated capacity of 1,000 Watts. That’s plenty for low-power devices like the TV, DVD player, toothbrush charger, or a laptop, but not nearly enough for some other appliances.

Here’s a rule of thumb: if it has a heating element, don’t try to run it from the inverter. This includes a hair dryer, toaster, coffee pot, space heater, waffle iron, etc. You might get away with it for a little while, but eventually, the inverter will overload and shut itself off—or burn out permanently.

Another rule of thumb: if it has a motor, think twice before using it. Most things with electrical motors need too much power. This includes the air conditioner and microwave (which aren’t even connected to the inverter, so they simply won’t go on), vacuum cleaner, plug-in fan, etc. At the very least devices like these will drain the batteries quickly, and they might overload the inverter.


3. Every appliance has a useful label.

Not sure if the device you want to plug in is safe for the inverter? You can easily find out. Every electrical device has some sort of labeling to tell you how much power it needs. For example, this is the label printed on my Macbook’s charger:

I apologize because this involves a tiny bit of math. You need to know that by multiplying Amps and Volts, you get Watts. (I promise, that’s as hard as it gets.)

Looking at this label, we see “Input: 100-240V”. That means this charger will operate on any voltage from 100 to 240. (That means you can use it in Europe!) In North America, it will run quite happily on 120 volts.

We take that number and multiply it by the next number. If you squint you’ll see that it says “~1.5A” which means it draws a maximum of about 1.5 amps.  So by multiplying 120 x 1.5, we come up with 180 Watts. That’s way below the 1,000 Watt rating of the inverter, so now we know there will be no problem using this charger.

Just for geeky fun, you might take a look at a few other items you might plug in, like a coffee maker. You might be surprised (dare I say “shocked”?) by the range of power requirements.


4. Turn the inverter off when you’re not using it.

Even in “stand by” mode with nothing plugged in, the inverter uses power. It’s not much at any given moment, but like a dripping faucet it adds up to quite a lot over the course of a couple of days. So only turn on the inverter when you really need it, and be sure to remember to turn it off again when you finish watching your movie.


5. Watch the heat.

Remember that 20% power waste I mentioned earlier? It goes up in the air as heat. The inverter has a pair of fans to keep it cool, but on a really hot day it can get too hot—and that’s bad for the longevity of the inverter.

Most of the time this won’t be a problem. But if you pull into a boondocking spot after a sunny day of towing and the interior of the Airstream is over 104 degrees F (which happens pretty easily in the southwest), the inverter will be over its safe maximum temperature. Wait for the Airstream’s interior to cool down before you use the inverter. You can easily check the interior temperature by pressing the appropriate button on the Airstream’s wall-mounted thermostat.


6. Outlets can be handy while traveling!

Here’s one of my favorite hacks: when I need to add air to the trailer’s tires during a trip, I use a portable compressor plugged into  one of the power outlets on my Airstream.

Note that the outside outlet isn’t connected to the inverter on most Airstreams, so you may need to run an extension cord from one of the interior outlets.

I used tip #3 to compute that the inexpensive portable compressor I use draws just 130 watts of power. So even though it has a motor, it’s well within the capacity of the inverter. That means that anytime I need air I can just flip on the inverter and plug in my compressor. That beats the heck out of trying to find a plug or a gas station air compressor!


That’s probably more than you need to know about inverters—but hopefully enough to make you see that the inverter is a really handy device, and how best to use it. Like all good things, it’s best enjoyed in moderation.


 * The voltages mentioned are not exact. Household current, for example, can run from 108 volts to 132 volts and still be considered normal. The WFCO brand inverter in a late model Airstream is actually designed to output 115 volts. Likewise, a “12-volt” battery is really going to put out about 12.6-13.0 volts when fully charged. This voltage drops as the battery is depleted. You didn’t need to know this and it really won’t change anything written here, but I mention it because otherwise, somebody will feel the need to “correct” me.

Solar–simplified!

The other day I heard about an educational seminar on the topic of solar power for Airstreams and decided to take a look. What I saw horrified me: the presenter turned this simple topic into an engineering class that would intimidate all but the geekiest among us. Imagine densely-packed slides full of numbers and technical terms.

Solar is easy. Don’t let anyone tell you differently. The sun shines, solar panels convert the sunshine into electricity, and that charges the batteries in your Airstream. That’s it.

The rest is stuff that only a few people really need to know. If you enjoy having all the details and talking about amps and volts (like me, I have to admit) by all means have fun learning everything you can, but I think most Airstreamers just want to get more camping time without having to find a plug or carry a generator.

Let me answer a few commonly asked questions:

“What can I run on solar?”

I often hear comments and questions from people who don’t understand exactly what solar panels are doing for them. At the risk of repeating myself: the solar panels charge the batteries. Solar panels don’t do anything else. So you don’t run anything on solar.

The batteries in your Airstream are actually doing the work of powering things when you’re boondocking. In my book “The Newbies Guide to Airstreaming” I have charts that show exactly what the batteries are powering. (In the 4th edition of the book you’ll find that chart on page 20.) Basically, if it runs on 12 volts, the batteries are powering it.

“Can I use the inverter?”

Sure. The inverter really has nothing to do with solar. It uses the battery’s energy to power the electrical outlets in the trailer. In other words, the inverter makes it possible for you to use things that have plugs, like the TV, DVD player and your laptop, when you’re boondocking—at least until the batteries run down.

Keep in mind that devices that plug in generally consume a lot of energy, so you should use them sparingly when you’re using the inverter. (I’ve done a more detailed blog on inverters which you can read here.)

“What size of solar panel system should I get?”

Unless you’re planning to camp off-grid for long periods of time, you don’t need a particularly large solar array. You can get a lot of benefits from a simple, plug-and-play portable solar setup like this one. You just unfold it, point it at the sun, plug it in, and walk away.

Solar panels are usually rated in terms of watts. The watt rating is really only useful for comparing one system to another since the actual energy generated on a given day varies depending on factors like cloudiness, time of year, and latitude. Personally, I wouldn’t bother with a system of fewer than 120 watts.

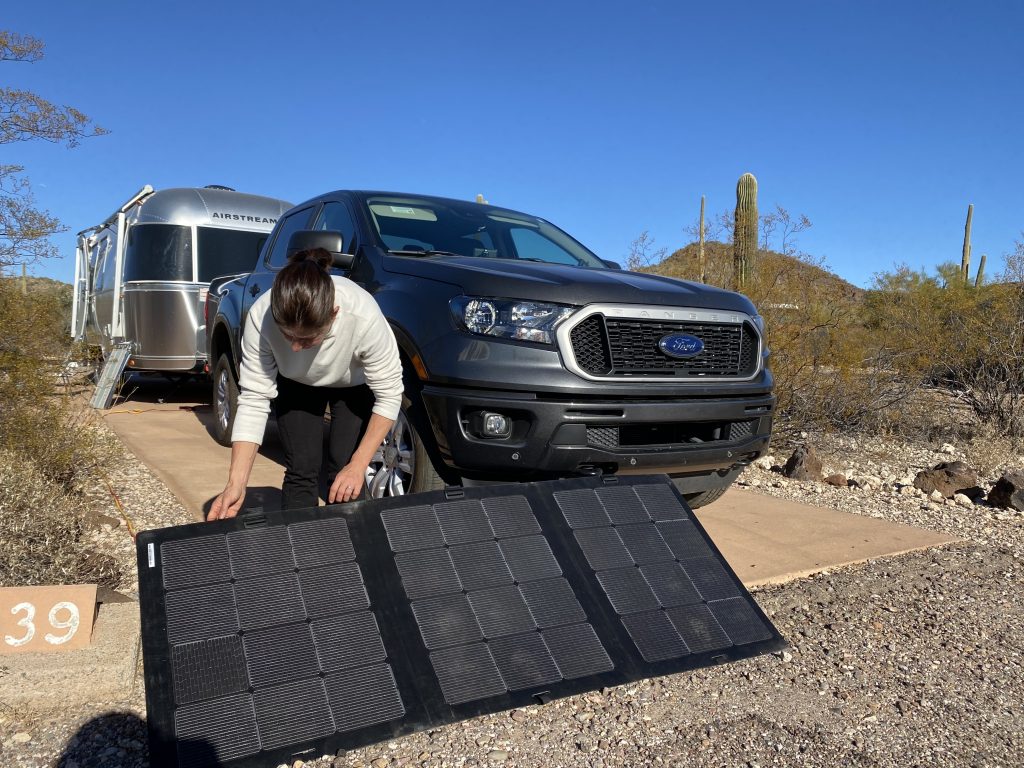
“Should I get solar or a generator?”

It depends on how you camp or travel. If you need to run things that consume a lot of power (like an air conditioner, microwave oven, hairdryer, CPAP machine, etc.) when you’re away from hookups, a generator will probably be the best choice.

But if you just want more battery power, solar has big advantages:

  1. Free energy from Mr. Sun
  2. Blissful silence
  3. Extended off-grid camping time
  4. No heavy generator or gasoline cans to carry

If you want more detail on this topic, check out this blog I wrote earlier.

“Should I get portable panels or a rooftop (permanent) installation?”

I wrote a separate blog about this topic, so if this is your question, click here.

“How do I know how much power I have?”

Sometimes people want to know how much power their panels are generating, or exactly how full their batteries are. This is entirely optional, but in this case, I recommend installing an amp-hour meter such as those made by Victron (BM-7xx series), Xantrex (Link series), Bogart Engineering (Tri-Metric), etc. These are much more useful than having a monitor on the solar panels themselves.

If you are less concerned with exact numbers, you can get by just fine with the built-in battery meter that came with your Airstream. It isn’t terribly accurate but it’s close enough for casual use.

To be honest I don’t even look at the numbers anymore. I just plug my solar panels in for the day and as long as we get a few hours of sunshine I know we’re fine for another day at least. (I could explain the math behind this, but I’m trying not to go down the rabbit hole of numbers here.)

“Do I need to upgrade the batteries?”

For most people, no. There are two cases where you should replace the batteries in your Airstream:

  1. They’re worn out and not taking a full charge anymore.
  2. You’re going to install a solar panel system larger than about 200 watts. In this case, you’d find there are a lot of days when the solar panels are producing more power than you can store, which means you’d have a lot of solar capacity that you can’t use. If you’re installing more than 200 watts you’re probably paying a fair amount to install rooftop panels, so you should talk to the RV solar specialist that is doing the work. They can help you match the battery bank to the capacity of your panels.

Bottom line: Solar is easy. Take in the free energy that the sun gives you and go enjoy your day.


If you want to check out my pick for a really simple and lightweight solar panel system, look here.

8 tools most Airstreamers should get now

You’ve got a new (or new to you) Airstream—what tools should be first on your list?

I’m going to assume you already have a sewer hose, a hitch, and other obvious things. Let’s talk about the things that you’ll learn you need through experience—without having the painful experiences.

Before I launch into my choices, a few disclaimers:

  1. This is by no means a comprehensive list. There’s probably a hundred more things that I could add. But these are some of the most useful tools and essential upgrades, in my experience.
  2. Not everything on this list is for everyone. Much depends on individual style: minimalist vs. survivalist, glamper or camper, hard-core DIY’er or “I always go to the dealer”. Think about how you travel, where you travel, and what sort of Airstream you have before you rush out to get new gear.

1. A tire changing kit

Your Airstream trailer did not come with a full set of tools needed to change a tire. (This is baffling to me. You get a spare tire, but no way to put it on.)

If you’re thinking that the tools that came with your truck will help, think again. The lug nut wrench probably won’t fit and the other tools won’t be much help when you need to change a tire on your Airstream. You need a dedicated Airstream tire changing kit.

Everybody should know how to change their own tires and carry the tools, even if you don’t actually plan to do it yourself. You may be physically unable to, but if you have the knowledge and you have the tools with you, then at least somebody else can change the tire.

The alternative is calling for roadside assistance, which might seem to be a great solution, but you’ll be sitting by the side of the road for hours, often in a place you do not want to be. Waiting to have someone come to change a tire for you is like waiting for somebody to come dress you in the morning. If you can do it yourself it is so much faster!

It’s not hard to change a tire. You can see the process in the video below, or read about it my book “The (Nearly) Complete Guide to Airstream Maintenance”—and we also include instructions in the Tire Changing Kit we sell in the Airstream Life Store.

We offer a Tire Changing Kit because it’s convenient to have one kit with all the tools in a single carry bag, but if you want to put together your own kit I’ll be just as happy.

The basics are a torque wrench (essential for correctly tightening the lug nuts when you put the wheel back on); a breaker bar (used for removing the wheel); an extension, and a correctly-sized socket. We also include a safety vest for roadside visibility, a pencil gauge to check the air pressure, and a six page instruction manual that explains exactly how to change a tire.

Tip: If you choose to buy all the parts separately, make sure you don’t skimp on the torque wrench. Cheap torque wrenches are not worth the money.

2. A cordless drill

It’s amazing how often I use my cordless drill for things other than drilling holes. On a trailer without powered stabilizer jacks, you can use a cordless drill with a socket adapter like this one, so you don’t have to kneel on your hands and knees in the mud to put your stabilizers up and down.

If you have a Hensley Arrow hitch, an 18 volt cordless drill makes quick work of tightening the strut jacks, and it’s also essential for the Hensley Hitch Helper (aka BAL Tongue Twister) if you have one of those.

I also find myself using the cordless drill to fix things around the Airstream. For example, on a recent trip the bathroom door’s hinge started to pull out of the door frame. With my cordless drill I was able to quickly drill a hole and install an additional screw to secure the hinge again—problem permanently solved in just a few minutes. Without it our trip would have been marred by a bathroom door that wouldn’t close until we got home.

3. A tool bag, with a few choice tools

I’m a big believer that it always pays to have dedicated tools for the Airstream. Not only does it save time, it ensures you always have the right tools in the Airstream on every trip. Don’t borrow tools from the garage for each trip, because you might forget them.

So start with a little tool box or (my preference) a tool bag. Make sure it will fit easily into the exterior storage compartments. Outfit it with the little tools you need most often during a trip, and the little parts that often need replacing.

Start with a few Philips screwdrivers. You can practically disassemble the complete interior of an Airstream with a single Philips screwdriver. You’ll find yourself tightening screws from time to time—they do occasionally work loose during trips. Some blue Loc-Tite will help keep screws from coming loose again or, to fix holes that have gotten too big to hold a screw you can carry a few match sticks and white glue.

Consider adding some of the following: adjustable wrench, pliers, a small “tackle box” for small parts like screws, spare fuses & fuse puller tool, teflon plumbing tape, silicone spray or Boeshield T-9, a few spare aluminum pop rivets in the correct sizes, a good quality rivet tool, sets of screw bits and drill bits for the cordless drill, utility scissors, a small microfiber towel, and some Parbond. Many of these items are in our Maintenance Essentials Kit.

I also like to have a headlamp so I can fix or examine things at night without having to hold a flashlight. A pair of disposable latex gloves can be nice for dirty jobs.

If you might get into little fixes or modifications to the 12 volt wiring system, then I’d add: electrical tape, butt splices, crimping tool, wire stripping tool, and a voltmeter.

If you have a Hensley hitch, I’d recommend a set of Allen wrenches and a grease gun (but you’ll want to keep that in the bumper compartment because it’s big and greasy).

4. A voltage monitor or (preferably) Electrical Management System

A plug-in voltmeter is really simple, and it will do a couple of very handy things. You just plug it into any outlet in your Airstream when you’re plugged into shore power, and it will tell you the voltage that you’ve got available—which is super important. It also verifies that there’s correct wiring at the campsite. It’s quite possible that the electrical pedestal at your campsite has a wiring problem, and that can actually be hazardous to your health.

There’s a reason we need to worry about the voltage coming into our trailers. We know that it’s supposed to be 120 volts, but rarely is it actually exactly 120 volts. Your appliances are going to be fine plus or minus ten percent, so from 108 to 132 volts. Exceed that, and you’re at risk of destroying certain appliances or even starting a fire.

Low voltage is by far the most common problem. An RV air conditioner typically can accept as little as 105 volts, but when you fire it up the compressor in it draws more power momentarily. So even though your voltage meter might shows 108 or 110 volts, you should keep an eye on it as the air conditioner starts up. If the voltage suddenly drops down below 105 for more than a few seconds, it is likely to burn out the motor in your air conditioner and you’ll be facing a big bill to replace the entire unit.

By the way, this can be a risk even if you’re in a fancy campground with shiny new wiring—especially on hot humid days when everybody’s pushing their AC to the max. Low voltage can still be a problem.

The best solution to this problem is an Electrical Management System (EMS, pictured at right). These devices check and monitor the power like a voltmeter but they also take action when something is wrong. If your EMS detects a problem, it will instantly cut the power to save your Airstream or appliances from damage—and it will automatically re-connect when it’s safe.

5. A rivet tool

A rivet tool is a surprisingly easy thing to learn how to use. Basically you just stick a rivet in the hole, hold it tight against the surface, pop the handle of the tool a few times, and the stem of the rivet breaks off when you’re done. It’s as easy as a screwdriver.

Don’t believe me? Check out this short video where Tothie demonstrates it.

Do you really need to travel with a rivet tool? Yes! Those little rivets on the inside of your Airstream break occasionally, especially after traveling a rough road, and there’s no need to haul your Airstream to a dealership just for that simple little repair. Just break out your handy tool and spare rivets, and you can fix the problem in seconds.

Also, someday you’ll lose a belly pan rivet, which is a more pressing problem. It happens because corrosion occurs where the aluminum belly pan and steel frame meet. The result can be a belly pan dragging on the road. If you have a rivet tool, a cordless drill, and the right sized aluminum pop rivets you can be back on the road in minutes.

It’s a no-brainer. There are 4,000-5,000 rivets in the average Airstream. You should be able to replace one of them.

6. MegaHitch lock

Storage facilities are not safe. I hear reports regularly from people who have lost their Airstreams out of supposedly secure RV storage equipped with video cameras. Once, some Airstream friends of mine found out that someone had broken into their stored trailer and thousands of dollars worth of their tools inside were all gone. Management didn’t even know—and it turned out that the videocameras were fakes.

Cheap hitch locks provide zero security. If you spend less than $100 on a lock I guarantee a thief could break it or bypass it within thirty seconds. Thieves can’t break a MegaHitch Coupler Vault PRO.

It’s not cheap, and it is heavy. But it works. If you’re keeping a $40,000-$150,000 Airstream on a storage lot, $200 is not a lot of extra money. You might also check with your insurance company. If you have proof that your trailer was locked with one of these, they may waive the deductible if it does get stolen.

7. Tire pressure monitor

A flat tire can do lot more damage to your trailer than you might think. It doesn’t just go flub-flub-flub as you come to a stop. Often you’ll have no idea that you’ve had a flat because it’s way back there on the trailer as it starts to shred. It rips up your Airstream, destroys the wheel, creates a hazard on the road, and it leaves you with a thousand dollars of damage that could’ve been prevented.

The TST tire pressure monitoring system is also not cheap, but it’s the best. I use it on every tow and it has saved my Airstream more than once.

8. A good water hose

Ultimate water hose from Airstream Life StoreYou can get drinking water hoses everywhere, and they’re usually pretty cheap—about $30. But the ones the RV industry pushes are really pretty bad. They kink, they have thin fittings that bend and leak after a year or so, and they fail regularly. Don’t even think of letting it freeze or get run over by a truck while it’s pressurized; the hose will burst. For these reasons, many people end up buying a new hose every year or so, which is not a good deal in the long run.

I could go on all day about how lame the typical “white hose” is, but instead I’ll just say this: get an Ultimate Water Hose. After years of replacing cheesy Wal-Mart and Camping World hoses, I finally decided to develop a far better one. We guarantee it for 5 years against any type of failure no matter what you do to it (other than cutting it with a knife).

Yes, it costs double what a cheap hose costs. But you won’t need to replace it for a very long time. Mine has been in heavy use since 2017 and I expect to keep using it for many years. If you want to read more about why you should ditch the ordinary water hose, read this blog entry.