How To Airstream

Hints and tips for Airstreamers from the publisher of Airstream Life magazine

  • Shop at the Airstream Life Store
  • Subscribe to the Magazine
  • Submit a “How to” Question
You are here: Home / Archives for RichLuhr

Aug 01 2020

Here’s why you really do need a torque wrench

Every Airstreamer should know how to change a tire, but many don’t.  That’s why we do tire changing demonstrations at Alumapalooza every year.

Lots of people want to learn the technique, but there is usually one point at which they start to resist the idea: they don’t want to buy a torque wrench.

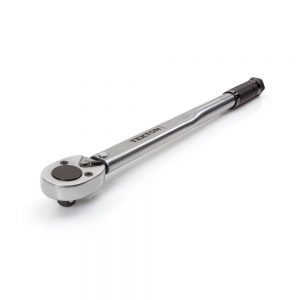
I can understand why.  A good quality torque wrench is a moderately expensive tool, and if you don’t need to work on cars regularly it will probably sit in your Tire Changing Kit most of the time.

Also, people often wonder why they need a torque wrench for their Airstream trailer wheels, when they don’t apparently need one for their car.

The reason is that the aluminum alloy wheels found on all late model Airstreams are prone to allowing lug nuts to loosen in the first 50 to 100 miles of towing.  To prevent them from completely coming loose, you need to check them with a torque wrench a couple of times, any time that the wheel is removed.

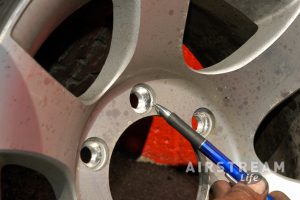
Each lug nut must be tightened to a specific tightness.  For aluminum Airstream wheels this is 110 foot-pounds (ft-lbs) of torque.  (If you use metric specifications that’s 150 Newton-meters.)  Steel wheels, which are usually the spare tires only, need 150 foot-pounds. To verify the correct torque spec for your wheels, check the Specification page in your Owner’s Manual or ask Airstream about the wheels you have.

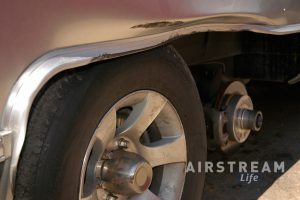
The wheel studs (the part the lug nuts thread on to) are designed to stretch a tiny amount to clamp the wheel on. This elasticity of the stud is what helps to secure the wheel on the hub. If the lug nuts are put on too tightly, the threads on the wheels studs can stretch beyond their elastic range. In the extreme, this can cause the studs to break and the wheel will come flying off.

Too loose, and the lug nuts will gradually work their way loose, which is just as bad. When a wheel comes off, the wheel is generally damaged beyond repair, and the Airstream tends to get collateral body damage that can run into the thousands of dollars.

That’s why you don’t want to guess at the proper tightness. Even if you work with cars every day, you can’t accurately estimate how tight those nuts should be.  The torque wrench is the way smart professionals verify the job is done right.

Here’s how a torque wrench works:

A few other tips: 

Before putting lug nuts on, check that the threads are clean (no dirt or grease).  Wipe any contaminants off with a paper towel or clean rag.

Don’t use any kind of lubricant (oil, grease, moly, anti-seize compound) on the studs.  Those things will make the torque reading inaccurate and you’ll end up over-tightening the nuts.

If you need a good torque wrench, we offer an excellent choice at a good price in the Airstream Life Store.

If you need a full set of tire changing tools, we have a complete kit with instructions and a carry bag.


Written by RichLuhr · Categorized: Safety and security, Tires and wheels, Tools

Jun 03 2020

How to courtesy park like a pro

Courtesy parking has to be one of the greatest benefits of being an Airstreamer. I’ve always said that an Airstream is like a passport—because just being in an Airstream opens so many doors. Many times I’ve had people ask if I could bring the Airstream to their driveway (“because they’re so cool”) and it has always been a good experience.

What’s not to like about courtesy parking? You get a free place to stay during your travels, a host who usually wants to show you around or point out great places to visit, often an interesting location (perhaps downtown, out in the quiet country, or near a tourist area), and sometimes you even get invited to dinner.

The best part is that by courtesy parking you’ll often meet great people who become friends. It’s a prime social opportunity for people who love to socialize.

But courtesy parking does come with some risks, and a wise Airstreamer will know how to assess an invitation before showing up. Here are my top tips for “pro” courtesy parkers:

Tip #1: Check out the location carefully. People who don’t own RVs will often underestimate the difficulty you might encounter getting to their home, or backing into their driveway. Don’t rely on their promises or guesses, because they may not fully understand the challenges of towing a trailer or driving a tall motorhome. Do your own research, before you commit.

I like to start by checking Google Maps to see which roads I’m going to have to take to get there. In particular I’m looking for difficult turns and possibly congested traffic areas. This helps me decide what time of day I want to arrive. Then I look closely at the satellite imagery to see if any of the neighborhood corners might be complicated by tight turning radii or parked cars on the street.

Finally, I always ask if there’s a Home Owners Association rule or local ordinance that might prohibit RVs parking in driveways or in front of the house. Sometimes people who don’t own RVs forget about such rules until you mention it.

Tip #2: Keep an eye out for overhanging trees. As you approach, remember that your Airstream trailer is nearly 10 feet tall, and your motorhome may be as much as 12 feet tall. The tree branches that don’t bother your hosts can do serious damage to your Airstream. The same goes for carports, gates, and trellises. Approach slowly, and if there’s any doubt, have your co-pilot or host stand by and watch carefully as you creep the rig forward.

This is a problem more often than you might think. Many times I’ve had to stop and ask my hosts to go fetch their tree trimmers and ladder. Nobody has ever refused to allow trimming of a few branches, although often I end up on a ladder sweating, doing it myself. (After a couple of years of active courtesy parking, I began to consider traveling with my own branch cutters.)

Tip #3: Expect obstacles, and tricky turns. People often forget that their car or truck will go places that are simply impossible for a towed vehicle. Even fellow RV’ers have invited me to places that were impossible. Neighborhoods and driveways aren’t the same as campgrounds. There’s no guarantee you can make all the turns.

I remember a case where a friend with a 22-foot travel trailer invited us to back into his driveway, which was located on a wide street in a downtown neighborhood. When I arrived at 5 p.m. on a weekday, the street was narrowed to about 1.5 lanes by parked cars on both sides of the street, and commuters were using the neighborhood as a short-cut so there was constant traffic. To make it worse, I was towing a 30-foot trailer which had a considerably larger turning radius than his trailer.

The result was a debacle: to back into the driveway we had to block the entire street, and there was still not enough turning space to get into the driveway without mowing down some flowers and toppling the mailbox. “But I never have any trouble backing in!” said my friend, who typically came home from camping on quiet Sundays. After 20 minutes of frustration, I bailed out and went to Plan B, which brings us to my next tip …

Tip #4: Have a backup plan. If things don’t go well, don’t force it. That’s how you acquire dents and scrapes on your trailer. Research campgrounds or other alternate parking situations in the area so you don’t feel obligated to get into a space you really shouldn’t.

One time while checking the satellite view I spotted a stone wall on a tight turn, which my potential hosts had neglected to mention. It was hard to get them to understand that a 30-foot trailer and tow vehicle amount to about 54 feet of length that doesn’t readily go around 110-degree bends, and that stone walls tend to destroy soft aluminum. I felt pressured to “try” to get in even though from experience I knew it would be a mistake, and I might even get stuck. Having a Plan B helps a lot, psychologically.

Tip #5: Try to arrive when your host is home. Several times I’ve been invited to show up while the homeowners are away, and it’s always a bit worrying if I haven’t been there before. There’s always something to ask about when you arrive, like:

  • how close to that gate/fence/door can I park?
  • is it OK to move that sculpture, or trim that tree?
  • can I run my hose around to the back yard to connect to water?
  • why doesn’t the power outlet have any juice? (usually, it’s because the GFI has tripped)
  • why is your neighbor staring at me?

Tip #6: Be ready to level up. Sometimes driveways have steep slopes, and the only to make it work is with a lot of leveling blocks. Check out the picture above. The hitch jack was fully extended and we still had to stack up 10″ of wood blocks.

This happens often in suburban situations, and sometimes there’s nothing to do about it except park elsewhere. If you can get enough blocks to get approximately level, be ready for a wobbly night because even with the stabilizers down the Airstream is likely to feel less stable than usual.

Tip #7: Don’t expect anything from your host other than a little free parking. Courtesy parking is a favor granted to you by your host. They might offer power or water, use of the pool, advice on places to go, or even dinner in the house, but they’re not obligated to do anything. Try to be a good guest by expecting nothing, staying out of the house and yard unless specifically invited, not overstaying your welcome, and showing appropriate gratitude. (Bringing a small gift is always a nice touch, or a thank-you card.)

You’d think this piece of advice is obvious, but lots of people “accidentally” overstay their welcome. If you are suffering a mechanical breakdown that requires a few days to get repaired, or your fridge is empty, remember that’s not your host’s problem. They didn’t adopt you, and they have their own lives to live.

I have been the victim of courtesy-parking guests who were supposed to stay a few days but then decided they were comfortable and didn’t want to pay for a campground nearby. Next thing I knew, the offer of dinner and a free parking spot turned into semi-permanent houseguests who expected daily breakfast and dinner in the house. Needless to say, they were encouraged to move on, and haven’t been invited back since. Don’t force your host to tell you it’s time to go–leave while they’ll still miss you.

Tip #8: Hone your boondocking skills. Like I said, you might not get water or electricity in your overnight courtesy parking spot. (It’s a good idea to travel with 50 or 100-feet of extension cord so you can try to reach a power outlet in the garage, and at least keep the batteries charged.) Show up with full water and batteries so you can live independently if you need to, and be prepared to conserve water and power.

Having said that, it’s a rare courtesy parking spot that has absolutely no prospect for at least a water refill (again, bringing 50-feet of hose is a great idea—don’t rely on your host’s garden hose because it’s not suitable for drinking water). Check with your host beforehand and see what options you have. If they have an RV hookup on site, be sure to thank them profusely, and offer to chip in for electricity if you’re running your air conditioning. After all, they’re saving you $30-50 per night, and probably giving you a chance to experience the local area through their eyes, which is invaluable.

Written by RichLuhr · Categorized: Lifestyle and travel · Tagged: courtesy, driveway, free

Jun 01 2020

Best and worst places to store your Airstream

Airstreams don’t like being lonely. They’re gregarious and fun-loving.

That’s why you need to store them in the right place between trips. Left alone, all kinds of bad things can happen. A small leak from rain or melting snow can seep in and do a lot of damage. Squirrels and mice can find their way in, and wreak havoc on the insulation (and anything else chewable by rodent teeth). Spiders can clog up the water heater burner. Thieves and vandals can break in.

So what’s the best choice for storing your Airstream?

#1: At home, in a carport or pole barn

No question, the best place to have your Airstream is where you can keep an eye on it and use it between trips. It’s not just a recreational vehicle, it’s potentially:

  • a guest apartment
  • a quarantine facility
  • a place to refrigerate your Thanksgiving leftovers
  • an office or creative space
  • an awesome place for a nap (or a little canoodling)
  • a bug-out vehicle in the event of a natural disaster

With the Airstream at home, you can keep it charged and ready for the next adventure at all times. You don’t even have to turn off the refrigerator if you have solar panels (or a plug) and propane in the tanks. And it’s a lot less likely to suffer damage when you keep using it between trips, compared to being out of sight and neglected at a storage facility.

If you store the Airstream inside a closed barn with a gravel floor, be sure that the floor has a vapor barrier (plastic sheeting under the gravel). Otherwise a lot of moisture from the ground will accumulate over the winter and rapidly accelerate corrosion. Any indoor environment needs to be dry and/or have great ventilation.

#2: At home, in the driveway

This is also a great choice, with only the disadvantage being that the Airstream is exposed to the elements. It’s a huge benefit to have a roof over the Airstream. That extends the life of your Airstream significantly—by keeping rain, snow, and UV light from the sun from gradually breaking down the sealants and plastics on the roof and appliances, and keeping the interior cooler in summer.

Driveway storage is great but eventually it would be best to put up some sort of shade structure or shed roof to keep the worst of the weather off the Airstream.

#3: At home, out in the field somewhere

I’m not a fan of keeping an Airstream in a grassy field, but if that’s what it takes to keep it close, it’s still better than a remote storage lot. The problem with storing the Airstream on grass is that it’s easy to let the weeds grow up, and that encourages critters, spiders, and snakes to check it out.

The belly pan on an Airstream is not fully sealed. It’s “mostly sealed” to protect the underbody and insulation from damage, but there are gaps big enough for a mouse to get in. Mice can get in the most incredibly tight spots, and the solution is not to seal up the belly pan so tight that you could camp on the Pacific Ocean—it needs to “breathe” so that moisture can get out.

A better preventative measure is to mow down those weeds, or better yet, put in a gravel pad. Maintain a “sterile” area around the Airstream for at least a couple of feet. There’s always going to be a risk of an unwanted visitor, but at least you won’t be rolling out a red carpet for all of Mother Earth’s creatures.

In any case, be sure to secure your Airstream trailer with a good coupler lock. It’s amazing how quickly thieves can remove cheap coupler locks and zip off with your Airstream.

#4: In a secure, covered, storage facility

Off-site storage is a reality for most of us. It’s rarely truly “secure” and often inconvenient, but I’d personally look for indications of good security anyway. I like storage lots with high walls so that the RVs aren’t on tempting display, video cameras that actually work, and a decent neighborhood around them.

I’d choose a more expensive storage lot in a good area far away, over a cheaper/scarier one that’s close to my house. I like my Airstream too much. But to each their own.

If you’re paying for a storage lot, strongly consider upgrading to covered storage. Like I said before, putting a roof over your Airstream pays off in the long run. A tiny drip from slow-melting snow can turn into a major, major repair of floor rot in a single winter.

#5: In an open lot, away from home

Now we’re getting down to the least palatable choices. Storing in an open lot away from your home is approaching an act of desperation. Maybe you have no other place to keep your Airstream, but without at least a good fence and some active security (night watch) you’re really rolling the dice.

Even RV dealerships sometimes have thieves come through at night. They like to break in quickly, steal the TV and other electronics, and flee. Sure, you’ll still have an Airstream in the end, but there’s going to be hassle involved in filing the insurance claim and getting the repairs done, and possibly some personal trauma and permanent scars to the Airstream.

#6: Near a body of salt water, or on damp ground

If you live near the ocean or perhaps Great Salt Lake, make sure your Airstream is stored far away. The “salt breeze” is seriously detrimental to your Airstream. It will cause fast-moving filiform corrosion (those white “spider webs” that afflict the edges of the aluminum skin, taillights, wheels, and other coated aluminum parts), and nothing will stop it except getting away from the salt and humidity.

Damp ground can be almost as bad. Florida is famous for this. I’ve seen lots of Florida trailers with completely rusted out frames underneath, just from a few years of sitting on neatly mown grass. There’s a lot of moisture rising from the soil all the time, even if you can’t feel it or see it.

#7: Under a tarp

Well, don’t do that. The only Airstream I’d cover with a tarp is a project trailer that has open holes in the roof—and not for long.

The problems with tarps are multiple:

  • they trap moisture
  • they flap in the breeze and create rub marks
  • they leak

They’re kind of the worst of all worlds, trapping moisture beneath while allowing leaks, and damaging the Airstream at the same time. Plus they’re ugly. Tarps are for temporary fixes and emergencies, but they’re not for long-term storage.

If you’ve got a tip regarding storage, share with us using the Comments box below.

Written by RichLuhr · Categorized: Safety and security · Tagged: storage

Jan 16 2019

What’s wrong with campground power?

If you take one message away from this posting, it should be this: Don’t trust campground power.

I’ve camped at literally hundreds of campground across North America, and I’ve frequently been amazed how often the electrical service is poor or even dangerous. The most frequent problem is low voltage, where the normal 120 volt or 240 volt service sags because everyone is using their air conditioner at the same time.

The electrical devices in your Airstream are designed for normal voltage plus or minus 10 percent. That means anywhere from 108 volts to 132 volts is tolerated by the refrigerator, air conditioner, microwave, and power converter. (The power converter changes the 120 volt AC power into 12 volt DC power to charge the battery and support all the other 12 volt accessories like furnace, water pump and lights, so it’s particularly important that it is happy.)

But in reality, a hot day in a campground can mean brief “brown outs” where the power dips below 105 volts—and that is bad news indeed. If your air conditioner tries to start up under those conditions it will probably burn out, and that’s a $1000+ replacement. (Plus you’ll have to suffer in the heat until you can get a repair!)

We have a Digital Voltage Meter in the Airstream Life Store, and I recommend that everyone carry one at a minimum so you can test the power before you plug in your Airstream. It checks the voltage and the wiring to make sure you aren’t plugging into bad power. It’s cheap insurance and will protect you from things like mis-wired outlets, bad grounds, and incorrect polarity.

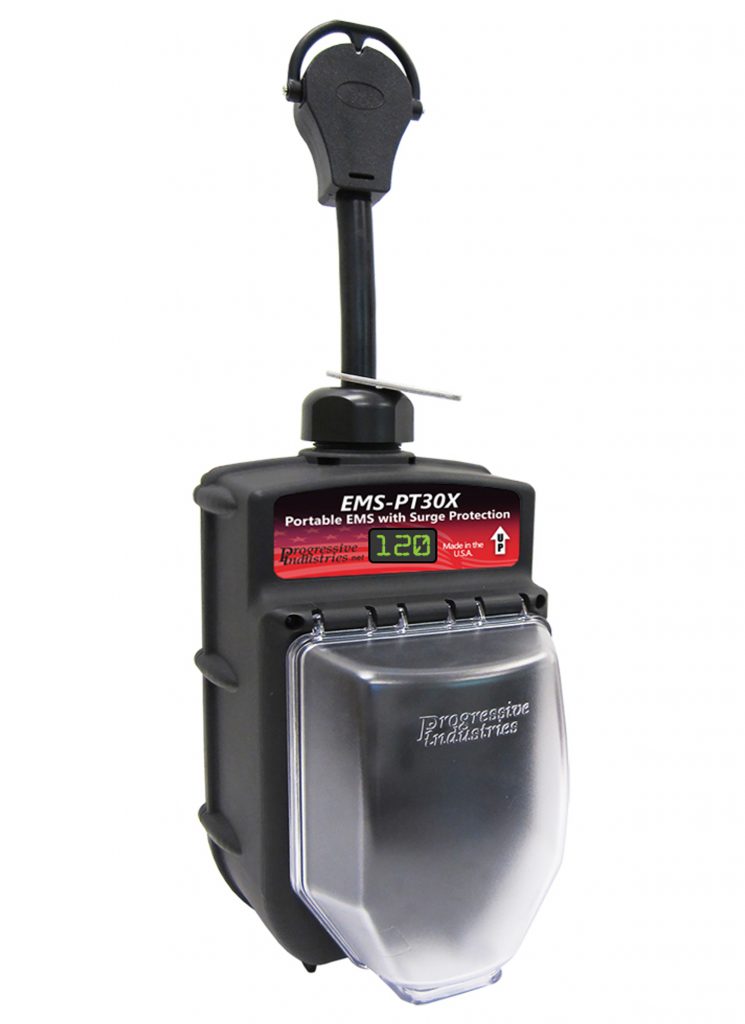
But the limitation of a meter is that it can’t help you if there’s a power surge or dip when you’re not watching. The best solution is  a smart Electrical Management System (EMS). Like the Voltage Meter, the EMS checks the wiring before allowing power to flow to your Airstream. Then it continuously monitors for dangerous conditions like high or low voltage.

An EMS like that will shut off the power instantly (in milliseconds) if something bad is happening, and then turn the power back on when conditions are safe again. It’s a brilliant solution.

Take a few tips next time you go camping:  When you get to your campsite, inspect the power pedestal before you plug in. Look for cracked or broken outlets, wasp nests (I’ve been stung more than once when opening a pedestal cover), or looseness. If the outlet seems questionable, don’t plug in without first using a Digital Voltage Meter or EMS.  You should see about 120 volts, and there should be no indications of mis-wiring.

If the voltage is below 115, be wary. That means the wiring you share with many other campers is already a little stressed, and it’s likely to go lower once you plug in. If you need to use an extension cord, that’s another concern because longer cord runs mean lower voltage. And don’t ever try to run the air conditioner while the Airstream is connected to a 15-amp household plug. It might work for a while but sooner or later the voltage will drop or one of the plugs may melt.

If the campground power voltage is a little low to start and you know the weather is going to get hot later you can probably expect that the voltage will continue to drop, perhaps to dangerous levels. This is the ideal situation to be using a good EMS, because it takes only a few seconds of low power to cause expensive problems in the Airstream. It’s much better to have the power cut off automatically by the EMS (and later restored automatically) than to blow up your AC appliances. The same is true of voltage spikes.

There are a couple of brands of EMS units on the market today. Most outlets sell a Surge Guard unit but I’m not a big fan of that one. Reliability seems to be an issue and the overall quality is (in my opinion) lower. For a decade now I’ve been using Progressive EMS units and they’ve been great, so that’s the only brand we carry in the Airstream Life Store.

Progressive also stands behind their product. I had one fail because I left it out in a Florida rainstorm with the plugs facing up, and they filled with water. Progressive honored the lifetime warranty anyway and replaced it for free. The current models come with a nice rain shield now, so even that problem is unlikely to occur.

Whatever solution you choose (Digital Volt Meter, Electrical Management System), be sure to pay attention to the power everywhere you plug in, including when you’re “driveway camping” at home or a friend’s house. A few seconds of attention can save you an expensive repair later!

Written by RichLuhr · Categorized: Electrical, Product Review

Oct 05 2018

What’s boondocking and what do I need to do it?

Every modern Airstream is pretty well set up for living off the grid, for a day or two. But if you want to get away from crowded campgrounds and park somewhere without hookups for more than a weekend—in other words, boondocking—you’ll want to start upgrading your Airstream and your camping practices a bit.

There are three major limitations to your boondocking experience: water, power and propane. (Other considerations are things like food and sewer capacity, but you’ll probably run out of water or power first.)

The best and least-expensive way to extend your boondocking time is to learn how to conserve.  Learn the “navy shower” technique, do less dishwashing or learn to wash very efficiently or use paper plates, replace all lights with LEDs (if they aren’t already), set the furnace temperature lower and sleep with an extra blanket or dog, etc. Conservation takes a little effort and a little practice, but it pays off immediately.

When using the 12 volt batteries you won’t be able to run the air conditioner or microwave, so the remaining big energy consumers are the furnace, water pump, and laptops. Airstream batteries are typically sized with just enough capacity for an overnight or a weekend (if you aren’t running the furnace a lot) because most people don’t use the trailer away from shore power for longer than a night or two.

Once the batteries run out of juice, everything in the trailer goes off: refrigerator (even when running on propane), heat, light, water pressure … even the hitch jack won’t go up or down anymore. So power conservation is important.

To reduce the drain caused by laptops, try using a tablet or your phone instead. An iPad requires about 10-20% of the power of a laptop and can charge quickly from a cigarette lighter plug, instead of requiring an inefficient inverter.  (You can pick up USB cigarette lighter adapters easily if you have an older trailer without USB outlets.) Shorter showers and limited dish washing will also cut power consumption by the water pump.

Carrying a portable solar panel can be very helpful if you like to camp where trees shade the Airstream.  With a solar panel kit and an extension cable you can put the panels in a spot where the sun hits them. Solar isn’t a perfect solution, but it’s silent, free to operate, eco-friendly, and you don’t have to carry gas. With summertime sun, a pair of solar panels can extend your boondocking time by days.

If you find the two batteries supplied with the Airstream aren’t enough, consider going to larger batteries. This will require some custom work, but you’ll get a lot of value out of it.


In hot weather, try to spend the day out of the Airstream.  This cuts down the length of time you’ll need the vent fans.  Each vent fan consumes about 2 DC amps, which means three of them running for six hours = 36 amp-hours.  That’s a lot of juice, which is put to better use after sunset when the temperatures start to drop.

In the winter, furnace use is the problem. The furnace eats a lot of power (7-10 amps when running) and it’s fairly wasteful of propane too. A catalytic heater is helpful, since it doesn’t use electricity at all, and is much more efficient at turning propane into heat.

Propane isn’t much of a limitation in the summertime, since a pair of 30-lb. tanks will run the refrigerator and water heater for weeks. But in late fall and winter you’ll want to travel with both propane cylinders as full as possible. You can easily find yourself spending an unexpected night along the road with only your propane supply to keep you warm. With freezing nights a tank of propane can be used up in just a few days.

If you are going to be off grid for a while, get a portable tank to carry fresh water. Serious boondockers will find a place in town or nearby to refill their jerry can or water bottles, and bring a little fresh water back to camp after every excursion. Mark the tank “FRESH WATER ONLY”.

After a few days of boondocking it’s nice to hit a full hookup campground for a night just to get everything back in ship-shape.  The Airstream will inevitably be full of dirt and gravel tracked in from the campsite, and you might be a bit less fresh than you’d like to be (due to careful conservation of water). Plus there may be various electronic devices that you postponed charging, or the laundry basket might be full, and it will probably be time to get some groceries and dump the tanks if there wasn’t a place to do it before.

We find that having a “recovery” day in a full hookup campground is something we enjoy, with long showers and a chance to get everything ship-shape before heading out for more adventure (or home).

Written by RichLuhr · Categorized: Lifestyle and travel, Solar power, Water and sewer · Tagged: boondocking, dry camping, Off-Grid

  • « Previous Page
  • 1
  • …
  • 5
  • 6
  • 7
  • 8
  • 9
  • …
  • 19
  • Next Page »

Recent Posts

  • 7 tips for hot summertime travel
  • Spare parts for Airstream road trips: 21 tips
  • What size Airstream trailer?
  • A quick guide to maintaining your Airstream’s exterior
  • Tire pressure monitoring de-mystified

Categories

  • Boondocking (3)
  • Cleaning and exterior (12)
  • Electrical (25)
    • Generator (2)
    • Solar power (7)
  • Furniture and interior (2)
  • General (3)
  • Kitchen and cooking (1)
  • Lifestyle and travel (16)
  • Mobile work and technology (9)
  • Product Review (6)
  • Renovations (1)
  • Safety and security (9)
  • Tires and wheels (10)
  • Tools (10)
  • Towing (4)
  • Travel tips (6)
  • Water and sewer (9)

©2004–2020 Church Street Publishing, Inc. “Airstream” used with permission