7 tips for hot summertime travel

It’s May, and we’re gearing up for summer travel—and that means gearing up for heat.

Perhaps heat is on my mind because we’re in Arizona right now and the temperatures are already hitting the nineties every day. With an Airstream it’s usually easy to get out of the heat—after all, we have wheels—but there are times when it’s inescapable for a few days, like when we are crossing the Great Plains states. Many times I’ve been crossing Kansas or Oklahoma or Missouri and been nearly steamed to death in what the meteorologists call “oppressive humidity.”

So even if you plan to drive away from the heat, you need strategies ready in case the heat follows you. Here are a few of the things I’ve learned over the years:

1. Air conditioning is miraculous—but not magical

First off, if you have delicate pets or humans traveling with you, don’t mess around: get a campground with 30-amp or 50-amp power and plug in. This may necessitate a change in plans and you might end up somewhere you don’t want to be, but the blessing of cool air blowing in from the A/C will make it all worthwhile.

I find that a lot people are surprised to discover the limitations of a single air conditioner on a 30-amp plug. If you’ve got a newer Airstream with dual air conditioners (and a 50-amp plug) you can deal with just about any level of heat. But a single A/C definitely has limits. The A/C will generally cool the incoming air by about 20 degrees, but that doesn’t mean your trailer will be 20 degrees cooler, especially if it’s sitting in the sun. That means on a 105-degree day, the trailer interior might be well into the upper 80s until after dark.

So it’s useful to park in shaded campsites, preferably not in asphalt parking lots (green surroundings = cooler air), and be realistic in your expectations. If the trailer is over 100 degrees inside when you arrive, it’s going to take a while before the air conditioner can remove all the latent heat that is stored in every object in the interior.

To cope, try to spend the few couple of hours somewhere else (like a restaurant or visitor center) while the air conditioner does its job. Don’t even dream of using the stove or oven—the burners can output much more heat than the air conditioner can remove. If you have a microwave use it instead, or go out for dinner, or cook outside, or eat a cold dinner.

2. Boondocking requires special skills

Not many people will choose to spend a night in extreme heat or humidity without air conditioning, but someday you may find yourself in an unexpected situation where you must. (Maybe a breakdown in a remote area, a power outage in the campground, or failure of the air conditioner, as examples.)

In this case, the keys to surviving a night in the heat are water and electricity:

Water, because you need to stay hydrated and a quick cool shower will go a long way toward keeping your body comfortable. In desert boondocking situations you can even soak towels and place them strategically around the trailer for evaporative cooling. I’ve always brought a few gallons of extra drinking water when heading into a boondocking site in the summer.

Electricity, because you’ll use a lot more battery power than usual with the vent fans running constantly. A single Fantastic Vent (the kind installed as original equipment in most Airstreams) might draw about an amp of power, which isn’t much for short durations. But with two of those fans running around the clock for a weekend, you’re looking at something in the region of 90 amp-hours, which is going to overwhelm the typical 2-battery setup in an Airstream trailer. You’ll need to plug in, or have an auxiliary source of power: solar panels, generator and/or a much larger set of batteries.

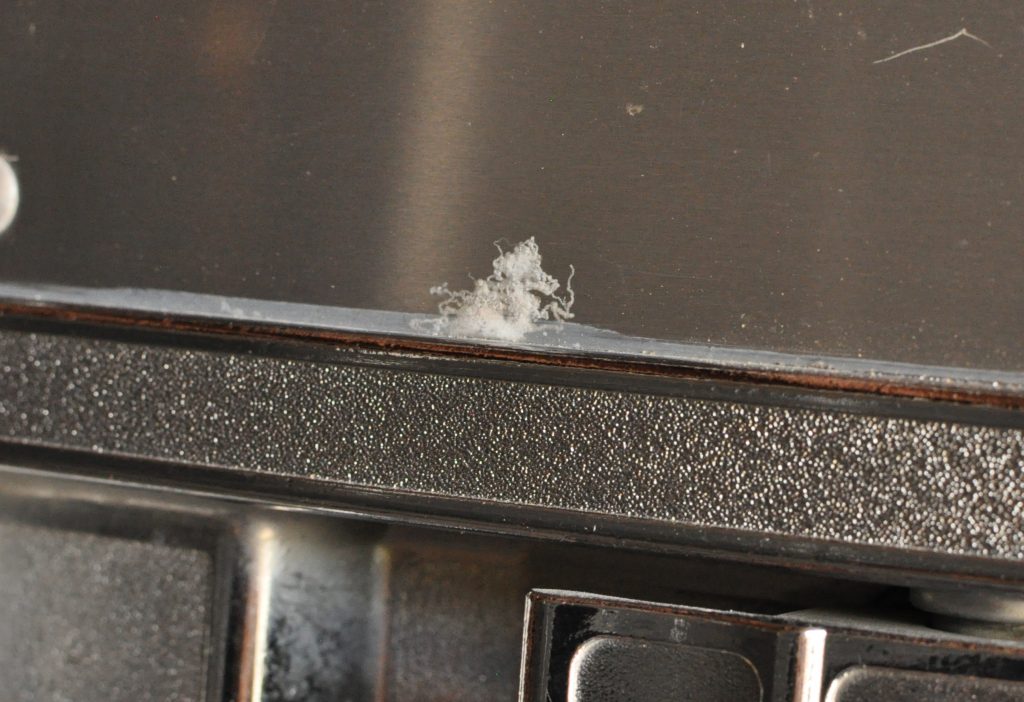
3. Beware the melted power plug!

If you’re plugged in, be aware that heavy use of air conditioning can result in a melted power cord, which can be disastrous. This is caused by corrosion building up on the prongs of the plug. Corrosion makes the brass prongs of the power cord look dark brown or black. If you see this, clean it off before you use your power cord again. (We sell a kit in the Airstream Life Store specifically to prevent this.) Failure to do so will cause the prongs to heat up and melt the plug. Not only will that end your air conditioning, it can damage your Airstream or even start a fire.

4. Use the awnings and a Solar Shade

The Zip Dee awning that came with your Airstream trailer (or the equivalent awning on a Nest, Basecamp, Interstate, or Atlas) can make a big difference if it’s on the south or west side when you park. Definitely deploy the awning as much as you can to shade that side of the rig. If you’ve got window awnings, use those too as needed to cut the direct sun.) You should try to stop the sun from shining on the sides of the Airstream as much as possible.

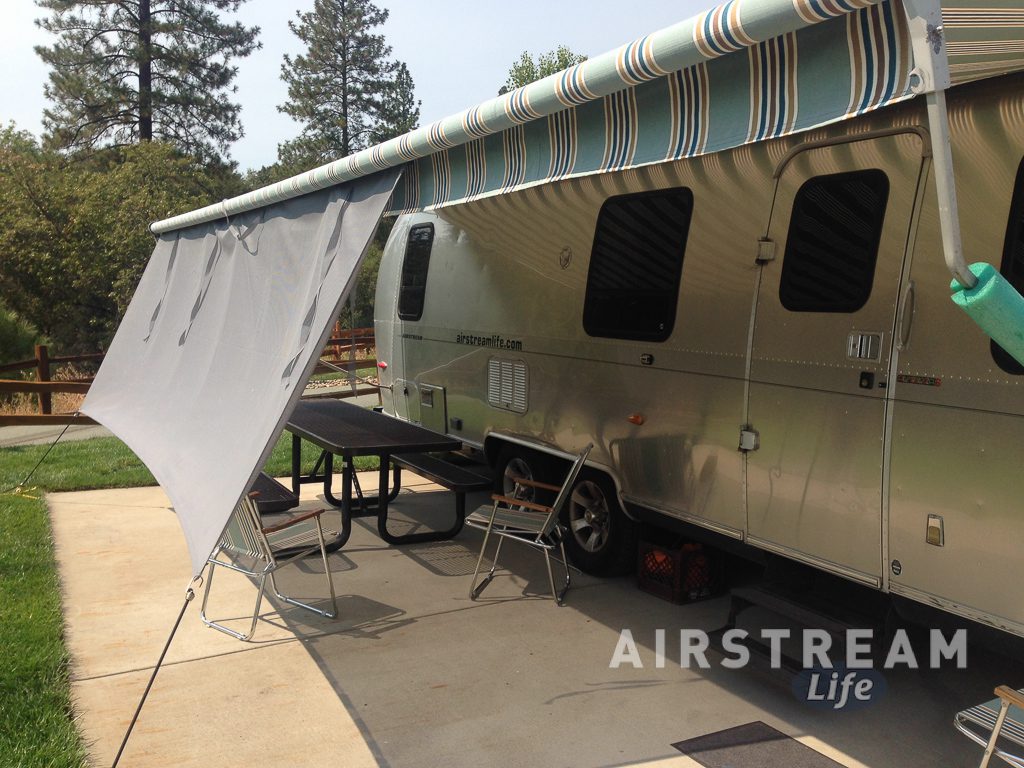
A Zip Dee Solar Shade is a huge help too, when the sun is beating down on that side of the trailer, especially when the entry door is facing west.  The Solar Shade broadens the shady patch in the afternoon, when it really matters, and gives you a nice outdoor space that you otherwise wouldn’t enjoy on a hot day.

In an Interstate motorhome, you may find that the Mercedes dashboard air conditioning isn’t quite enough when traveling on the highway on a 100+ degree day, especially for any back-seat passengers. Sometimes you need to fire up the onboard generator so that you can run the roof air conditioner as you go. It might seem weird but it’s OK to do this.

5. Make sure your water hose can handle the heat

When you’re parked, you will probably discover that you don’t need to turn on the water heater. Often the fresh water hose lying in the sun, combined with warm water in the tank, will be plenty warm for showers. But there’s a downside to this: most drinking water hoses are not rated for “hot water” use. Cheap-o hoses made of vinyl or other plastics may leach chemicals when laying in the sun all day filled with hot water. That’s why we switched to drinking water hoses that are rated for hot water use.

6. Monitor the fridge and freezer

Keep an eye on your refrigerator as well. Often, RV refrigerators don’t have great ventilation and so heat can build up in the refrigerator compartment (the space behind the refrigerator). When the air temperature around the refrigerator’s cooling fins approaches 100 degrees—which is very common in the enclosed compartment, even when the outside temp is much lower— the result is warm food in the refrigerator.

To combat this, keep the fridge door closed, and if you need to get something be sure to get it quickly. It’s not like your home refrigerator that has a big compressor and can recover its coolness in a few minutes. Each time you open that door it can take hours to recover fully on a hot day.

If your refrigerator has a manually activated cooling fan, switch it on whenever the temperatures exceed 90. Some refrigerators have automatic cooling fans, others don’t have fans at all. If yours lacks a fan, consider having a set of electric fans installed in the chimney of the refrigerator compartment. These things are amazingly effective at moving hot air out away and helping the refrigerator cool down.

Also, get a wireless temperature monitor so you can check the interior temp without opening the door. You can get two of them and monitor the freezer as well, but I’ll tell you right now that if the fridge starts to climb above 50 degrees, whatever is on the door of the freezer will probably start to defrost. (Pack your ice cream and seafood in the back.) These wireless monitors are available from many sources and they’re not expensive.

7. Keep an eye on tire condition and temperature

As you travel on hot days you need to be extra aware of the condition of your tires. They are much more susceptible to problems and wear on hot days. When the air is 95 degrees Fahrenheit, the highway surface can easily be 120+, and the air inside the tires will often exceed 140 degrees at highway speeds. That’s brutal on tires and it shortens their life.

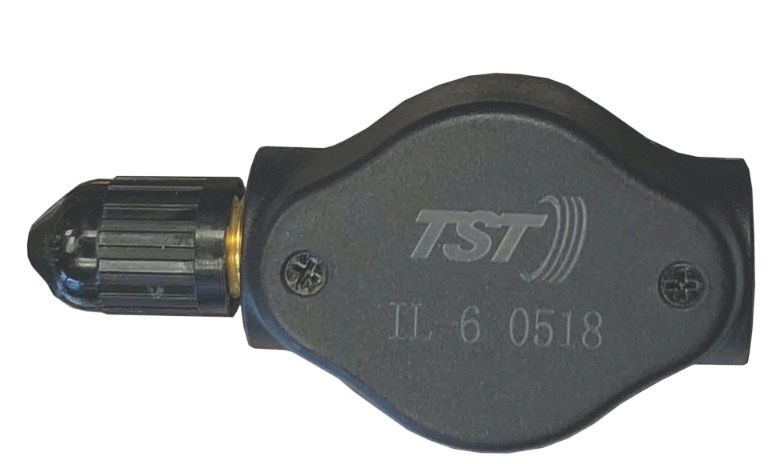
This is just one of several reasons I strongly recommend a good tire pressure/temperature monitoring system. Blowouts and other failures are far more likely on hot days, and you want to know right away if something goes wrong before it does additional damage. If you don’t have a tire pressure monitoring system you should make a habit of visually inspecting all the tires at every stop, checking the temperature with an infrared sensor, and checking air pressure frequently.

Spare parts for Airstream road trips: 21 tips

Back in February, we shot a video about the tools we carry on long trips, and exactly why they’re essential. (You can read the blog and see the video here.)

This week we’re following up with a discussion of the spare parts, tapes, and lubricants that we also bring on every trip. In the course of shooting this 23-minute video we came up with 21 separate tips for you, so it’s probably worth your while to watch the whole thing.

If you prefer to read the Cliff’s Notes version, here’s the summary of the tips:

  1. Choose spare parts based on your travel style & abilities
  2. Carry spares of cheap consumables like grease
  3. Bring spares that are hard to obtain on the road
  4. Tapes: Teflon, butyl, electrical, silicone, masking, body
  5. Threadlocker: great for screws that keep backing out
  6. Consider bringing spares of “dumb but essential” parts
  7. Light, small, handy items like zip ties and storage bags
  8. Gloves! Mechanics and vinyl
  9. Spare propane hoses and tools needed to change them
  10. Lubricants: silicone spray, Boeshield T9, grease, etc
  11. Little items: drain plug, fuses, latches, rivets
  12. Hensley owners: get the spare parts kit
  13. If you might replace the drain plug: 15/16″ socket
  14. Your Fantastic Vent and power hitch jack may need a glass fuse!
  15. Extra #8 wood screws for furniture
  16. Replacement refrigerator bulb
  17. “Travel size” containers of glue, lube, cleaner, etc
  18. De-Oxit and burnishing tool for electrical connections
  19. Organize your supplies into kits
  20. Pre-made kits available in the Airstream Life Store
  21. “Free-flowing” Y connector for big rallies

What size Airstream trailer?

One of the biggest decisions a new Airstream trailer buyer has to make is the length.

Short trailers are cute, easy to tow, fit into more campsites, can be towed by a wider range of vehicles, and cost less.

Long trailers are roomier, can carry more stuff (including kids and pets), and tend to offer the most luxurious options.

So how do you decide?

First off, for this discussion let’s assume you’re looking at only new Airstreams. If you’re budget-constrained, you might be able to find a 5-10 year old Airstream at a significant discount, which means you can afford a bigger trailer for the same money. But these days the used market is pretty hot and it’s hard to find a gently-used and relatively young Airstream at a good price.

New Airstreams are in short supply too, thanks to the rush of RV buying that started in April 2020. Airstream is still struggling to keep up with orders and you’re likely to have to wait months to get the Airstream you want. The good news is that this gives you time to think carefully about which model and length will suit you best.

Budget

In the new market as of this writing, Airstreams start at about $40k and top out around $177k for the top-of-the-line Classic 33FB. The Interstate and Atlas motorhomes are more. (All of these prices are before any negotiated discount from the dealer. I wouldn’t count on much discounting right now.)

Price may be the dominant factor that determines your choice. Remember, all Airstreams have the same essentials: bed, kitchen, bath, heat, air conditioning, door, windows. A small trailer has just about everything a big one has, except space. So your first decision should be how much you’re willing to spend. More money means more space and the opportunity to add in some luxe options. For a quick price comparison, check Airstream’s official site.

Even the least expensive Airstream, the Basecamp, comes in two lengths, so you always have some decision to make about size.

Tow vehicles

Another major consideration is your tow vehicle. If you like big trucks you can tow any Airstream. If you want to tow with something smaller you’ll have to look to the smaller, lighter end of the trailer spectrum. If your tow vehicle is limited to a 5,000 pound tow rating you’ll be limited to Basecamp, and Bambi or Caravel from 16 to 22 feet long.

Where will you camp?

Assuming you’ve still got room to consider longer models, you should next consider your “camping style”. (If you’re going to be a first-time buyer you may not be sure about it, but give it a shot anyway.) Ask yourself what sort of camping or traveling appeals to you most, and the kind of places you would like to go. The goal here is to figure out if you’re going to need a nimble trailer—or if you value interior space more.

Many state parks and some national parks have length restrictions, so sticking with something 25 feet or shorter opens up more options in those places. National Forest sites are often even shorter or have access roads that limit trailers to 20 feet or less.

If you enjoy backroads or boondocking, shorter is generally easier. A longer trailer is more likely to bottom out on uneven surfaces. The “X” variation of the Basecamp 16 and Basecamp 20 has more ground clearance, so those trailers are great options. Lift kits that increase ground clearance by 2-5/8″ can be purchased for other Airstream trailers if towing off-road is your jam. (They’re also pretty useful for steep driveway entrances and other spots where the tail end might drag.) Keep in mind that a lift kit will require you to make adjustments to your hitch ball height.

If you are always going to seek out full-hookup campgrounds like RV resorts, you don’t need to worry about this consideration. Nearly all RV parks can handle any length of Airstream.

Gear hauling

You might be surprised to learn that the biggest trailers aren’t always the best for carrying large gear like bicycles and kayaks. The 27-foot Tommy Bahama with rear hatch (previously sold as the Eddie Bauer and Pendleton 27FB) was the sweet spot for gear like that. That trailer was dropped for 2021 but you can still find the rear hatch as an option on the 25FB and 27FB Flying Cloud and International models—and the Basecamp, which is a very decent option even though it only comes in 16 and 20-foot lengths.

Back in 2006, there was also an enormous 34-foot Airstream “toy hauler” called the PanAmerica, which would even carry motorcycles. They’re hard to find now because they were produced in low numbers.

Otherwise, your best option for large items is a rack on a pickup truck. We talked about options for carrying bicycles in an earlier post. The good part about going this route is that it doesn’t matter what size trailer you have.

Longer trailers also tend to have more and larger exterior storage compartments. If this is important to you, consider the option of Twin beds. Twin bed floorplans often have more exterior storage than Queen bed floorplans of equivalent size.

Capacities

Bigger trailers generally have bigger fresh water tanks and bigger waste holding tanks. This means you can boondock for longer times, or be a bit less thrifty with water. A 2021 Bambi 19CB has a 23-gallon fresh water tank and a “combo” black/gray tank that holds 30 gallons of wastewater. It’s pretty good for a weekend of boondocking.

At the other end, the Classic 33FB holds a whopping 54 gallons of fresh water, 37 gallons of gray water (from the shower and sink) and 39 gallons of black water. That’s lot of you-know-what.

Interestingly, going to a larger trailer doesn’t always translate to more electrical capacity. All of the trailers have approximately the same battery storage. People with longer trailers are at a slight disadvantage in this regard because their trailers have more lights, more power-hungry furnaces, and more powered accessories. If you’re a frequent boondocker, you’ll probably want to look into adding battery capacity, switching to Lithium batteries (which have more usable capacity) and/or solar panels, regardless of the size of your trailer.

Similarly, most Airstreams come with a pair of 30-pound propane tanks, probably because that’s plenty for most people who don’t camp in the winter routinely. The largest Airstreams get an upgrade to 40-pound propane tanks because their furnaces are bigger.

Niceties

Even the most basic Airstream is a pretty nice place to spend the night. But maybe you’re a fan of really nice surroundings and fancy amenities like a heated towel bar, solid-surface countertops, a large screen TV that tucks itself away, and all kinds of powered gizmos (adjustable bed, stabilizer jacks, awning, window shades). You can get all of these things in the more upscale trailers, and that generally means the longer trailers because they can afford the weight penalty.

The “entry level” for some of these perks is the Globetrotter 23FB, which retails at $99k, and goes up rapidly from there. (Super-luxe ain’t cheap.) If you like these niceties and your budget can handle it, you’ll be looking at the 23 to 33-foot trailers.

Style

Some people just like small and cozy, while others like big and roomy. Honestly, this preference tends to trump all other logic. I’ve seen two people and two dogs cram into a 16-foot Airstream for a three-month tour because they preferred to live small. I’ve seen single guys tow a 34-footer because they wanted to have room for lots of toys.

If you have one of the smallest Airstreams, get ready for a lot of “that’s so cute!” comments. If you have a magnificent big one, you’ll hear “your Airstream is beautiful!” Either way, it’s going to get a lot of attention as you travel—and either way, you’re going to love it.

A quick guide to maintaining your Airstream’s exterior

Now that you have that lovely jewel box made of aluminum, you’re probably wondering how to keep it looking awesome. We’ve got you covered on that: we recently held a maintenance webinar and answered the Most Commonly Asked Questions about Airstream exterior cleaning and maintenance.

What’s the best product to clean and protect my Airstream’s aluminum?

If you’ve got an aluminum Airstream made in the last four decades, it has a protective clearcoat covering the aluminum. This clearcoat is like paint, and you can take care of it the same way you care for your car. Any good car wash will do.

If you wash the Airstream a lot, tiny scratches can form in the clearcoat from harsh scrubbing or grit. Whether you use soft bristled brushes, microfiber mitts, or sponges, be sure to rinse out the cleaning tool frequently and brush lightly. There shouldn’t be any need to scrub hard. Tree sap and sticky bugs are best gently removed by softening them with a dedicated bug/tar/sap remover (which you can get at any auto parts store or general merchandise store) instead of scrubbing.

To protect the surface you can use any natural or synthetic wax made for painted vehicles. I recommend polymer waxes for the front dome (at least) because bugs seem to stick less, which makes the next washing a lot easier.

By the way, there’s a bit of lore about a product called Walbernize. Airstream recommended it for a long time for their earlier clearcoat formulation (pre-1999) and now it has taken on a mythological standing. In reality, the current formulation of clearcoat is so tough and resistant to UV that any good car wash and wax will do.

What’s the easiest way to clean my Airstream?

Take it to the truck wash. Prices vary but I’d expect to pay about $40 for your truck and trailer. Many truck stops have washes like Blue Beacon, and they do a pretty good job. If you’re a perfectionist you should probably do it yourself, but whenever a truck wash misses a spot I just point it out and they’ve always made it right.

Beware of going to the truck wash if there’s a line. Four trucks in front of you means you’ll wait about an hour. But don’t be tempted to go to a regular car wash with a trailer!

When I’m on the road for a long trip, I generally try to hit the truck wash about once a month, or immediately after camping near salt water or encountering “love bugs” in Florida.

Tell me about filiform corrosion—what is it, and how do I fix it?

Your Airstream is admirably protected against rusting. The body is aluminum, and the rock guards are stainless steel. The fasteners are all made of non-corrosive metals as well.

But nothing is perfect. Corrosion happens. Even aluminum will naturally oxidize under most conditions, and the oxidization happens more rapidly in high humidity or where accelerants such as sea salt or magnesium chloride (used on roads) are present.

Ever see white “spider webs” forming on your Airstream, like those in the picture? That’s filiform corrosion. Filiform corrosion is what happens aluminum begins to oxidize and there’s a clearcoat for the corrosion to “worm” under.

Filiform starts wherever there’s a tiny gap for moisture to get under the clearcoat. That means anywhere the aluminum has an edge or gets nicked. This includes the body panels, taillights, wheels, and door handles.

Filiform isn’t an indication of a defect. It’s just something that happens. It’s impossible to prevent under all circumstances. All you can do is try to minimize it. You can slow it down in a few ways:

  1. Wash the Airstream as soon as possible after camping near salt water
  2. Don’t store the Airstream in a damp spot, or in an enclosed barn unless it can be kept very dry
  3. Wash the Airstream thoroughly after towing on roads that have been salted (wintertime)

There’s really no fix for filiform corrosion that has already happened. Since the corrosion is beneath the clearcoat, you can’t remove it without removing the clearcoat first—which tends to cause an uglier problem. If you’ve got a badly corroded taillight, wheel, or door handle, you can remove that part, then strip it completely and re-coat it, or just install a replacement part.

The good news is that filiform stops growing when the humidity drops below about 60%. So the more time you spend in the desert, the less filiform you’ll gain!

How do I get decals or stickers off my Airstream?

Use a 3M Eraser Wheel (or equivalent). Don’t use toxic chemicals. This short video shows how it works.

How do I clean behind the window stone guards and the stainless steel rock guards?

They’re actually pretty easy to open for cleaning. For the stainless rock guards you need a wrench, but that’s all. Airstream did a pretty good video showing the procedure, and in this case a video is worth 1,000 words:

For more cleaning and maintenance tips check out my book, “Airstream Life’s (Nearly) Complete Guide to Airstream Maintenance” which is available in the Airstream Life Store.

Tire pressure monitoring de-mystified

I talk about Tire Pressure Monitoring Systems (TPMS) a lot because it’s important. It’s important enough that all cars sold in the USA have had TPMS built in since 2007. This system saves lives in passenger cars.

A TPMS has one main job: it warns you when a tire is going flat or is under-inflated. In a travel trailer that’s a big deal because a flat tire can cause serious damage or even a loss-of-control accident.

You might wonder why, 14 years after cars were mandated to have TPMS, travel trailers still aren’t required to have it. That’s probably because passengers don’t ride in travel trailers. (Also, Federal regulators don’t really care if your Airstream’s aluminum gets all torn up because of a blown tire.)

I get that, but to me, a TPMS is an essential piece of safety equipment. I put it on all my Airstreams.

Being a premium brand, Airstream started installing TPMS in the Classic series of trailers in the 2020 model year. I wouldn’t be surprised if someday they installed it on most of the line, but for now, if you have any other Airstream trailer you’ll need to add it yourself.

Let’s look at some of the common questions we get from people about TPMS:

How does it work?

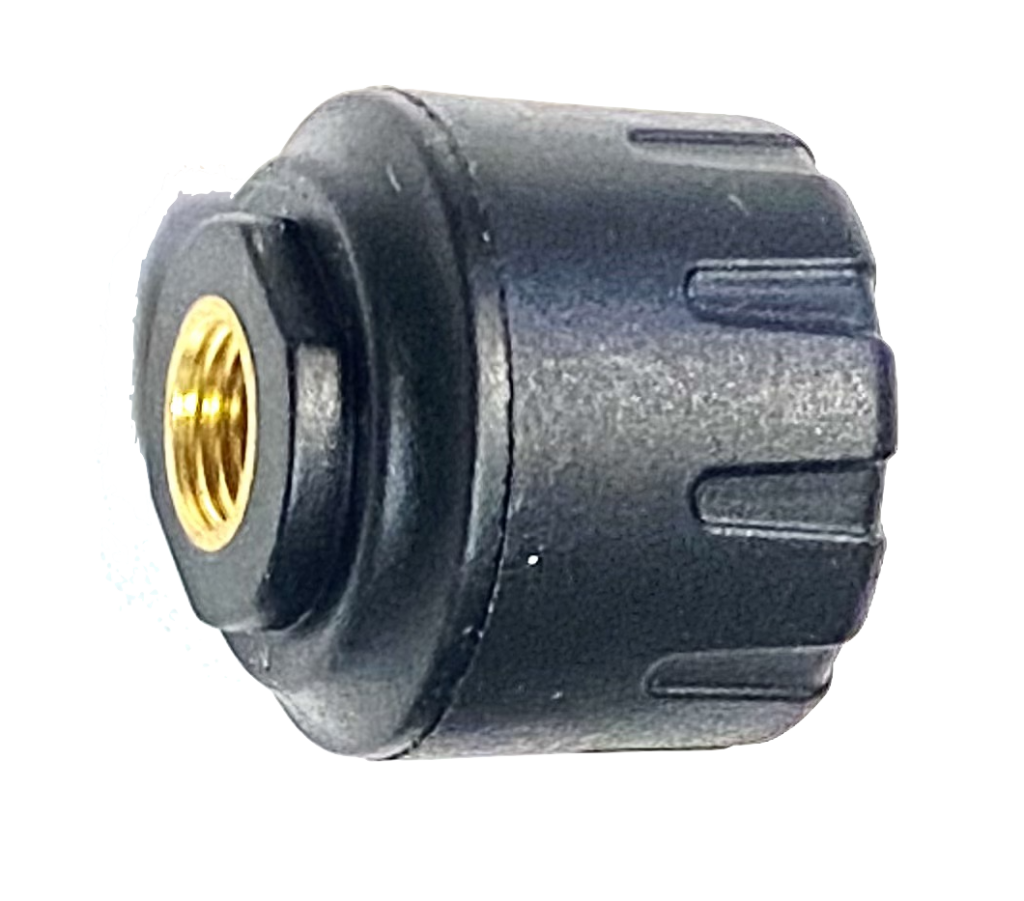
A TPMS has a sensor on each tire. To install the TST brand that we sell, you just remove the cap where you put air into the tire and replace it with the sensor. It screws on with your fingers—no tools required.

Each sensor sends a signal to a monitor in your truck (pictured at right). The sensors report the current pressure in the tire and the temperature. If all is well, the sensors report in every few minutes.

But if something goes wrong, like the tire gets too hot or the pressure gets too low, the sensor reports immediately. You’ll get a beeping alert and a visual warning on the monitor so you can pull over and check out the problem before it gets more serious.

This is the beauty of TPMS. It can often tell you there’s a problem before permanent damage is done.

If you want to see what the components of a TPMS look like and how they work together, I explain that in this short (4:40) video.

Is a TPMS hard to install?

Remember going to people’s homes in the 1980s and seeing the VCR blinking “12:00” all day long? Those same people are wondering if they can figure out how to program a TPMS. I know because we get calls, and quite often people say they are planning to pay the local RV dealer’s service center to install it.

I don’t recommend that. The dealership will charge you for an hour or more of shop time at their regular rate (typically $120-180). One customer told me he was quoted $250 for installation.

There’s really no need to pay someone for this simple job. Installing the TST brand of TPMS on four tires takes about 15-20 minutes if you’ve never done it before. You just follow the instructions to set the system up once.

If you don’t want to bother with this, our team can program the TST system for you when you purchase it from us. All we need to know is the pressure you plan to run in your tires. After we ship and you receive the system, you just screw on the tire sensors.

Should I get “flow-through” or “cap” sensors?

A flow-through sensor
A cap sensor

A flow-through sensor allows you to add air to the tire without removing the sensor. This is handy for motorhome wheels where it’s hard to get to the sensor. The big downside of a flow-through sensor is that you must have metal valve stems installed, which requires dismounting the tire if you don’t already have them.

For trailers, we recommend the “cap” type sensor. The cap sensors are more reliable and there’s no need to change the valve stems. The valve stems that came with any late-model Airstream will be fine.

Do I need a repeater or antenna in order for the signal to reach my truck?

A repeater

In the past, my advice was that you only needed it if you had a trailer longer than 23 feet, but these days with more devices on the road that could interfere with the radio signal, we recommend always installing the repeater for best performance.

The good news is that a repeater comes with every TST kit we sell, and it’s really easy to install. You can just connect it to any 12-volt source in the trailer (or even inside the battery box). There’s no configuration or setup needed, and it draws so little power that you never need to turn it off.

There’s no big antenna on the TST system, just a little stub that sticks up from the monitor.

How long does the battery last?

The monitor has a rechargeable battery which lasts for a few days of towing in my experience. It plugs into any USB outlet to recharge in a couple of hours. I usually take it into the Airstream and plug it in to recharge every three days or so.

(This means it’s completely wireless when you’re using it, so it doesn’t take up one of your truck’s cigarette lighter or USB plugs!)

The sensors have little button cell batteries in them. The flow-through models take a CR1632 and the cap models take a CR2032. These batteries typically last about 18 months. We sell an inexpensive kit to replace the batteries and O-rings yourself so you don’t have to send it back to the manufacturer for periodic service.