A quick guide to maintaining your Airstream’s exterior

Now that you have that lovely jewel box made of aluminum, you’re probably wondering how to keep it looking awesome. We’ve got you covered on that: we recently held a maintenance webinar and answered the Most Commonly Asked Questions about Airstream exterior cleaning and maintenance.

What’s the best product to clean and protect my Airstream’s aluminum?

If you’ve got an aluminum Airstream made in the last four decades, it has a protective clearcoat covering the aluminum. This clearcoat is like paint, and you can take care of it the same way you care for your car. Any good car wash will do.

If you wash the Airstream a lot, tiny scratches can form in the clearcoat from harsh scrubbing or grit. Whether you use soft bristled brushes, microfiber mitts, or sponges, be sure to rinse out the cleaning tool frequently and brush lightly. There shouldn’t be any need to scrub hard. Tree sap and sticky bugs are best gently removed by softening them with a dedicated bug/tar/sap remover (which you can get at any auto parts store or general merchandise store) instead of scrubbing.

To protect the surface you can use any natural or synthetic wax made for painted vehicles. I recommend polymer waxes for the front dome (at least) because bugs seem to stick less, which makes the next washing a lot easier.

By the way, there’s a bit of lore about a product called Walbernize. Airstream recommended it for a long time for their earlier clearcoat formulation (pre-1999) and now it has taken on a mythological standing. In reality, the current formulation of clearcoat is so tough and resistant to UV that any good car wash and wax will do.

What’s the easiest way to clean my Airstream?

Take it to the truck wash. Prices vary but I’d expect to pay about $40 for your truck and trailer. Many truck stops have washes like Blue Beacon, and they do a pretty good job. If you’re a perfectionist you should probably do it yourself, but whenever a truck wash misses a spot I just point it out and they’ve always made it right.

Beware of going to the truck wash if there’s a line. Four trucks in front of you means you’ll wait about an hour. But don’t be tempted to go to a regular car wash with a trailer!

When I’m on the road for a long trip, I generally try to hit the truck wash about once a month, or immediately after camping near salt water or encountering “love bugs” in Florida.

Tell me about filiform corrosion—what is it, and how do I fix it?

Your Airstream is admirably protected against rusting. The body is aluminum, and the rock guards are stainless steel. The fasteners are all made of non-corrosive metals as well.

But nothing is perfect. Corrosion happens. Even aluminum will naturally oxidize under most conditions, and the oxidization happens more rapidly in high humidity or where accelerants such as sea salt or magnesium chloride (used on roads) are present.

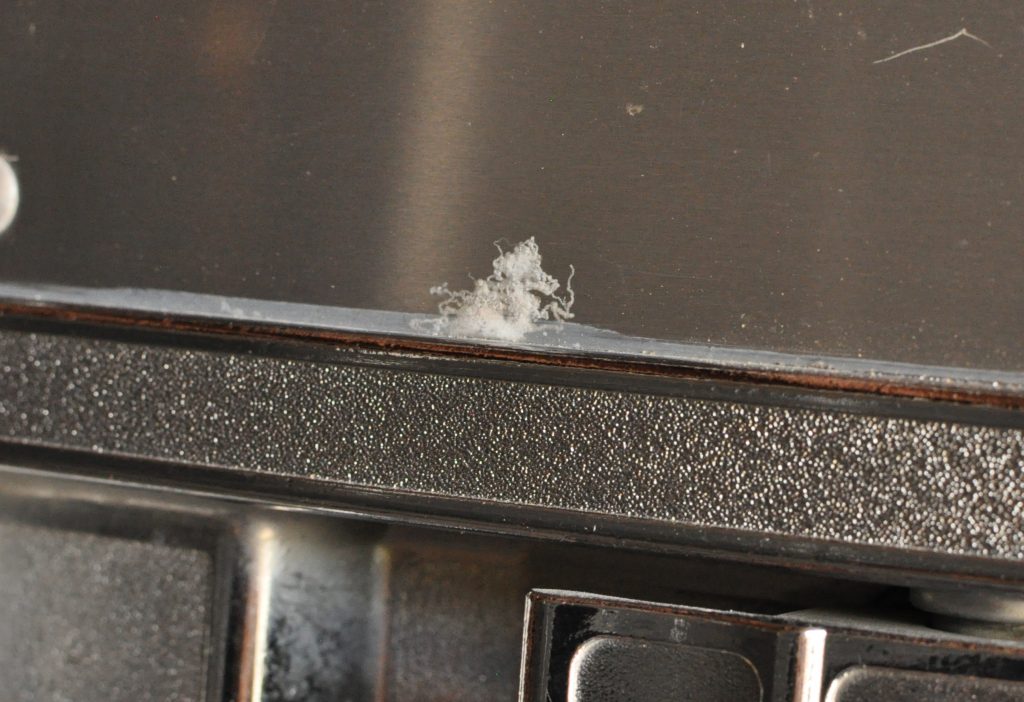
Ever see white “spider webs” forming on your Airstream, like those in the picture? That’s filiform corrosion. Filiform corrosion is what happens aluminum begins to oxidize and there’s a clearcoat for the corrosion to “worm” under.

Filiform starts wherever there’s a tiny gap for moisture to get under the clearcoat. That means anywhere the aluminum has an edge or gets nicked. This includes the body panels, taillights, wheels, and door handles.

Filiform isn’t an indication of a defect. It’s just something that happens. It’s impossible to prevent under all circumstances. All you can do is try to minimize it. You can slow it down in a few ways:

  1. Wash the Airstream as soon as possible after camping near salt water
  2. Don’t store the Airstream in a damp spot, or in an enclosed barn unless it can be kept very dry
  3. Wash the Airstream thoroughly after towing on roads that have been salted (wintertime)

There’s really no fix for filiform corrosion that has already happened. Since the corrosion is beneath the clearcoat, you can’t remove it without removing the clearcoat first—which tends to cause an uglier problem. If you’ve got a badly corroded taillight, wheel, or door handle, you can remove that part, then strip it completely and re-coat it, or just install a replacement part.

The good news is that filiform stops growing when the humidity drops below about 60%. So the more time you spend in the desert, the less filiform you’ll gain!

How do I get decals or stickers off my Airstream?

Use a 3M Eraser Wheel (or equivalent). Don’t use toxic chemicals. This short video shows how it works.

How do I clean behind the window stone guards and the stainless steel rock guards?

They’re actually pretty easy to open for cleaning. For the stainless rock guards you need a wrench, but that’s all. Airstream did a pretty good video showing the procedure, and in this case a video is worth 1,000 words:

For more cleaning and maintenance tips check out my book, “Airstream Life’s (Nearly) Complete Guide to Airstream Maintenance” which is available in the Airstream Life Store.

Get ready for summer travel!

If your Airstream is just coming out of winter storage, or if it’s new to you, you should give it a thorough inspection and take a few simple steps to prep it for travel. It’s easy, and you’ll learn more about your Airstream in the process, which will make you a more confident and prepared traveler. You can do all the inspections on this list in about an hour, with almost no tools.

For much more information about these procedures, or what to do if you find a problem, refer to Airstream Life’s (Nearly) Complete Guide to Airstream Maintenance. Page numbers refer to this book.

Wally Byam was always ready to go!

Let’s start outside the Airstream, at the front.

Batteries

Many Airstreams come with Absorbed Glass Matt (AGM) or Lithium batteries that don’t need any maintenance. But if your Airstream has “wet cell” batteries with removable plastic caps on the top, then you need to pop off the caps to check the water level inside. You’ll want to add distilled water to top them up as needed.(See page 178 for details.) Be careful—it’s acid in there, so don’t splash. If the batteries are not already fully charged, plug in the Airstream overnight to allow them to charge fully.

Hitch

Lube the hitch ball and coupler (page 114), as well as the weight distributing hitch as recommended by the manufacturer.

Test the breakaway switch by pulling the pin out briefly (page 117). The trailer brakes should come on full.

Slide under the back of your tow vehicle and inspect its hitch receiver with a flashlight. Look for any cracks (which may appear like rusty lines), broken welds, loose or missing bolts, or other signs of damage (page 115). If anything looks suspicious, have it checked professionally.

Tires

If you have a TST Tire Pressure Monitor, turn it on and give it a few minutes to check all the tire pressures for you (while you do something else). If you don’t have a monitor, you’ll need to check the air pressure on all of the tires (including the spare) with a manual tire gauge. Pressure should be within 5% of the maximum air pressure rating printed on the side of the tire. Add air as needed (page 119-120). While you’re there, inspect the tires for damage (page 122-123).

Propane

Check the propane level in both propane tanks, and fill if needed. Check propane pigtail hoses for cracks (page 189) and check propane system for leaks (page 187-188). If the hoses look bad or are very stiff, you can get new ones in our Propane Maintenance Kit, but since you’re replacing the hoses why not upgrade your safety level with a pair of GasStops as well?

Awning

Open the awning. Make sure it deploys properly and is free of unwanted creatures like spiders or wasp nests. Lube it if it’s sticky or hard to open (page 52). For a power awning you can also watch my video “9 Places Your Airstream Needs Lubrication”.

Water Heater

Open the exterior door to the water heater and look for any signs of insect nests, webs, or leaks. If you have a water heater with a tank (trailers before model year 2021) and the nylon drain plug was removed, replace with a new one (page 210). A new plug is included in our Maintenance Essentials Kit.


That’s it for the outside stuff! Now, let’s go inside your Airstream:

General Inspection & Cleaning

Inspect the interior for signs of rainwater or snowmelt leaks that might have occurred over the winter (page 68-71). Also check for signs of rodents (page 152-153).

Press the Test button on the smoke and/or carbon monoxide detectors. While you are at it, supply each with new, 9-volt batteries (page 161-162). Check all the other items that have expiration dates—for details, see this video: “9 Things That Expire In Your Airstream” or pages 161-163.

Test the GFCI outlets (page 168-169).

Sanitize the water system (page 94). This ensures you start the season with a fresh system, and can help remove some of the lingering taste of RV Anti-freeze (if it was used during winterizing). If your Airstream has a built-in water filter, replace the filter cartridge.

Appliances

You’ll want to test all the appliances to make sure everything is working correctly. First, turn on the propane gas at the tanks and light the stove to prove that all the air is out of the lines and you’ve got gas. If you have GasStop installed, be sure to press down on the GasStop’s built-in gauge a few times to ensure that gas is flowing.

Turn on the furnace to be sure the blower and heat are working. It will take a minute or two for heat to appear at the vents.

Turn on the air conditioning (if connected to shore power and the outside temperature is above 70 F) to be sure it’s cooling properly.

Turn on the refrigerator and let it run overnight. A propane/electric freezer should make ice within a day. Electric-only freezers are faster.

Turn on all lights and replace bulbs as needed (Airstreams with LED lights don’t have bulbs, so if they don’t come on, check the fuse box, page 167). If you need to replace a fuse, watch this video. Fuses and fuse pullers are included in our Maintenance Essentials Kit.

Turn on all the fans to make sure they work. Check fuses on the fans themselves and the batteries in the remote control (if applicable) if there’s a problem. If the fans or screens are dirty, check page 87-88.

Final Steps

Hitch up, then check the trailer lights (including brake and turn signals), and check the operation of the brake controller. If everything’s good, head out for a short tow. While you are out, roll down the windows and listen for strange noises from the hitch and trailer that could indicate a need for adjustment or repair.

Now you’re ready. You’ve checked every major system and probably learned a few things about your Airstream in the process. Feels good, doesn’t it?

All about rivets

Your Airstream is made of aluminum, but rivets are what make it strong. Take those 5,000 rivets away and you’ve got a floppy pile of soft metal.

In this age of robotic vehicle assembly you might be surprised to learn that each one of those rivets was placed on your Airstream by hand by a pair of skilled workers at the factory in Jackson Center, Ohio. Those two people had to practice relentlessly and demonstrate their skill on practice sheets before they had the ability to repeatedly install rivets with speed and precision.

It’s not an easy thing to get right. At Alumapalooza we have held Rivet Masters contests for several years, where attendees get a quick lesson on how to put in a rivet properly and then compete for the fastest times. Most of the contestants are lucky to get about half the rivets in correctly even with some practice.

“Bucked” solid rivets

Most of the rivets you see on the exterior of your Airstream are “bucked” (solid) rivets. They start life as little mushroom-shaped bits of aluminum. These very strong rivets hold two panels together, or fasten a panel to one of the trailer’s internal ribs. This bond will last the life of the Airstream, unless damaged in a collision.

To install these requires a team of two people working together like dance partners.

How to buck a rivet—The outside installer holds an air-powered rivet tool, which is sort of a miniature jackhammer that pounds on the mushroom head of the rivet.

The inside installer holds a shaped metal tool called a “bucking bar” that is pressed against the tail (or stem) of the rivet. The rivet gun very quickly hammers the rivet, pushing it inward and squashing the tail against the bucking bar, which causes the tail to get shorter and wider. This fills the hole and locks the two pieces of aluminum together very strongly.

Under normal circumstances, this rivet is in place forever, and it seals so tightly to the body panel that sealant is not needed for the rivet to be waterproof.


Timing is critical. Stopping too early means the rivet won’t fully deform and thus it won’t fill the hole for maximum holding power. Hammering too long will flatten the rivet too much, which also lowers its strength and can look cosmetically awful on the exterior.

The difference between “too short” and “too long” is less than a second, so the riveters rely on their experience and the tone of the hammering to know exactly when to stop. Then, as a pair, they move to the next rivet without delay. Good teams can put in a perfect rivet every three or four seconds.

Blind rivets

Also known as “POP” rivets, these are mostly found on the inside of the Airstream. (POP rivets was the original brand name.) These rivets are easy to install and replace, using a different kind of rivet tool. Since you can put one in without needing access to both sides of the aluminum, it only takes one person.

Hand held rivet toolA hand-operated rivet tool is something that should go into your everyday tool kit, because blind rivets do occasionally break and replacing them is a very easy job if you have a few spares and the rivet tool on hand. If you buy a tool, don’t skimp on quality. A good rivet tool is a pleasure to use, whereas cheap ones can be awkward and prone to jamming.

A single broken or missing blind rivet is not a serious issue. You’ll know a blind rivet is broken because it will either be obviously loose, missing, or you’ll see a little ring of black around the head of the rivet. (The black ring is aluminum oxide, caused by the loose rivet head rubbing.)

To replace a blind rivet, you put the thin end of a new rivet in the tool (the thin end is called the mandrel) and press the wider tail end of the rivet into the hole. Hold the rivet tool firmly against the surface while squeezing the handle three or four times. This makes the rivet expand in the hole and eventually the mandrel snaps off, which tells you the job is done.

The video below is a quick demonstration of how easy it is to install a blind rivet.

Blind rivets and drill bitsAirstream uses a variety of pop rivets, but most are aluminum and most have 1/8” diameter body or 3/16” diameter body. You can find the basic type in hardware stores. There are also specialty rivets with extra-wide heads, used for belly pan repairs. It’s a good idea to have a few of those in your tool kit too. Check the Airstream Life Store for those, and for a good rivet tool.


Shave-head or “Olympic” rivets

These provide the same function as bucked rivets but have a major advantage: they can be fastened from the outside by one worker. This is really useful when an exterior body panel has to be replaced. To do that repair with bucked rivets would require removing the interior furniture and interior panel so that one worker can get access from the inside. This adds considerable expense to a repair, and so quite often owners (or their insurance companies) opt for a shave-head (often called “Olympic”) rivet instead.

The design of this rivet is clever. It is installed just like a blind rivet but when you squeeze the handle of the rivet tool, three legs of the rivet billow outward like petals of a flower, on the opposite side of the panel where you can’t see it. These three legs enable a strong bond—not as strong as a bucked rivet, but adequate for repairs and patches.

After a shave-head rivet is installed, it has an obvious bump in the center of the rivet head that doesn’t look as nice as a solid rivet. It’s a remnant of the rivet mandrel that broke off during installation, kind of like a belly button is a legacy of an umbilical cord. To make the rivet look just like a bucked rivet, there’s a tool called a “rivet shaver” which cuts off the bumpy part of the rivet stem and polishes the head so that it’s much harder to tell it was installed as a replacement. Now you know why these are called “shave-head rivets.”

Interestingly, current technology could allow Airstream to build aluminum trailers using only adhesives instead of rivets—but you probably wouldn’t want that. Rivets are more than just a way of fastening the metal together. They’re part of the “look” of an Airstream, thousands of little reminders of the strength and durability of your travel trailer, and a connection that reaches all the way back to the origins of Airstream in the 1930s.

For more on rivets and riveting, check out our video:


Locked out of your Airstream

It seems to happen at every large Airstream rally:  someone, somehow, gets locked out of their trailer or motorhome.

I have seen it far too many times.  There’s panicked look of owners as they realize they can’t get back in. They think about their wallet, pets, cell phone, and everything else they need that’s inside.  Then the the slow circulation of bystanders begins, anxious to help but not capable of doing much.

Then someone suggests climbing in through a cargo hatch.  This can work (and I’ve done it) but it only works on a few floorplans that have an exterior cargo compartment that goes under the bed—and you’ve got a very thin person on hand—and the bed is on hinges—and the hinges are not locked down.

Finally the inevitable call to a locksmith goes out.  An hour or two later, and a $100 bill, and they’re back inside.

Why is this such a common problem?  Several reasons:

  1. Some Airstream door locks have an “interesting” ability to occasionally self-lock when slammed
  2. It’s easy to drop your Airstream keys when you’re out and about
  3. People don’t think to stash a spare key
  4. Local locksmiths don’t usually have the correct blank in stock for Airstream door keys

Fortunately it’s very easy to prevent the shock of being locked out.  We sell blank keys for most Airstream trailer locks (door handle and deadbolt), plus Basecamp, Nest, and most motorhomes including Interstate and Atlas.  As I mentioned, you can’t find these at most locksmiths, so you need to order the blanks in order to get duplicates made.

Sometimes locksmiths say the key blanks won’t work because they have slightly different head shapes or grooves cut into them. We promise they will! For more explanation, watch this video:

After you’ve had the duplicates made (I suggest two spare sets), put one set in a hidden place. There are lots of interesting hiding places on the outside of an Airstream if you think about it for a while.  I won’t mention them all here (why help potential thieves?) but if you walk around the outside and look closely at the trailer A-frame, various unlocked access hatches, underside, wheel wells, and compartments I bet you’ll come up with a few ideas of your own.  A magnetic Hide-A-Key is helpful for fastening your keys to steel parts.

Another place to keep spares is in your tow vehicle, but that assumes you’ll have access to the vehicle even if you’ve left your Airstream keys inside.  Or, hide a spare key for the tow vehicle on the outside of the Airstream, and hide an Airstream key inside the truck.

But whatever you do, get a couple of spare sets of keys for your Airstream now!  Someday you’ll be glad you did.

Is it safe to tie down your awning?

This one is a bit controversial. We used to sell a very nice tie-down kit in the Airstream Life Store that was great for securing almost anything to the ground. (I still like the product, but we stopped selling them because not very many people bought them.)

Although a ground anchor is great for dog leashes, kites, solar shades, and even airplanes, a common use is to tie down the Zip Dee awning so it doesn’t flap as much on a breezy day.

I like to do this when we are camped near a beach or any other place where it tends to be breezy. But fair warning: the moment you propose to tie down your awning, someone will come up to you and proclaim that you should never tie down the awning. Even Zip Dee, the manufacturer of your Airstream’s awning, will tell you they don’t recommend it. So you might feel a bit foolish for having bought a tie-down that you are officially discouraged from using.

Well, I’ll go out on a limb and say that’s overly-precautionary. Tying down an awning won’t hurt it. Leaving it deployed in a heavy wind or storm will.

Zip Dee says your awning will be fine in a light breeze, but they don’t give an official wind speed limit. Instead, they say things like “if you’re comfortable in the breeze, the awning probably is too.” I’ve also heard various numbers tossed around but there seems to be no exact consensus. Somewhere above 20 MPH there’s a point at which a deployed awning arm might bend, but without a wind tunnel or a really good mechanical engineering study I doubt we’ll ever know exactly.

So if there’s a chance of heavy weather (like thunderstorms or high wind gusts), take down your awning as a precaution. And always take it down at night, because if you don’t the wind will magically pick up around 2 a.m. and the rattling of the awning will wake you up.  Take it from me. I’ve taken the awning in many times in the pitch black, wearing pajamas.

Now let’s get real. On a day when there’s a lot of sun and a mild breeze, I’ll be a rebel and tie down the awning. (Yeah, I live on the edge.) I do it because the awning rattles and flaps in the wind and it’s distracting. As long as the wind stays moderate, tying down the awning won’t do any harm.

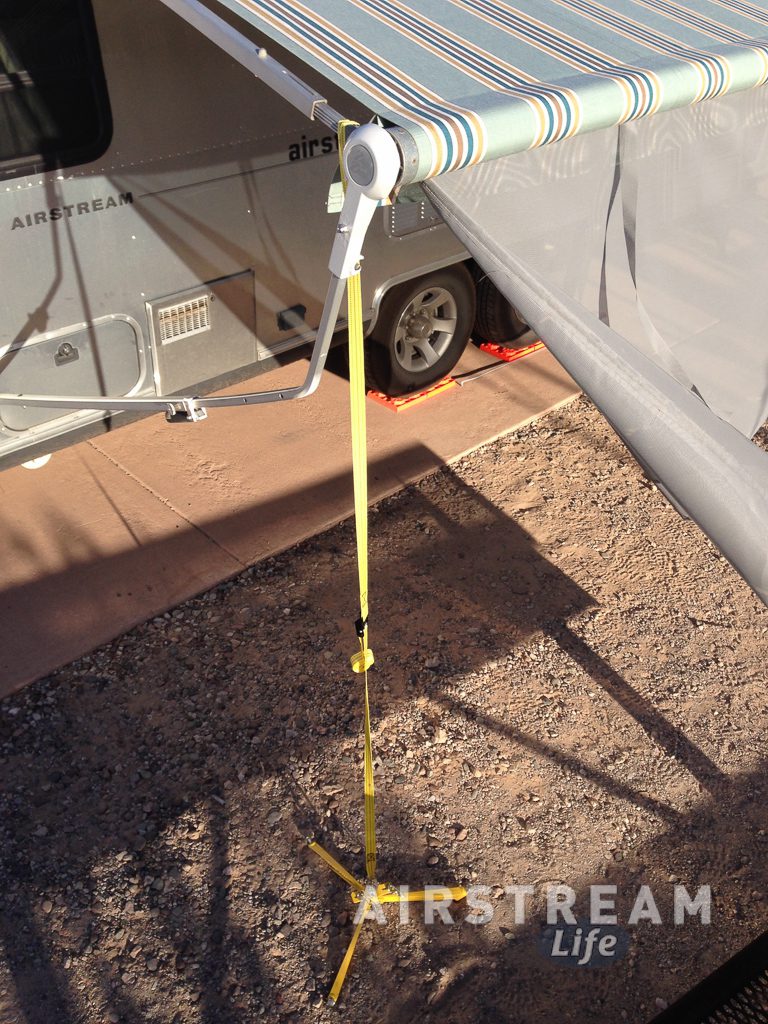
The theory against using a tie-down seems to stem from the idea that a Zip Dee awning has some flex built into it, which helps it resist damage in the wind. If so, I’m taking some of that flex away by pulling the awning down with my tie-down. I can live with that, in exchange for a bit of quiet. Obviously, if the wind picks up, I’ll disconnect the tie-down and roll up the awning. We’re not talking about complex calculus here.

But if you can’t stand the idea of helpful people coming up to you to explain that you’re not doing it correctly, then I recommend a Solar Shade. This snaps to the underside of the Zip Dee awning and adds some privacy and shade to your outdoor living space. Use “The Claw” to secure the Solar Shade instead. This has the same effect of quieting the awning in a breeze, with the security of knowing that the Solar Shade will disconnect at the snaps if the wind pressure becomes too high.