How To Airstream

Hints and tips for Airstreamers from the publisher of Airstream Life magazine

  • Shop at the Airstream Life Store
  • Subscribe to the Magazine
  • Submit a “How to” Question
You are here: Home / Archives for Cheryl Toth

Apr 12 2021

7 things to know about your Airstream’s federal certification label

What’s the recommended tire pressure psi for your trailer? Where can you find the maximum recommended towing weight?

The answers to these and other essential questions can be found on your Airstream’s federal certification label. This label has been mandated for RVs and trailers since the early 2000s and it contains some pretty useful information about your trailer.

Where to find the federal certification label

In modern Airstream trailers, the federal certification label is found on the forward left-hand external section of the trailer. Take a look and you’ll see that there are actually two labels in that spot.

Here’s an overview of the two labels’ most commonly needed pieces of information.

1. Model, year, and floorplan

Starting at the bottom of the lower label, you’ll find the model, year, and floorplan of your Airstream. Model changes, floorplan variances, and trailer lengths within a model can vary from year to year. Sometimes they can even vary within the same calendar year. So, knowing the model, year, and floorplan of your Airstream is important when purchasing replacement parts or products such as teak shower and floor mats or spare keys. Knowing the exact length of your Airstream is also useful when there are length limitations in a national park or campground.

Our trailer’s label shows 23FB Globetrotter 2020, which means:

  • 23FB is the floorplan
  • The trailer is 23 feet long, from the tip of the A-frame to the back bumper
  • It has a Front Bedroom
  • The model name is Globetrotter (keep in mind there are multiple models available for each floorplan)
  • The model year is 2020 – although it may not have been made in that same calendar year; we’ll get to that
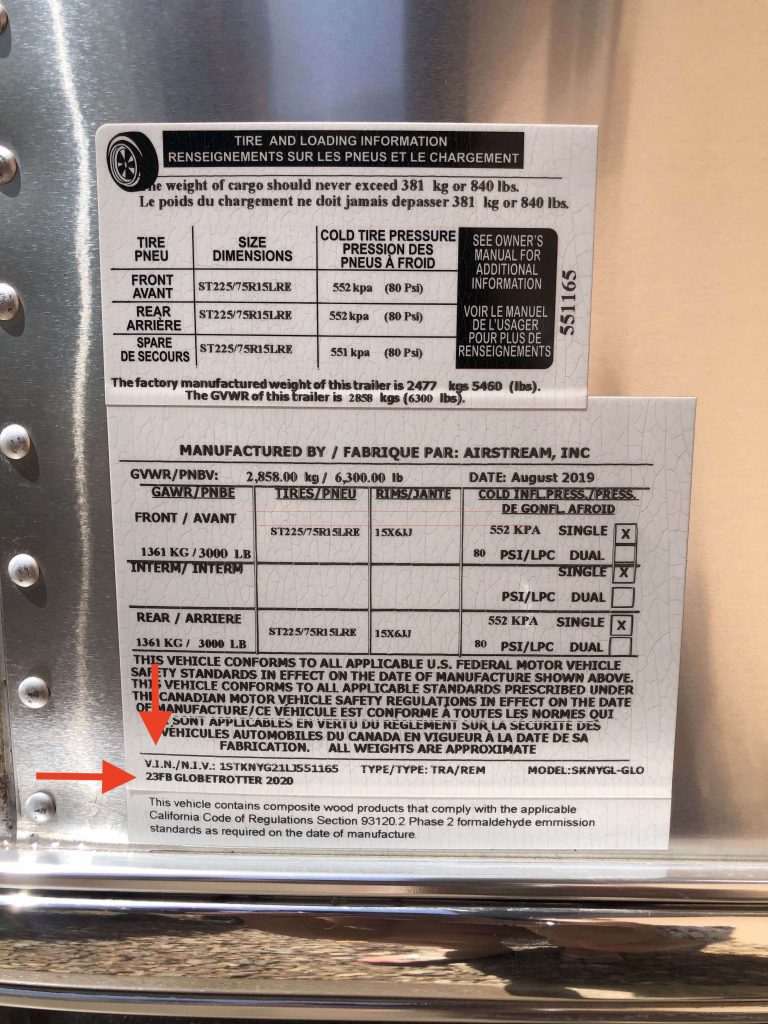
Model, year, and floorplan, and VIN number

2. VIN

Just above the model and year is the vehicle information number (VIN), which all vehicle types are required to display. Like your car’s VIN, this number is unique to your Airstream and includes information about its features, specifications, and manufacturer. The VIN is needed for registration and an insurance policy and is used to track recalls, warranty claims, and theft.

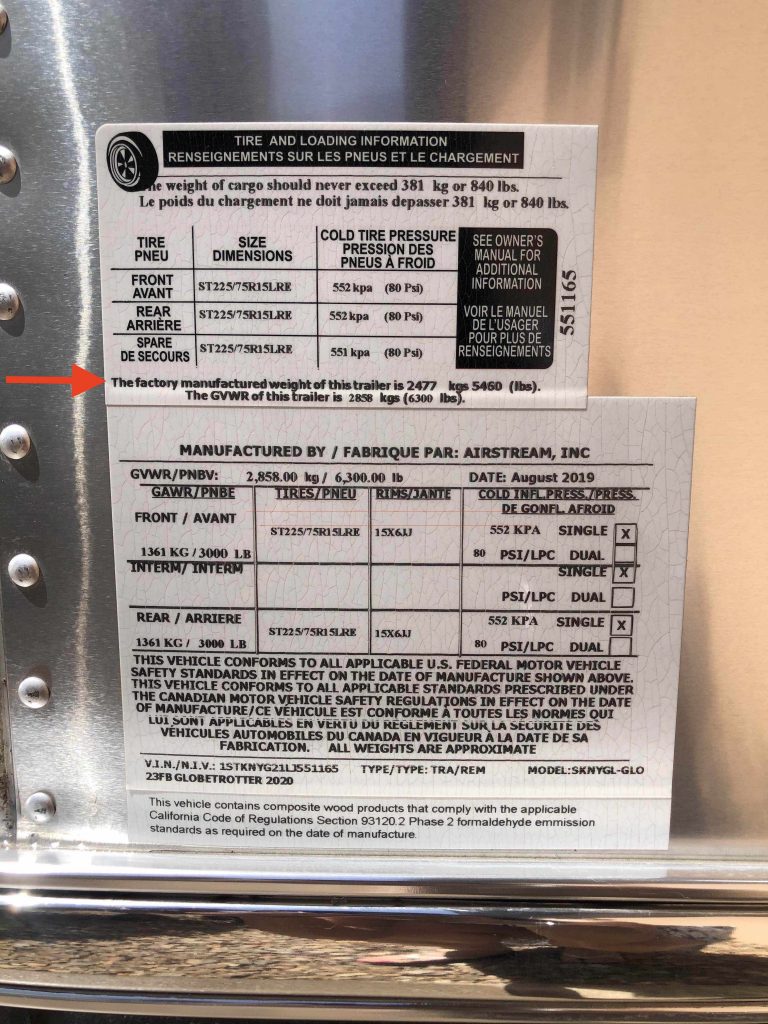
3. Factory manufactured weight

This value indicates the empty weight of your trailer when it left the Airstream factory in Jackson Center. Ours, for example, weighs 5,460 lbs. This number is important for calculating the amount of stuff you can safely load into your Airstream and tow.

The weight of your Airstream when it left the factory is its “manufactured weight.” It’s important for calculating the weight of the stuff you can safely tow.

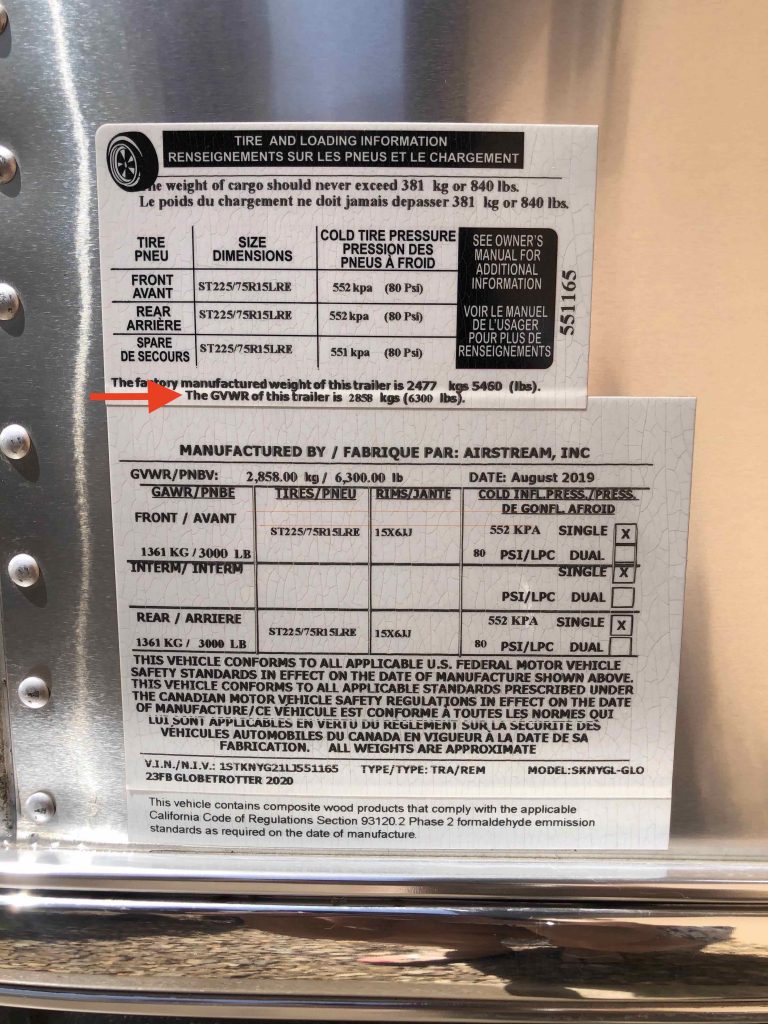
4. Gross Vehicle Weight Rating (GVWR)

The GVWR is the maximum amount the trailer can safely weigh when fully loaded with cargo. In our case, that’s 6,300 lbs. Subtract the factory manufactured weight of 5,460 and you’ve got the amount of weight we can load our trailer with: 840 lbs. (Which is also shown on the upper label, as a “not to exceed” weight amount.)

As you determine the amount of gear and goods to stock for a trip, remember to figure in more than just food, clothing, and kitchenware. You’ve also got to consider the weight of water and propane. The only way to know the weight of your Airstream with certainty is to weigh it, which you can do at most truck stops on their CAT scale. It’s easy and usually costs less than $15.

If you’re interested in complete details about this, Rich explains how to weigh your Airstream in the Newbie’s Guide and The (Nearly) Complete Guide to Airstream Maintenance.

GVWR minus the factory weight = the pounds of stuff you can safely take with you on a trip. Don’t forget to add water and propane to the calculation.

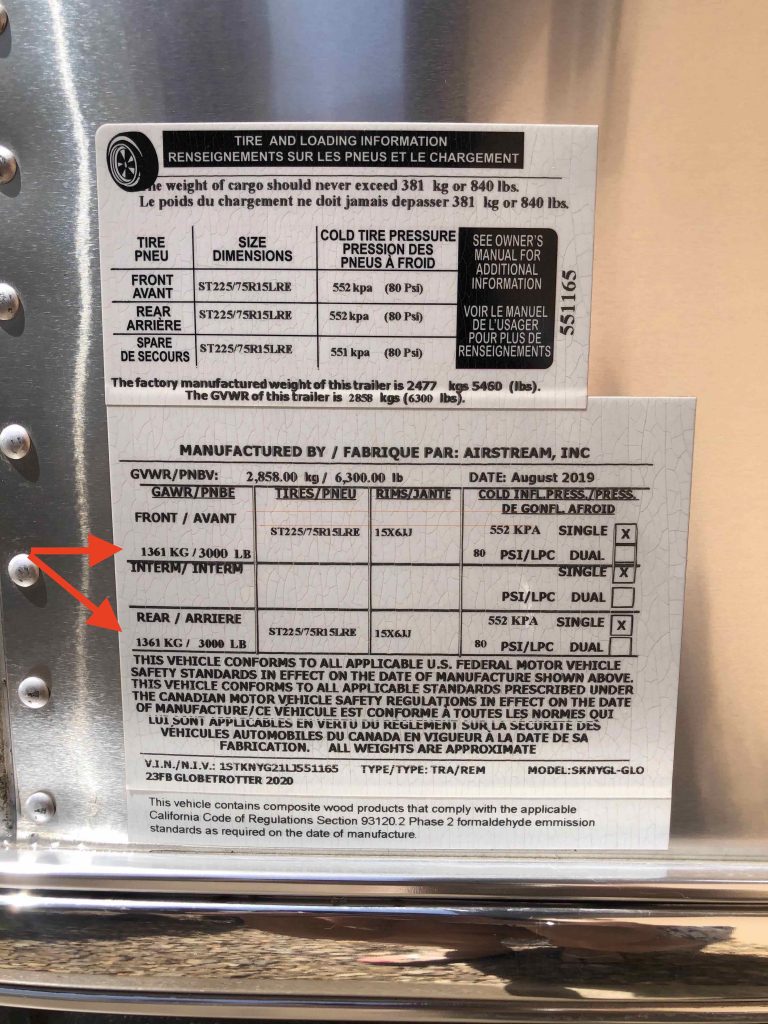
5. Gross Axle Weight Rating (GAWR)

The GAWR is the maximum weight each axle is allowed to carry. Notice that our label indicates a maximum of 3,000 per axle, yet 3,000 + 3,000 = 6,000 and our GVWR is 6,300. So what gives? They’re also allowing 300 pounds of tongue weight (weight on the hitch) that is carried by the tow vehicle, and thus isn’t being carried by the axles. Our trailer’s actual tongue weight can be higher than 300 pounds as long as the total weight of the trailer doesn’t exceed the 6,300 pound GVWR.

The combined GAWR weight of the axles is less than the GVWR in order to factor in the weight of the tongue (often referred to as the Airstream’s A-frame) on the tow vehicle.

6. Recommended tire pressure

The tire pressure rating (in psi, or pounds per square inch) indicates the maximum recommended cold tire inflation pressures for the tires that originally came with your Airstream. Cold refers to the fact that the psi is measured prior to getting on the road, and while the tires are not facing into direct hot sunlight. In addition to being aware of your Airstream’s tire pressure requirement, you should always monitor tire pressure as you travel using a tire pressure monitoring system. Because you can’t feel a slow leak from the driver’s seat, a monitoring system is an essential piece of safety equipment when traveling.

Inflate your tires to the psi ratings shown on the certification label. Psi is also printed on the wall of each tire.

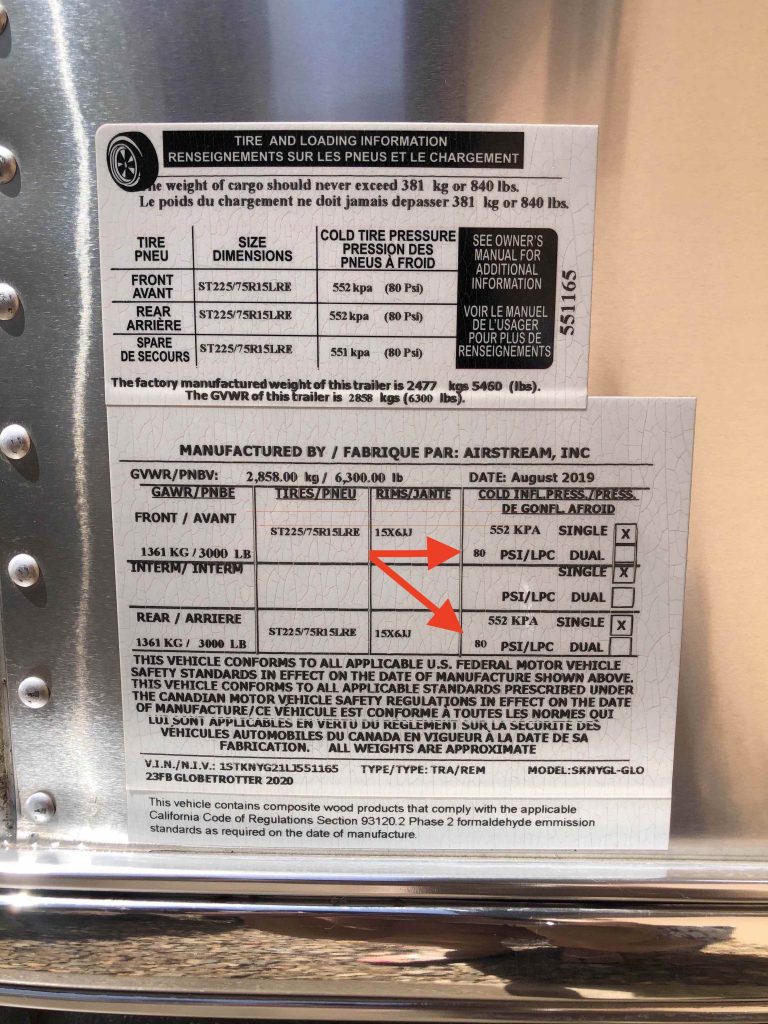
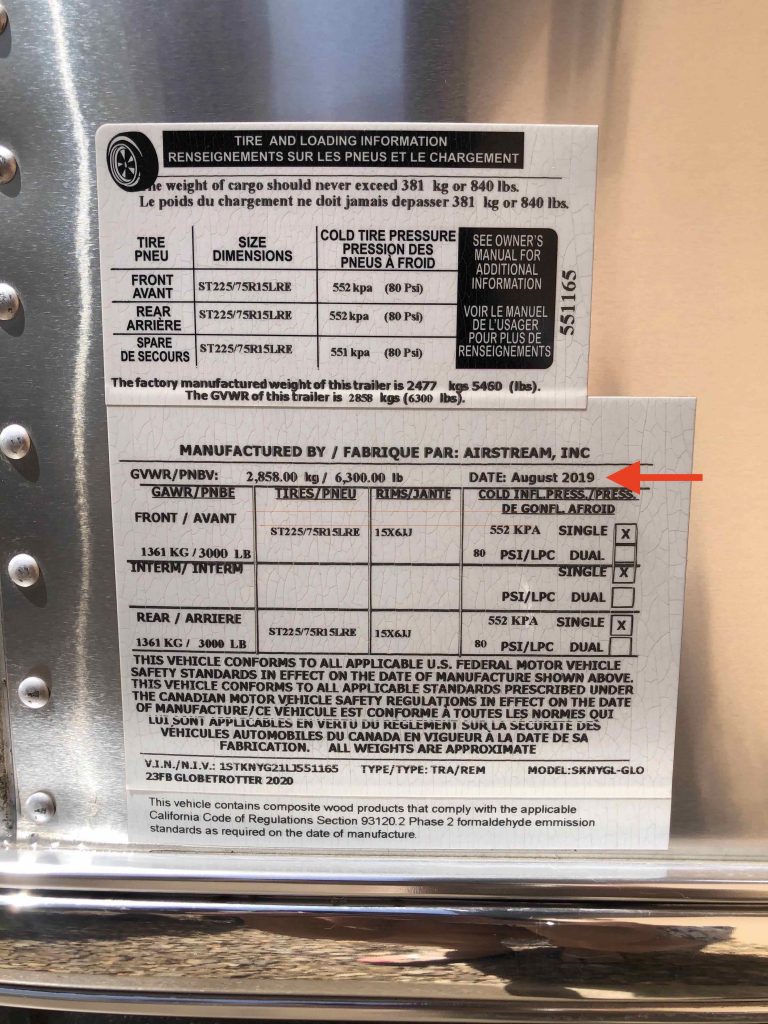
7. Date manufactured

I mentioned earlier that the year shown in your model/year/date may not actually be the calendar year in which your Airstream was made. That’s because Airstream’s model year spans June through June. Case in point, our 23FB Globetrotter 2020 was manufactured in October 2019. In addition to this date being an interesting factoid about your trailer, it’s an important piece of information when it comes to factory recalls.

The date in your model/year may not be the year in which the Airstream was manufactured. This factoid is important in the case of a factory recall.


Written by Cheryl Toth · Categorized: General

Feb 28 2021

How to bake cookies in the convection microwave

Many new Airstreamers opt for the convection microwave instead of a traditional oven when they buy their Airstream. But although most people use the microwave a lot during travel, few use the convection oven. In fact, we’re often asked, how does the convection microwave work, and what can we cook in it?

The convection microwave that came in our 2020 Globetrotter.

I asked these same questions when we bought our new Airstream last summer. I’ve had home ovens with a convection setting and never figured out how to use them. So truth be told, I only used our Airstream’s convection microwave as a microwave.

That is, until a few months ago – when I tracked down the instruction manual and decided to figure it out for myself.  I then tested the instructions by baking an American classic in our Airstream kitchen: Nestle toll house chocolate chip cookies.

What I learned is that using the convection oven is WAY easier than I thought. The instruction guide made it more complicated than it needed to be. Honestly, you have to do a tiny bit of math to modify the cooking time, then push a few buttons.

I’ve explained all this in the blog post and video below. I hope it inspires you to try your convection oven – and bake chocolate chip cookies on your next trip.

Microwave vs. convection cooking: what’s the difference?

A microwave oven produces microwaves that are reflected within the metal interior of the oven and absorbed by the food you put inside. When the microwaves are absorbed, they cause water molecules inside the food to vibrate and produce heat, which cooks the food.

A convection oven uses a heating element to raise the temperature of the air inside the oven. A fan in the oven circulates the heated air up, over, and around the food, cooking it from all sides. That’s one reason why a convection oven browns the outside of food and a microwave oven doesn’t.

Convection technology has another characteristic: it cooks food approximately 25% faster than a conventional oven. That means you’ll need to adjust all recipes to a shorter cooking time than they call for. 

The convection microwave that came with your Airstream contains both of these technologies – so you have the best of both worlds.

Here’s how to to use the convection oven to bake chocolate chip cookies.

  1. Make the cookie dough before your trip. Lugging a mixer and ingredients with you in the Airstream takes up space. It’s easier to make the dough ahead of time and have it ready in the frig when you’re ready to bake. I used the Nestle toll house cookie recipe for this example, shaping the dough into logs for easy storage and transport in your Airstream refrigerator or freezer. The dough log is a trick I learned from my mom and I do it at home all the time. Simply make a batch of dough, separate it into about four dough logs, wrap them in plastic wrap, and store them in the freezer. When you crave fresh baked cookies slice 6-8 off the log and bake them.

    Make the dough ahead of the trip, and wrap dough logs in plastic for easy transport in your Airstream refrigerator or freezer.
  2. Take the round, metal tray that comes with the convection microwave, on your trip. This tray has a rubber backing, which keeps it securely on the turntable as it turns. It’s also the right shape and size for the oven, and won’t impede the turntable’s movement. The turntable must be able to turn freely during cooking, or your cookies and other foods, won’t bake correctly.

    This round metal tray came with our convection microwave.
  3. When you’re ready to bake on the road, take a dough log out of your Airstream frig or freezer and let it warm a bit. For best baking results, you want the dough to be slightly cool – not warm – but not too cold.
  4. PRE-HEAT the convection oven, just as you would pre-heat your oven at home. Here’s how:
    • Push the CONVECTION button to turn on the convection oven feature
    • Push the button that corresponds with the oven temperature in your recipe. In the case of chocolate chip cookies, that’s 375. You’ll see the oven temperatures in smaller font, underneath the number keys. (“8” is the 375 degrees button.)
    • Push the Start/+30 seconds button. The display will show the baking temperature (in my case, 375), along with a progress bar underneath. The progress bar grows to the right, indicating pre-heating. When pre-heating is complete, the oven will beep and the temperature will flash. This indicates you can open the door and put your cookies in, then set the timer for baking them. TIP: Let the oven pre-heat completely. If you don’t, you won’t be able to set the baking timer.

      When pre-heating is complete, the oven beeps, and the temperature number flashes.
  5. While the oven is preheating:
    • Slice or pull off chunks of the dough log, and put them onto the round, metal tray. I use about a heaping teaspoon size. The tray is non-stick so you don’t need shortening/baking spray. One less thing to take with you.
    • Convert the baking time from your recipe into a convection cooking time. Remember, you need to cook food for about 25% less time in the convection oven. My cookie recipe called for 9 minutes of baking time. So I set the timer for 7 minutes.
  6. After pre-heating is complete, the oven beeps, and the temperature number flashes.
    • Open the door and put the cookies inside. 
    • Push the numbers that correspond to convection baking time. For my 7 minutes, I entered 7,0,0.
    • Push the Start/+30 seconds button.
  7. When the oven beeps, it’s cookie time! Our cookies turn out slightly brown on the edges and a bit gooey inside – just like we like them. We baked a second batch about 45 seconds longer for an even browner finish. Both tasted delicious.
This batch was lightly browned on the edges and soft on top. Yummy.


Troubleshooting Tips

If the cookies are underbaked – This happened to me only once. I closed the door, repeated the pre-heat steps, and left them in for about another minute. They were perfect.

If the cookies are overbaked – This never happened to me (so far).  My guess is there was too much time set on the timer. Redo your math, ensuring you baked them at 25% less cooking time than the conventional oven recipe. If they are still overbaked, reduce the number of minutes and try again.


Now that I realize how easy it is to bake in the Airstream, I plan to do more of it. Next up: roasted root vegetables with garlic and rosemary (I call that dish Root-a-bake-a). Rich and I are also eager to try the Air Fry setting. Onion rings on the road, anyone…?

Written by Cheryl Toth · Categorized: Kitchen and cooking, Lifestyle and travel

Feb 01 2021

What I learned on my first boondocking trip

Does the thought of boondocking make you nervous? I’m a newbie, and it made me nervous too. 

Since buying a new Airstream last summer, we’ve been staying only in places with full hookups. But last weekend, I boondocked for the first time, and – spoiler alert! – I enjoyed it more than I thought I would.

First, let me say that I’ve never considered myself a “camper.” After a few tenting trips to northern Arizona and Yosemite, I realized it just wasn’t for me. With an olfactory system like a bloodhound, I’m not so big on unwashed body (or other) smells, which admittedly, I equate with “roughing it.” A hot shower and shampoo with blow-dry are my daily requirements. 

So, my vacation preference has historically been to travel by airplane and stay in boutique hotels with lots of amenities. I always thought Airstreams were cool, but I had never dreamed of owning one. 

Then I met Rich Luhr, publisher of Airstream Life magazine. And as soon as I became an Airstreamer by injection, I eagerly awaited the chance to travel in one. 

When we bought a 2020 Globetrotter 23 FB this summer, I fell in love with everything about it – the cozy shape, the interior design style, and sleek cabinetry, the fact that everything is so adorably little. I affectionately refer to it as The Fort and I’m really getting the hang of traveling in it.

But up until mid-January, all of our trips in The Fort had included full hookups. From Prescott and Patagonia, Arizona to Silver City, New Mexico, and Borrego Springs, CA, each adventure involved staying in a national park or private campground with water, sewer, and power. Meanwhile, Rich kept telling me how much fun boondocking would be, as it afforded the opportunity to stay in certain places that we couldn’t otherwise enjoy.

So in early January, I decided to throw caution to the wind – along with my high heels, a going-out dress, and my blow dryer – and head out for a sans hookup weekend in Organ Pipe Cactus National Monument, just north of the Arizona border. 

Unhooked campsite in Organ Pipe Cactus National Monument
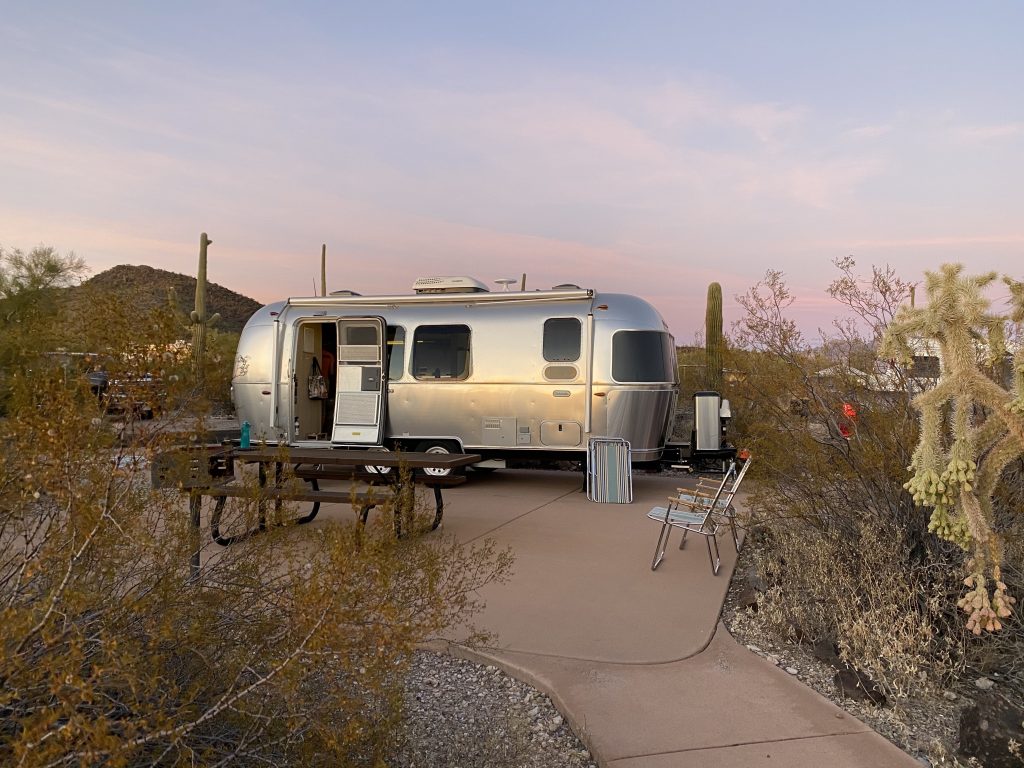
Our unhooked campsite at Organ Pipe Cactus National Monument

I can honestly say that this no hookups campground ended up being my favorite of all those we’ve stayed in. The lush vegetation in and around the campground, spectacular vistas, and starry skies allowed us to unplug and relax for two days and two nights with our little dog Mickey. 

Our dog Mickey enjoying the sunrise out of our Airstream bedroom windowsMickey loved the Airstream bedroom sunrises.

Here are 9 things I learned on this first boondocking trip.  

1. The prep is a little different than if you are heading toward hookups.

Do these things before you leave:

    • Top off everything. Although we never leave with completely empty tanks or batteries, in the case of boondocking you want to be sure everything is full. Fill the water tanks to overflow, make sure you’ve plugged in overnight so your batteries are fully charged, and fill both propane tanks.
    • Plan ahead for coffee. Important to anyone like me who is adamant about having an excellent morning brew. More on that in a moment.
    • Take note of what you won’t (or shouldn’t) use while boondocking. When you are only using batteries, things that have a heating element or need a surge of power to operate, either won’t work or shouldn’t be used. Common items include: blow dryer, microwave, air conditioner, drip coffee maker, laptop charger. Plan accordingly.
    • Buy a bunch of fresh drinking water in gallon jugs. We took 6 gallons and used about 3 for drinking and cooking. Tip: Make sure at least one of the jugs has a screw-on top so you can lay it down in the refrigerator without risking the top popping off during towing.
    • Take a power source with you. This allows you to keep the batteries charged so you can run the lights, sound system, TV, and furnace without worry. We have a portable solar system. Rooftop solar or a generator are other options.
    • Pack easy to make foods and snacks. When you have a limited amount of water and can’t use the microwave, you’ll appreciate this. We took things like instant oatmeal, mixed nuts, dried fruit, cereals, cut up veggies, hummus, cold cuts, bread, etc.
    • Take a few rolls of paper towels. A tidy boondocker’s best friend, I found these to be useful for many things. 

2. Set up is so easy!

Normally, it’s my job to hook up water, electric, and sewer hose at arrival. It had been two months since our last trip so I was reviewing how to do these things in my head while we were driving, and mentioned to Rich that I might need a refresher from him about the sewer hose connection. He gently reminded me that there would be no place to hook it up. I had not quite clued into the fact that no hookups = no sewer hose. And no electricity plug or need for the EMS power protector or water spigot either. Just pull in, unhitch, and flip on the water pump and you’re good to go. 

3. You need a good coffee solution because you can’t use a coffee maker. 

Coffee lovers, pay attention! When you’re drawing from the battery, you can’t use anything that has a heating element that draws a lot of power quickly. That means, no drip coffee maker. Mon Dieu.

I have taken my Bialetti stovetop coffee maker on previous Airstream trips, and I do love the coffee it makes. But to plan for this trip, I had been testing a stainless steel pour over that doesn’t require a filter. I wanted a bit of a “slow coffee” experience. On this trip, I heated the drinking water we carried with us in a collapsible kettle and poured it over ground coffee. 

A pour over for my coffee and collapsable teapot
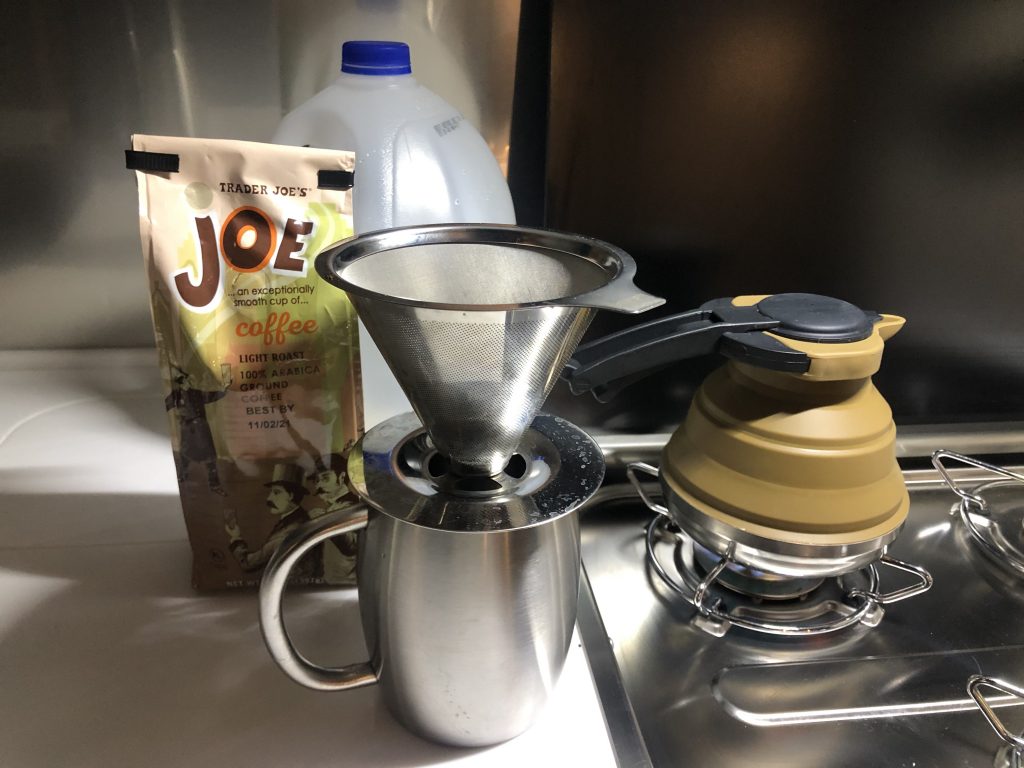
The aroma is amazing when you use a pour-over funnel to make your morning coffee. 

I love the simplicity of this pour-over method and the aroma is spectacular. Plus, you make it one cup at a time so it’s always hot and fresh and doesn’t have that burned taste you get when it sits on the electric warming burner too long. 

4. You have to check the fresh and grey water tank levels throughout your stay.

All you experienced Airstreamers are thinking “well, duh,” but I had truly not thought about this kind of diligent monitoring until Rich mentioned it during the trip.

The level data is available on the Tank Monitor panel. In our 2020 Globetrotter, it’s in the bathroom. In your model, it might be in the kitchen.

  • Push the FRESH button to see the percent of freshwater you have left. Most Airstream trailers carry 30 gallons in a full tank. If you are experienced you can run it down to 25% or even 10%. This helps you know how long you can stay put without going to dump and refill. If you plan to stay longer, you’ll need to plan for using the campground dump station and refilling the tanks.
  • Push the GREY button to see the percentage of space that’s been used in the grey water tank. In other words, at the beginning of a trip it will start at 0% and gradually go up as you use water. After a day, ours was reading 20% full, and Rich gave me props for that since I’m the primary cook and dishwasher.
  • Push the BLACK button to see the percentage of space that’s been used in the black water tank. There was no need for me to monitor this tank level because there are only two of us and our trip was only two days long. 

Note that the level on the panel is approximate. There are a whole bunch of reasons why the data cannot be completely accurate (for example, the black tank includes toilet paper, which impacts the level reading), but I won’t go into that kind of detail here. Mostly, because I still don’t understand it well enough to explain it.

Bottom line: The more you boondock and monitor your levels while doing it, the more you’ll understand your usage.


Check the levels of your fresh and grey tank regularly when boondocking. If you’re
planning to stay unplugged for more than about five days, check the black tank level too.


5. Solar power makes a huge difference.

We used the Airstream Life Portable Solar Kit throughout our trip and it performed beautifully. I plugged it into the solar charge port on the A-Frame and connected the two cables, then unfolded the three solar panels in the morning sun. Super easy. Because it’s portable, we moved the panels with the sun throughout the day to optimize our solar “catch.” 

The result was that we never worried about our batteries draining. The sun kept them charged all day long. So we used electricity as if we were plugged in, save for one thing:

You can’t use the microwave or A/C when you are using the batteries. And it did get into the 80s during the day, with west-facing exposure. This is where you have to roll with it when boondocking. Sure, it wasn’t an icy 65 degrees in the trailer. But we put the awning out and the fans on and it was fine. If we’d had our Zip-Dee solar shade with us, we would have hung it on our awning – but we haven’t yet installed it in our trailer.

If you are wondering, you can plug in your laptop charger, but boondocker beware. Without getting technical, doing so requires that you turn on the inverter, which switches the power supplied directly from the battery, to the type of power that is required to run things like a laptop power cord, television, DVD player, and other electronics. 

But just because you can do this doesn’t necessarily mean you should. At least, not too frequently. That’s because overuse of an inverter ultimately can lead to it failing, and that’s an expensive thing to replace. So if you must bring your laptop, don’t keep it plugged in the entire trip.

If you’re looking for more technical details about solar, Rich has written multiple blogs on the topic. Here’s one about when you do (and don’t) need solar panels.  

We used a portable solar system to charge our batteries during the day.
The panels weigh only 18 lbs which made it easy for me to move them as the sun moved.


6. Yes, hot (albeit short) showers are possible!  

Full disclosure, I showered both days but didn’t wash my hair on the first morning of the trip. It’s medium length and thick and I didn’t want to use too much water. I’d say this was the only real drawback of boondocking for me. (I realize this may cue eye-rolling for some of you.)  

Here’s what I learned is the best way to take a boondocking shower:

    • Turn on the propane switch in the bathroom to heat the water. It takes about 20 minutes, so plan ahead. 
    • Turn the shower full on to HOT. That will get the shower-ready water faster and you’ll use the least amount of water. 
    • Turn the water on to rinse, and off to suds up. This will be familiar to some as a ‘military shower.’
    • Use the water saver button on the showerhead. I had not noticed this little gem but Rich showed it to me on day two. There is a black button on the side of the showerhead that shuts on and off the water. So, get the temperature right, then use the button to turn the water on and off – saves more water than turning it on/off at the faucet each time.
    • Shower during the warmest part of the day. This will make your shower infinitely more comfortable. Especially if you boondock during colder weather.

7. Paper towels are a great all-purpose solution for cleaning and water savings. 

Great for wiping out the pour-over coffee filter (read: no water was used to clean it each day), wiping out the sink, and wiping off countertops. I used, dried, and reused paper towels throughout the trip. I also brought a plate scraper, but we didn’t eat anything that required me to use it. I found the paper towel to be much easier and more versatile. 

Yes, there is the sustainability issue of more waste, but for convenience and the fact many of the paper towels could be used multiple times after drying them, I think paper towels are the way to go. And, you can purchase a brand made from recycled material. We used about a third of a roll during the entire trip. 


8.
 You can rinse dishes and wash your face with surprisingly little water.

To wash dishes: Dampen a sponge and put dish soap in it, then suds up each dish or utensil with the water off and put it in the sink. When everything has suds, turn on the sink to a small drizzle, and using your hands and moving the plate, rinse quickly.

To wash your face/brush your teeth: Similar to showering, turn the water on only when rinsing, and keep the flow low. Turn it off when brushing or washing. 


9. Propane is really efficient and seems to last forever.

Kudos to Airstream for including so many gas-run appliances in the trailer. They are incredibly energy efficient. We didn’t skimp on running the stove, refrigerator, or furnace, and there was still plenty of propane left when we got home. 


My overall take on boondocking? It requires a little practice and mindset modification, but I didn’t feel we sacrificed anything. Sure the showers were short, but we ran the furnace, cooked, listened to music, and even watched Gone With the Wind one night. I just had to be mindful of and monitor my water usage. And frankly, that’s a conservation mindset I should adopt at home anyway. The boondocking experience kept me mindful about how we were using our resources.

If you have long, thick hair you may have to go without washing it for a day. And no, you can’t use the microwave or leave the faucet running while you wash dishes. But in the end, these aren’t the reasons you bought an Airstream anyway. So, don’t be nervous about boondocking. Embrace it as an opportunity for simpler travel, and an excuse to leave your blow dryer at home.


Written by Cheryl Toth · Categorized: Boondocking, Lifestyle and travel

Nov 23 2020

The 30-Day Thank You Challenge

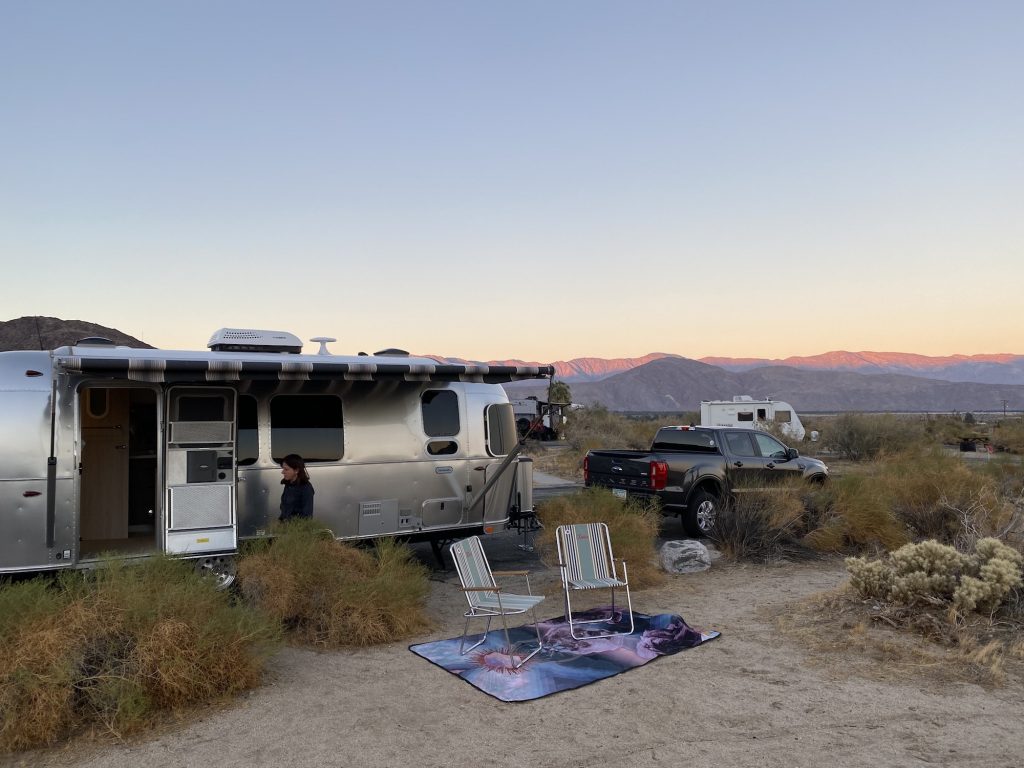
During our trip to Borrego Springs, CA last week, Rich and I talked about the many things we are thankful for. Big things—like how much we love our new 2020 Globetrotter and how excited we are to be creating a five year ‘life plan’ together.

And little things—like the enjoyment we got out of a historic photography exhibit at the town hall in Julian, CA, and the fun and convenience of pulling over and making lunch in our Airstream while traveling.

As challenging as 2020 has been, we try every day to remind ourselves how truly good our lives really are. If we regularly remind ourselves about the things and people we’re thankful for, unpleasant things don’t seem quite as bleak. In fact, multiple studies have shown that expressing gratitude can increase happiness and emotional health, improve psychological well-being, and make us more resilient against envy and other negative feelings because of the positive emotions it creates.

When I feel frustrated or when things aren’t going well, I remind myself how blessed I am to have access to clean water and hot showers, which so many people in the world don’t. How thankful I am that my good health enables me to run. And how much joy I get from waking up in our cozy Airstream bedroom to watch the sunrise.

In the spirit of Thanksgiving we’ve decided to codify, if you will, our attitude of thankfulness, by logging the things we’re grateful for and thanking those who make our good life possible. Rich and I encourage you to join us for what we’re calling our 30-Day Thank You Challenge.

Every day from November 24 to December 24, do these two simple things:

  1. Write down at least one thing you are thankful for.

It doesn’t matter what it is, as long as you feel grateful for it. It could be something big, like an easy sale of an elderly parent’s home, or a final chemo treatment. Or small, like discovering the best apple pie you’ve ever tasted, or playing a game of catch with your grandson.

I’ve found that writing down the things I’m thankful for, instead of just thinking or talking about them, gives them more power. They become “real” because you can see and reflect on them later.

So, grab a small notebook or journal. Next to each day’s date for the next 30 days, log one thing you are thankful for. If you prefer using an app for this, try Gratitude—which is free, private, and does not require an account. (I’m trying it out for the 30-Day Challenge.) You could also use a journal app like Day One.

  1. Say thanks to a person you appreciate or who has done something nice, big or small.

Think about how many people come in and out of your life on a daily basis. Friends and colleagues. Your house cleaner. The neighbors who walk their dogs at the same time you do each day. The service guy at the dealership. The outdoor line manager at Trader Joe’s. We have so many pleasant and positive interactions that go unacknowledged, every day.

So, for the next 30 days, acknowledge them. Either verbally or in writing.

When you begin recognizing and thanking people who’ve done nice things, or who do their job admirably and competently, it’s amazing how it lights them up—which will change both your perspective and theirs.

When I was a kid, my mom insisted that my brother and I write thank you cards to every person who gave us birthday, Christmas, graduation or other gifts. We hated it, but today I cherish the fact that writing thank you notes is so hardwired in me. These days, it’s rare that I don’t send a handwritten note after attending a dinner party, receiving a gift, or being the recipient of some other thoughtful act.

It’s up to you whether you express your appreciation verbally or in writing, or a combination of both. But I find that sitting down and handwriting a thank you note slows me down and gets me to focus on how much the person’s thoughtfulness meant to me.

If you decide to join me and Rich in this challenge, you will have a list of at least 30 things you are thankful for by Christmas Eve. And, you’ll have spread your positive, thankfulness magic to a bunch of people in your life, and there’s no telling how that will be paid forward in their lives.

So, get yourself a journal or download an app and create your first entry today. At the end of 30 days, you may just have created the most meaningful Christmas gift you’ve ever been given.


Cheryl Toth (a.k.a., Tothie) is Director of Marketing, Airstream Life Store, and Co-Founder of the Globetrotter Gallery. She got her first Airstream (with Rich Luhr) in the summer of 2020 and has been digging the freedom of road travel ever since.

Written by Cheryl Toth · Categorized: General

Recent Posts

  • 7 tips for hot summertime travel
  • Spare parts for Airstream road trips: 21 tips
  • What size Airstream trailer?
  • A quick guide to maintaining your Airstream’s exterior
  • Tire pressure monitoring de-mystified

Categories

  • Boondocking (3)
  • Cleaning and exterior (12)
  • Electrical (25)
    • Generator (2)
    • Solar power (7)
  • Furniture and interior (2)
  • General (3)
  • Kitchen and cooking (1)
  • Lifestyle and travel (16)
  • Mobile work and technology (9)
  • Product Review (6)
  • Renovations (1)
  • Safety and security (9)
  • Tires and wheels (10)
  • Tools (10)
  • Towing (4)
  • Travel tips (6)
  • Water and sewer (9)

©2004–2020 Church Street Publishing, Inc. “Airstream” used with permission