How To Airstream

Hints and tips for Airstreamers from the publisher of Airstream Life magazine

  • Shop at the Airstream Life Store
  • Subscribe to the Magazine
  • Submit a “How to” Question
You are here: Home / Archives for Tools

Nov 09 2020

8 tools most Airstreamers should get now

You’ve got a new (or new to you) Airstream—what tools should be first on your list?

I’m going to assume you already have a sewer hose, a hitch, and other obvious things. Let’s talk about the things that you’ll learn you need through experience—without having the painful experiences.

Before I launch into my choices, a few disclaimers:

  1. This is by no means a comprehensive list. There’s probably a hundred more things that I could add. But these are some of the most useful tools and essential upgrades, in my experience.
  2. Not everything on this list is for everyone. Much depends on individual style: minimalist vs. survivalist, glamper or camper, hard-core DIY’er or “I always go to the dealer”. Think about how you travel, where you travel, and what sort of Airstream you have before you rush out to get new gear.

1. A tire changing kit

Your Airstream trailer did not come with a full set of tools needed to change a tire. (This is baffling to me. You get a spare tire, but no way to put it on.)

If you’re thinking that the tools that came with your truck will help, think again. The lug nut wrench probably won’t fit and the other tools won’t be much help when you need to change a tire on your Airstream. You need a dedicated Airstream tire changing kit.

Everybody should know how to change their own tires and carry the tools, even if you don’t actually plan to do it yourself. You may be physically unable to, but if you have the knowledge and you have the tools with you, then at least somebody else can change the tire.

The alternative is calling for roadside assistance, which might seem to be a great solution, but you’ll be sitting by the side of the road for hours, often in a place you do not want to be. Waiting to have someone come to change a tire for you is like waiting for somebody to come dress you in the morning. If you can do it yourself it is so much faster!

It’s not hard to change a tire. You can see the process in the video below, or read about it my book “The (Nearly) Complete Guide to Airstream Maintenance”—and we also include instructions in the Tire Changing Kit we sell in the Airstream Life Store.

We offer a Tire Changing Kit because it’s convenient to have one kit with all the tools in a single carry bag, but if you want to put together your own kit I’ll be just as happy.

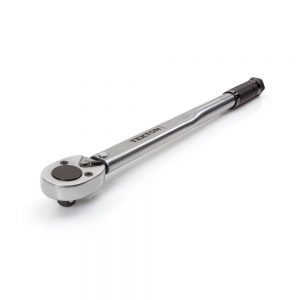
The basics are a torque wrench (essential for correctly tightening the lug nuts when you put the wheel back on); a breaker bar (used for removing the wheel); an extension, and a correctly-sized socket. We also include a safety vest for roadside visibility, a pencil gauge to check the air pressure, and a six page instruction manual that explains exactly how to change a tire.

Tip: If you choose to buy all the parts separately, make sure you don’t skimp on the torque wrench. Cheap torque wrenches are not worth the money.

2. A cordless drill

It’s amazing how often I use my cordless drill for things other than drilling holes. On a trailer without powered stabilizer jacks, you can use a cordless drill with a socket adapter like this one, so you don’t have to kneel on your hands and knees in the mud to put your stabilizers up and down.

If you have a Hensley Arrow hitch, an 18 volt cordless drill makes quick work of tightening the strut jacks, and it’s also essential for the Hensley Hitch Helper (aka BAL Tongue Twister) if you have one of those.

I also find myself using the cordless drill to fix things around the Airstream. For example, on a recent trip the bathroom door’s hinge started to pull out of the door frame. With my cordless drill I was able to quickly drill a hole and install an additional screw to secure the hinge again—problem permanently solved in just a few minutes. Without it our trip would have been marred by a bathroom door that wouldn’t close until we got home.

3. A tool bag, with a few choice tools

I’m a big believer that it always pays to have dedicated tools for the Airstream. Not only does it save time, it ensures you always have the right tools in the Airstream on every trip. Don’t borrow tools from the garage for each trip, because you might forget them.

So start with a little tool box or (my preference) a tool bag. Make sure it will fit easily into the exterior storage compartments. Outfit it with the little tools you need most often during a trip, and the little parts that often need replacing.

Start with a few Philips screwdrivers. You can practically disassemble the complete interior of an Airstream with a single Philips screwdriver. You’ll find yourself tightening screws from time to time—they do occasionally work loose during trips. Some blue Loc-Tite will help keep screws from coming loose again or, to fix holes that have gotten too big to hold a screw you can carry a few match sticks and white glue.

Consider adding some of the following: adjustable wrench, pliers, a small “tackle box” for small parts like screws, spare fuses & fuse puller tool, teflon plumbing tape, silicone spray or Boeshield T-9, a few spare aluminum pop rivets in the correct sizes, a good quality rivet tool, sets of screw bits and drill bits for the cordless drill, utility scissors, a small microfiber towel, and some Parbond. Many of these items are in our Maintenance Essentials Kit.

I also like to have a headlamp so I can fix or examine things at night without having to hold a flashlight. A pair of disposable latex gloves can be nice for dirty jobs.

If you might get into little fixes or modifications to the 12 volt wiring system, then I’d add: electrical tape, butt splices, crimping tool, wire stripping tool, and a voltmeter.

If you have a Hensley hitch, I’d recommend a set of Allen wrenches and a grease gun (but you’ll want to keep that in the bumper compartment because it’s big and greasy).

4. A voltage monitor or (preferably) Electrical Management System

A plug-in voltmeter is really simple, and it will do a couple of very handy things. You just plug it into any outlet in your Airstream when you’re plugged into shore power, and it will tell you the voltage that you’ve got available—which is super important. It also verifies that there’s correct wiring at the campsite. It’s quite possible that the electrical pedestal at your campsite has a wiring problem, and that can actually be hazardous to your health.

There’s a reason we need to worry about the voltage coming into our trailers. We know that it’s supposed to be 120 volts, but rarely is it actually exactly 120 volts. Your appliances are going to be fine plus or minus ten percent, so from 108 to 132 volts. Exceed that, and you’re at risk of destroying certain appliances or even starting a fire.

Low voltage is by far the most common problem. An RV air conditioner typically can accept as little as 105 volts, but when you fire it up the compressor in it draws more power momentarily. So even though your voltage meter might shows 108 or 110 volts, you should keep an eye on it as the air conditioner starts up. If the voltage suddenly drops down below 105 for more than a few seconds, it is likely to burn out the motor in your air conditioner and you’ll be facing a big bill to replace the entire unit.

By the way, this can be a risk even if you’re in a fancy campground with shiny new wiring—especially on hot humid days when everybody’s pushing their AC to the max. Low voltage can still be a problem.

The best solution to this problem is an Electrical Management System (EMS, pictured at right). These devices check and monitor the power like a voltmeter but they also take action when something is wrong. If your EMS detects a problem, it will instantly cut the power to save your Airstream or appliances from damage—and it will automatically re-connect when it’s safe.

5. A rivet tool

A rivet tool is a surprisingly easy thing to learn how to use. Basically you just stick a rivet in the hole, hold it tight against the surface, pop the handle of the tool a few times, and the stem of the rivet breaks off when you’re done. It’s as easy as a screwdriver.

Don’t believe me? Check out this short video where Tothie demonstrates it.

Do you really need to travel with a rivet tool? Yes! Those little rivets on the inside of your Airstream break occasionally, especially after traveling a rough road, and there’s no need to haul your Airstream to a dealership just for that simple little repair. Just break out your handy tool and spare rivets, and you can fix the problem in seconds.

Also, someday you’ll lose a belly pan rivet, which is a more pressing problem. It happens because corrosion occurs where the aluminum belly pan and steel frame meet. The result can be a belly pan dragging on the road. If you have a rivet tool, a cordless drill, and the right sized aluminum pop rivets you can be back on the road in minutes.

It’s a no-brainer. There are 4,000-5,000 rivets in the average Airstream. You should be able to replace one of them.

6. MegaHitch lock

Storage facilities are not safe. I hear reports regularly from people who have lost their Airstreams out of supposedly secure RV storage equipped with video cameras. Once, some Airstream friends of mine found out that someone had broken into their stored trailer and thousands of dollars worth of their tools inside were all gone. Management didn’t even know—and it turned out that the videocameras were fakes.

Cheap hitch locks provide zero security. If you spend less than $100 on a lock I guarantee a thief could break it or bypass it within thirty seconds. Thieves can’t break a MegaHitch Coupler Vault PRO.

It’s not cheap, and it is heavy. But it works. If you’re keeping a $40,000-$150,000 Airstream on a storage lot, $200 is not a lot of extra money. You might also check with your insurance company. If you have proof that your trailer was locked with one of these, they may waive the deductible if it does get stolen.

7. Tire pressure monitor

A flat tire can do lot more damage to your trailer than you might think. It doesn’t just go flub-flub-flub as you come to a stop. Often you’ll have no idea that you’ve had a flat because it’s way back there on the trailer as it starts to shred. It rips up your Airstream, destroys the wheel, creates a hazard on the road, and it leaves you with a thousand dollars of damage that could’ve been prevented.

The TST tire pressure monitoring system is also not cheap, but it’s the best. I use it on every tow and it has saved my Airstream more than once.

8. A good water hose

Ultimate water hose from Airstream Life StoreYou can get drinking water hoses everywhere, and they’re usually pretty cheap—about $30. But the ones the RV industry pushes are really pretty bad. They kink, they have thin fittings that bend and leak after a year or so, and they fail regularly. Don’t even think of letting it freeze or get run over by a truck while it’s pressurized; the hose will burst. For these reasons, many people end up buying a new hose every year or so, which is not a good deal in the long run.

I could go on all day about how lame the typical “white hose” is, but instead I’ll just say this: get an Ultimate Water Hose. After years of replacing cheesy Wal-Mart and Camping World hoses, I finally decided to develop a far better one. We guarantee it for 5 years against any type of failure no matter what you do to it (other than cutting it with a knife).

Yes, it costs double what a cheap hose costs. But you won’t need to replace it for a very long time. Mine has been in heavy use since 2017 and I expect to keep using it for many years. If you want to read more about why you should ditch the ordinary water hose, read this blog entry.
Written by RichLuhr · Categorized: Electrical, Safety and security, Solar power, Tires and wheels, Tools, Water and sewer · Tagged: air conditioner, Megahitch, portable solar panel, rivet, Theft, tire changing, tire pressure monitor, TST, voltage, water

Aug 01 2020

Here’s why you really do need a torque wrench

Every Airstreamer should know how to change a tire, but many don’t.  That’s why we do tire changing demonstrations at Alumapalooza every year.

Lots of people want to learn the technique, but there is usually one point at which they start to resist the idea: they don’t want to buy a torque wrench.

I can understand why.  A good quality torque wrench is a moderately expensive tool, and if you don’t need to work on cars regularly it will probably sit in your Tire Changing Kit most of the time.

Also, people often wonder why they need a torque wrench for their Airstream trailer wheels, when they don’t apparently need one for their car.

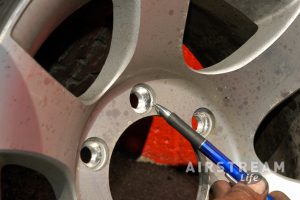
The reason is that the aluminum alloy wheels found on all late model Airstreams are prone to allowing lug nuts to loosen in the first 50 to 100 miles of towing.  To prevent them from completely coming loose, you need to check them with a torque wrench a couple of times, any time that the wheel is removed.

Each lug nut must be tightened to a specific tightness.  For aluminum Airstream wheels this is 110 foot-pounds (ft-lbs) of torque.  (If you use metric specifications that’s 150 Newton-meters.)  Steel wheels, which are usually the spare tires only, need 150 foot-pounds. To verify the correct torque spec for your wheels, check the Specification page in your Owner’s Manual or ask Airstream about the wheels you have.

The wheel studs (the part the lug nuts thread on to) are designed to stretch a tiny amount to clamp the wheel on. This elasticity of the stud is what helps to secure the wheel on the hub. If the lug nuts are put on too tightly, the threads on the wheels studs can stretch beyond their elastic range. In the extreme, this can cause the studs to break and the wheel will come flying off.

Too loose, and the lug nuts will gradually work their way loose, which is just as bad. When a wheel comes off, the wheel is generally damaged beyond repair, and the Airstream tends to get collateral body damage that can run into the thousands of dollars.

That’s why you don’t want to guess at the proper tightness. Even if you work with cars every day, you can’t accurately estimate how tight those nuts should be.  The torque wrench is the way smart professionals verify the job is done right.

Here’s how a torque wrench works:

A few other tips: 

Before putting lug nuts on, check that the threads are clean (no dirt or grease).  Wipe any contaminants off with a paper towel or clean rag.

Don’t use any kind of lubricant (oil, grease, moly, anti-seize compound) on the studs.  Those things will make the torque reading inaccurate and you’ll end up over-tightening the nuts.

If you need a good torque wrench, we offer an excellent choice at a good price in the Airstream Life Store.

If you need a full set of tire changing tools, we have a complete kit with instructions and a carry bag.


Written by RichLuhr · Categorized: Safety and security, Tires and wheels, Tools

Oct 21 2017

How to replace your water heater’s drain plug—and why

One of the most overlooked maintenance items on an RV is the drain plug on the water heater. They don’t last forever, and if you ignore it, the result can be super-annoying later.

Typically the plug gets removed once a year, during winterizing, to drain the water heater. It’s made of nylon, because plastic won’t react with the metal in the tank (a metal plug, even a brass one, can result in corrosion).

Because the nylon is soft and easily damaged, it should be replaced with a fresh one every time it is removed. But sometimes people (even technicians who should know better) will re-use the plug. This is a false economy.

First of all, these plugs are cheap. They tend to be overly expensive when sold as “RV water heater plugs”.  Try a local hardware store instead, and ask for a 1/2″ NPT plastic drain plug with 15/16″ head.  You’ll probably find them at about a buck apiece, versus $3-4 each online or at RV shops. Get a few spares while you’re at it.

Second, when the plastic gets old or worn, the plug will be prone to leaking or—far worse—it can get fragile. Then the head of the plug is likely to break off when you eventually try to remove it. If that happens, you’ll have to find a way to extract the remains of the plug without damaging the aluminum threads of the drain hole, and that’s a real hassle.  (Ask me how I know …)

(By the way, this is why we include a spare drain plug in our “Little Things Kit of Essentials“. It’s one of those little things that most of us never remember to have on hand.)

I think people don’t like to deal with the drain plug because it seems hard to get to.  Certainly it’s not conveniently located on RV water heaters, but it’s actually simple to remove and replace when you know how.  So I’ll tell you.

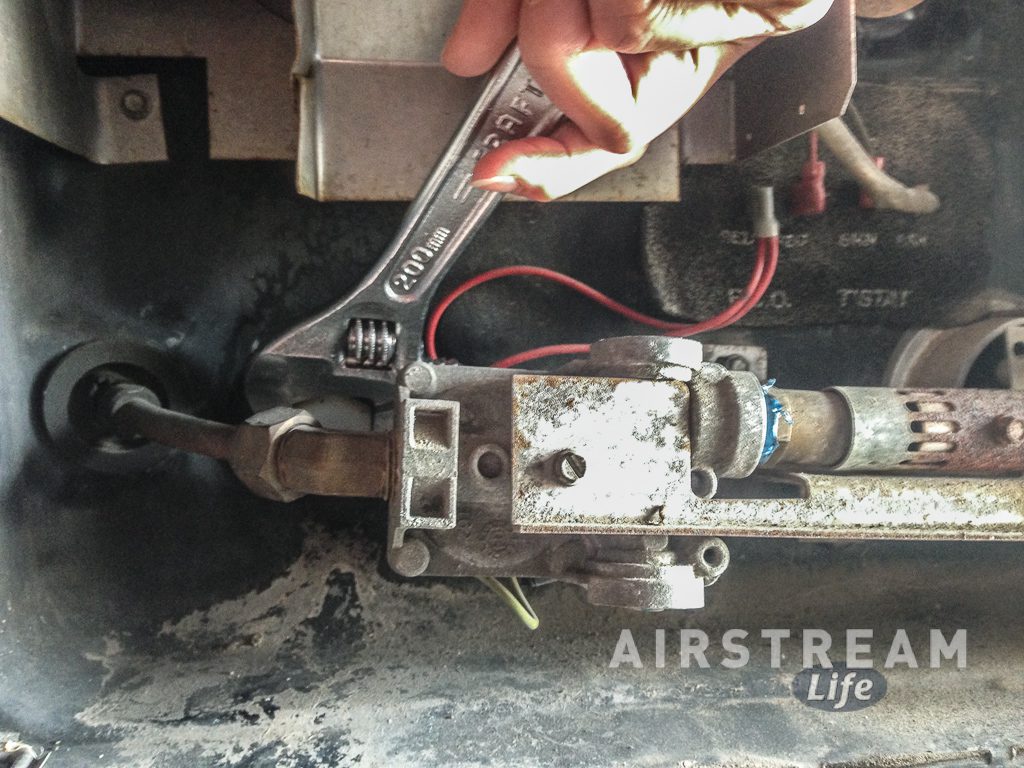
The main thing is not to try to get at the plug with an adjustable wrench. That’s what everyone tries to do because that’s the tool everyone owns.  But an adjustable wrench won’t reach the plug very well, and you’ll probably end up scraping up your hands on the sharp edges of the vent above.

(See picture at left for an example of how not to do it.)

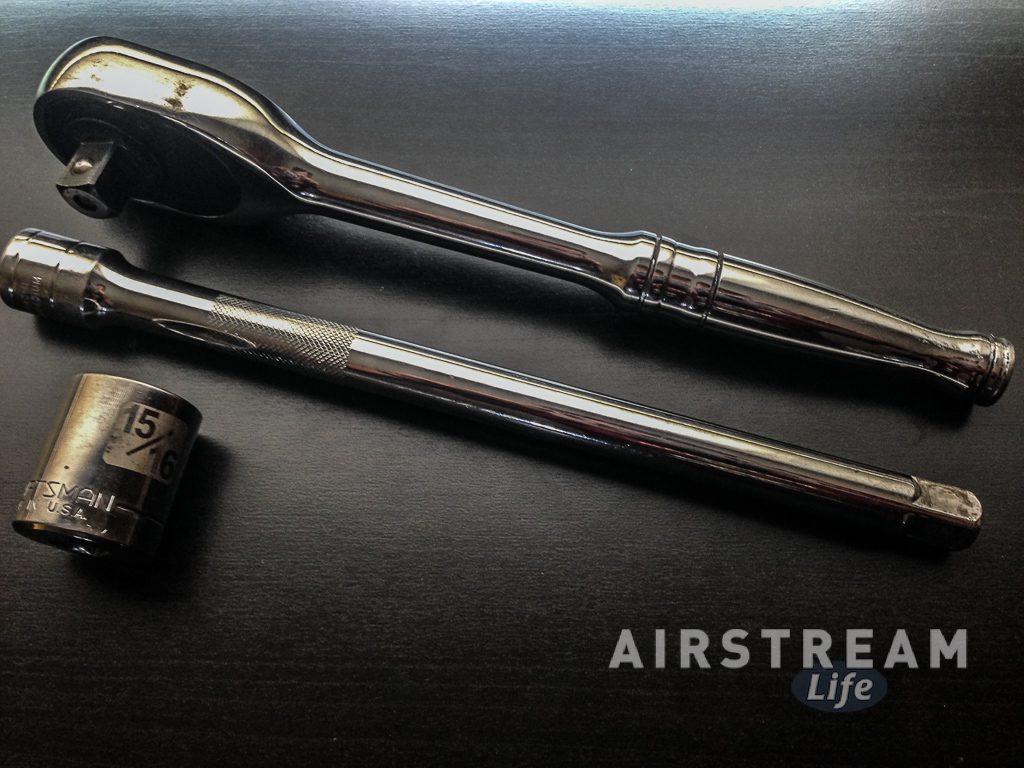
Instead, three simple tools will make this job so easy you’ll want to do it yourself instead of paying a technician $100/hour to do it for you:

  1. a 15/16″ socket
  2. a ratchet wrench with a drive size that fits the 15/16″ socket (usually 1/2″ drive)
  3. an extension of 5-10″ length in the same drive size

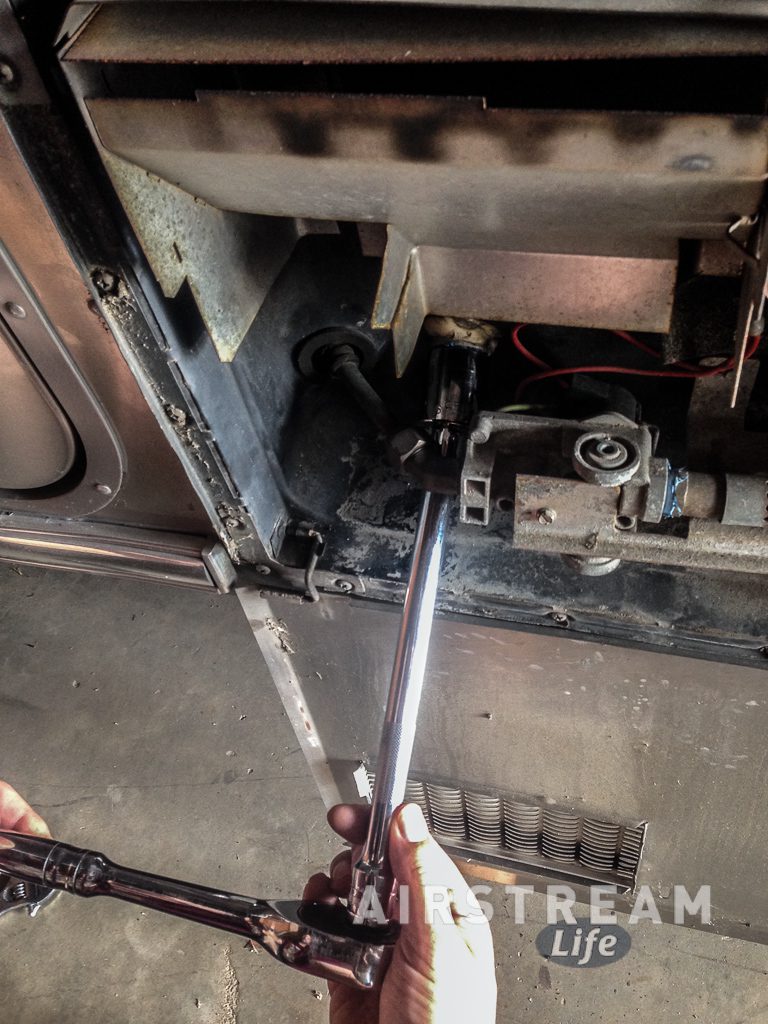
If you have the Airstream Life Tire Changing Kit, you already have the extension and a “breaker bar” that will substitute for the ratchet wrench in a pinch. All you need in that case is a 15/16″ socket (1/2″ drive), which you can get at a hardware store.

Assemble the three tools and use those to easily remove a water heater drain plug in seconds. (Remember, righty-tighty, lefty-loosey.)  Be ready for a gush of water as the plug comes out. A bucket on the ground below the water heater is helpful.  Throw away the old plug so you’re not tempted to reuse it someday.

Installing the new replacement plug is just as easy, with one extra step.  Have some plumber’s tape (aka Teflon tape) on hand to wrap tightly around the threads of the new plug before you begin to thread it in.

Put on three or four full turns of tape, and stretch it tight as you do.  This will make your new plug leak-proof.  You can skip this step but there’s a good chance the plug will ooze or drip water when the heater is on and the tank is pressurized, so I always use the tape.

Start threading the plug by hand, to make sure it’s not cross-threaded.  You should be able to give it a turn or two with your fingers.  Once you’re sure it is going in straight you can switch to the tools to finish tightening it.

Be sure to fill the water heater (run the water in the kitchen on full hot until no more air comes out) before lighting it. Check that the plug is not leaking before you light the heater.  If all seems good, let the heater come to full temperature and double-check that the plug is not leaking.

If it leaks, you may have to remove it entirely and use more plumber’s tape on the threads. Don’t over-tighten the plug, because the plastic threads are soft and it could break.

WARNING: Don’t tighten or remove the plug while the water is hot! There is a possibility you could over-tighten it and cause it to break, which would result in you getting scalded by hot water!

Instead, let the water heater cool first.  The fastest way to cool it is to turn off the heater and run the hot water inside until there’s no hot water left.

If you read online RV forums about water heater problems or winterizing you’ll come across plenty of reports from people who struggle and skin their knuckles trying to replace this little plastic plug. Don’t be one of those people.

With a very modest investment in tools and parts this plug can be removed in literally seconds, and replaced just as quickly.  It should be done at least once a year, even if you don’t winterize, to ensure the plug doesn’t age out, and also to drain sediment that may have accumulated in the water tank.

Written by RichLuhr · Categorized: Tools, Water and sewer

Jun 30 2015

Newbies Tool Kit

Airstream maintenance might seem like something only an RV technician can do, but most routine maintenance isn’t hard, especially if you have the right tools to get the job done. Almost anyone can do the basics with a little instruction.

Naturally, the tools you need depend on the jobs you are willing to take on. For most tasks you can get by very comfortably with just a few tools. You should have a small collection of tools and parts that stay in the Airstream to deal with on-the-road problems. Consider carrying the parts and tools needed to do common maintenance like:

  • change a tire
  • replace a fuse or light bulb
  • disconnect / re-connect the battery
  • clean up corrosion
  • detect a gas leak and tighten a gas connection
  • remove and replace a rivet
  • tighten a loose screw
  • test a power outlet
  • fix a simple plumbing fixture leak
  • stop a rainwater leak
  • lubricate hinges, latches, and hitch

Surprisingly, you don’t need a ton of fancy tools to do those jobs. Most of them are readily found in hardware stores.

Probably the most useful (and expensive) tool you might need is a cordless drill. Get a powerful one, 18 volts or better. Obviously it’s great for drilling holes if you need to install a new hook somewhere, but you will end up using it the most to raise and lower the stabilizers on your trailer. (You’ll need a socket adapter and the correct size of socket.) This turns a tedious chore into a 30 second non-event. You will appreciate this the first time you set up or break camp in a heavy rain.

The cordless drill is essential for drilling out broken rivets so you can install replacements, so you’ll want a set of drill bits as well. The usual size drill for an interior rivet in an Airstream is #30, or 1/8” but you should get a set that ranges from 1/16” to 1/4”. 

With a small set of screw bits, your cordless drill can also be used as a high-speed, high-power cordless screwdriver. Owners who have equipped their Airstream with either a Hensley Arrow or Pro-Pride 3P hitch can also use a cordless drill with the 3/4” socket and socket adapter to run their weight distribution bars up and down.

The only other expensive tool you need for maintenance is a good torque wrench (and a 10″ extension & socket), so you can be sure you’ve got the lug nuts tightened properly when you change a tire. (Or a complete Tire Changing Kit.)

The rest of the tools most people need are pretty simple and not terribly expensive, even the rivet tool used to replace pop rivets.

If you travel for long periods, or if you’ve got an older Airstream, then you’ll want more stuff. The trick is not knowing what to bring, it’s knowing when to stop packing tools. Turning your tow vehicle into a rolling tool box is overkill, and can even be dangerous if you are overloading it with heavy tools you won’t need.

On a long expedition, it might make sense to carry a hard-to-find tool or part, if it’s light or small, but there’s a point at which it makes more sense to find a service center—or just buy the part when you actually need it. This is a judgement call.

You should be prepared for anything that might seriously disrupt a trip and is easily repairable on the road, such as problems with tires, electricity, gas leaks, and water leaks. It’s really frustrating to be somewhere wonderfully remote, like Big Bend National Park in Texas, or the north rim of Grand Canyon, and find you have power problems because of a simple bad ground caused by corrosion—but be forced to leave because you don’t have the tools to find and fix it.

Here are a few more suggestions of basic tools and supplies you should consider carrying in your Airstream or tow vehicle at all times:

Tools for changing a tire. Airstreams don’t come with tire changing equipment or instructions, and the ones for your tow vehicle won’t work. Our kit includes everything you need, such as torque wrench, tire pressure gauge, a high-visibility vest, instructions, and more.

Silicone Spray
Silicone Spray

Silicone spray. Dozens of sticky areas on your Airstream can benefit from a squirt of silicone spray: the awning, hinges, locks, stabilizers, vent seals, window seals, and more.

Hitch ball lube or grease. No one likes a squeaky hitch. Use a heavy-duty grease.

Headlamp. Go hands-free while making repairs, manipulating parts, or searching through supplies.

First Aid kit. Only the Interstate comes with a first aid kit. Buy a pre-assembled kit, or make your own, and be sure it has more than just a few Band-Aids.

voltage monitor
Voltage Monitor

Voltage monitor. Low voltage kills air conditioners. Plug it into any interior outlet while you’re hooked to shore power and make sure the voltage is at least 114 when the air conditioner or microwave are running.

Screwdriver set, or combination screwdriver. Did you know that Phillips screws are the most common in Airstream trailers? Stock a couple of sizes, and medium, small and “stubby” flat heads too. One space-saving combination screwdriver provides all you’ll need.

Tape. Pack Teflon plumber’s tape (PTFE), useful for stopping leaks on threaded fittings (choose the blue “Monster” brand), and a small selection of other specialty tapes: electrical, duct, and/or masking as needed. Some available in silver.

Screws
Screws

A few screws, especially #8 and #10 wood screws for replacing lost screws in furniture and wall attachments. (Some wood glue wouldn’t hurt, either.) Look for an assortment of stainless screws in the boat store.

Rivet gun, and a small handful of aluminum POP rivets: 1/8” aluminum POP rivets (grip range 1/8” —1/4”) for the interior; 3/16” aluminum large flange POP rivets (grip range 1/8”—1/4”) for the belly pan. Replacing POP rivets is easy. Click here to see how easy it is!

You can find a top quality rivet gun at store.airstreamlife.com, with instructions on how to use it.

Heavy duty scissors. You’ll find many uses for strong kitchen or utility-style shears, or a retractable safety knife.

Rubber hose washers for fresh water hoses that leak at the fittings.

Wrenches & Pliers
Wrenches & Pliers

Wrenches and pliers. Carry a small selection for tightening gas fittings, removing drain plugs, and more. Start with a single adjustable wrench and ordinary pliers, and then add more if you see the need.

Spare incandescent bulbs for interior lighting, brake and turn signals, and clearance lights. If you’ve got a newer Airstream with full LED lighting, you don’t need to carry spares. Some of the LEDs are replaced as whole fixtures rather than bulbs.

Fuses
Fuses

Fuses. Assorted 12v automotive-style blade fuses are handy, primarily the yellow 20-amp and green 30-amp fuses. (Check your power converter to see what ratings your trailer requires.)

Sandpaper, emery cloth or a small burnishing tool to remove corrosion on wires.

Electrical tools. Wire stripper/cutter, red and blue butt splices, electrical tape, and butt splice crimping tool—if you might occasionally modify or repair 12-volt wiring.

Old beach towel. Those who’ve read The Hitchhiker’s Guide to the Galaxy know that a towel is about the most massively useful thing you can have—and the best value tool you’ll ever carry in your Airstream. Use it for a pad when kneeling by or laying under the trailer, cleaning dirty hoses and cords, drying tools, etc.

Written by RichLuhr · Categorized: Tools · Tagged: Airstream toolkit, checklist, maintenance, repairs, Safety, Tools

May 19 2015

Be seen!

“I don’t think Airstreams come with enough reflectors to be safe,” said John Irwin, seminar presenter at a recent Alumaevent. “One night I went to a meeting in my neighborhood, when my Airstream was parked in front of my house. Afterwards, I walked up the street towards the trailer and I realized that I couldn’t see it at night very well. So one of the first things I did with my new trailer was to increase the amount of reflective surface.”

Irwin—an Airstream Life contributor since the magazine began in 2004—is known for designing clever modifications that you can apply to your own factory-issue Airstream to make it safer and more convenient. Many are easy and affordable, and the following tips will keep you and your trailer more visible on the road and at your campsite.

Stick ‘em up.

Airstream reflectors“If you look at any 18-wheeler on the road you’ll find that they’re bedecked with red and white reflective markers,” said Irwin, who recommends affixing the same type of strips to your trailer as he uses on his third Airstream, a 2005 28-foot Classic.

“The Classic with the pull out drawer in the back is perfect for those,” he said, as the height of the bumper is precisely the same as a standard reflectors that you can buy at any auto parts store. The package usually contains three reflectors; peel and stick two to your bumper and get creative with the third one. “I cut that up in pieces and put the white portions on the front of the trailer and banana wrap, and the red ones on the back of the trailer,” said Irwin

“This has a nice side effect,” he said. “When we’re at a rally and we’re walking back at night, you can spot your trailer a mile away with a flashlight. Virtually everyone in our (WBCCI) Unit has additional reflectors on their Airstream.”

Convert to LED taillights.

Most recent Airstreams are installed with LED taillights, but if you don’t have them, Irwin suggests converting from incandescents to deter rear-end accidents. “LEDs are much safer at sundown,” he explained. “They can be seen with sun on the back of the trailer.”

Conversion kits are available for most Airstreams, but if you can’t find one for your model it’s easy to MacGyver a solution. “Get on the internet with somebody like LED4RV and start a conversation,” suggests Irwin. “They can most certainly come up with a way to convert your taillights to LED. They’ll be eager to work with you, and it gives them something new to sell to customers.”

Fire up your clearance lights.

“If you’re broken down by the highway somewhere, it’s a good idea to light up your trailer, particularly if a tow vehicle has to be unhitched and taken away for repair,” said Irwin, who recommends purchasing an inexpensive old-style clearance light blinker at any auto parts store. “Back in the old days before cars were computerized there were little blinker units that you can still plug in to your umbilical cord to make your lights blink,” he said. (Be aware that running the clearance lights all night without being connected to power will run down the battery.)

Travel with a safety cone—or two, or three.

Safety Cones - IrwinReflector Triangle - IrwinDistracted or sleepy drivers often hit disabled vehicles on the shoulder of the road, so carry several warning devices to place behind your parked or broken-down rig. Traffic cones—including space-saving collapsible models—are easy to purchase online and at hardware and RV parts stores. “I have three of them,” said Irwin. “They actually come in handy for a lot of things; put one by your ProPride hitch stinger to keep your friends from tripping over it, or set up cones by a hazard at an RV park or rally.”

“Even in the smallest Airstream you can have a few reflector triangles,” he said. “They don’t take up a lot of space, and they don’t cost too much money.” You might need to weigh them down with a wrench or rock to secure them against the wind from passing traffic. (Irwin suggests bean bags.)

“Invest in a really good LED flashlight,

and expect to pay forty dollars or more for it,” said Irwin. “You need a good light, and be able to get your hands on it when you need it.” It will always be accessible if you do what he did: screw the canvas case your flashlight came in to a wall inside a cabinet in your Airstream.

Blinky gadgets

TurboflareIrwin uses various emergency lights—like the flashy rotating Turboflare—for safety and misadventures. “I like to keep a light inside the trailer between the curtain and the back window,” he said. “It really makes the trailer show up to any traffic that’s coming down the street. Let it run all night.” Continuous lights inside give an unoccupied Airstream a lived-in look.

Double trouble

“Everybody—all my kids, all my grandkids—keep giving me LED lights,” Irwin laughed. “I have several LED trouble lights that I’ve collected over the years.” Trouble lights come in various nifty configurations and usually have a hook for hanging. “They are really nice if you have to change a tire or something like that at night,” said Irwin. “Those lights are worth their weight in gold.”

Check all gadgets once a year to ensure that the batteries are viable.

Try this old Army trick: when the device isn’t in use, flip the batteries around backwards (reversing the plus/minus direction) to prolong their life.

Written by RichLuhr · Categorized: Cleaning and exterior, Tools · Tagged: LED, lighting, reflectors, Safety, traffic hazard

  • « Previous Page
  • 1
  • 2

Recent Posts

  • 7 tips for hot summertime travel
  • Spare parts for Airstream road trips: 21 tips
  • What size Airstream trailer?
  • A quick guide to maintaining your Airstream’s exterior
  • Tire pressure monitoring de-mystified

Categories

  • Boondocking (3)
  • Cleaning and exterior (12)
  • Electrical (25)
    • Generator (2)
    • Solar power (7)
  • Furniture and interior (2)
  • General (3)
  • Kitchen and cooking (1)
  • Lifestyle and travel (16)
  • Mobile work and technology (9)
  • Product Review (6)
  • Renovations (1)
  • Safety and security (9)
  • Tires and wheels (10)
  • Tools (10)
  • Towing (4)
  • Travel tips (6)
  • Water and sewer (9)

©2004–2020 Church Street Publishing, Inc. “Airstream” used with permission